
Table of Contents
In this article, we will go through 5 Best Steps to Install Cockpit on CentOS 8. Cockpit is an easy to use web-based graphical interface for Servers. Using cockpit, you can perform number of System tasks like starting containers, administering storage, configuring networks and Logs Inspection. Cockpit uses existing system API to perform all the system tasks instead of using another API sublayer. It also has its own command line which can be used when you connect from non Linux devices. It has various other features which can be checked on Cockpit docs.
Here are the List of tasks that you can perform on each host running cockpit:-
- Inspect and change network settings
- Configure a firewall
- Manage storage (including RAID and LUKS partitions)
- Create and manage virtual machines
- Download and run containers
- Browse and search system logs
- Inspect a system’s hardware
- Upgrade software
- Keep tabs on performance
- Manage user accounts
- Inspect and interact with systemd-based services
- Use a terminal on a remote server in your local web browser
- Switch between multiple Cockpit servers
- Extend Cockpit’s functionality by installing a growing list of apps and add-ons
- Write your own custom modules to make Cockpit do anything you want

Steps to Install Cockpit on CentOS 8
Also Read: 6 Easy Steps to Install LastPass CLI on Ubuntu 20.04
Step 1: Prerequisites
a) You should have a running CentOS 8 Server.
b) You should have sudo or root access to run privileged commands.
c) You should have yum utility installed in your Server.
Step 2: Update Your Server
It is always recommended to first update your Server with all the latest stable releases from CenOS Repo using yum update command as shown below.
[root@localhost ~]# yum update
Last metadata expiration check: 0:01:55 ago on Mon 12 Jul 2021 09:31:11 AM EDT.
Dependencies resolved.
=============================================================================================================================================================
Package Architecture Version Repository Size
=============================================================================================================================================================
Installing:
centos-linux-release noarch 8.4-1.2105.el8 BaseOS 22 k
replacing centos-release.x86_64 8.1-1.1911.0.8.el8
replacing centos-repos.x86_64 8.1-1.1911.0.8.el8
kernel x86_64 4.18.0-305.7.1.el8_4 BaseOS 5.9 M
kernel-core x86_64 4.18.0-305.7.1.el8_4 BaseOS 36 M
kernel-modules x86_64 4.18.0-305.7.1.el8_4 BaseOS 28 M
Upgrading:
PackageKit x86_64 1.1.12-6.el8 AppStream 599 k
PackageKit-command-not-found x86_64 1.1.12-6.el8 AppStream 27 k
PackageKit-glib x86_64 1.1.12-6.el8 AppStream 140 k
Step 3: Install Cockpit
Next to install cockpit application you need to use yum install cockpit command as shown below.
NOTE:
root user to run all the below commands. You can use any user with sudo access to run all these commands. For more information Please check Step by Step: How to Add User to Sudoers to provide sudo access to the User.[root@localhost ~]# yum install cockpit
CentOS-8 - AppStream 1.5 MB/s | 8.1 MB 00:05
CentOS-8 - Base 3.7 MB/s | 3.6 MB 00:00
CentOS-8 - Extras 8.9 kB/s | 9.8 kB 00:01
Package cockpit-196.3-1.el8.x86_64 is already installed.
Dependencies resolved.
=============================================================================================================================================================
Package Architecture Version Repository Size
=============================================================================================================================================================
Upgrading:
cockpit x86_64 238.2-1.el8 BaseOS 76 k
Transaction Summary
=============================================================================================================================================================
Upgrade 1 Package
Total download size: 76 k
Is this ok [y/N]: Y
Step 4: Enable Cockpit
Then enable the cockpit service by using systemctl enable --now cockpit.socket command as shown below. To know more about systemctl commands, check 30 Useful Commands to Manage Systemd Services through systemctl.
[root@localhost ~]# systemctl enable --now cockpit.socket
Created symlink /etc/systemd/system/sockets.target.wants/cockpit.socket → /usr/lib/systemd/system/cockpit.socket.
Step 5: Open Cockpit
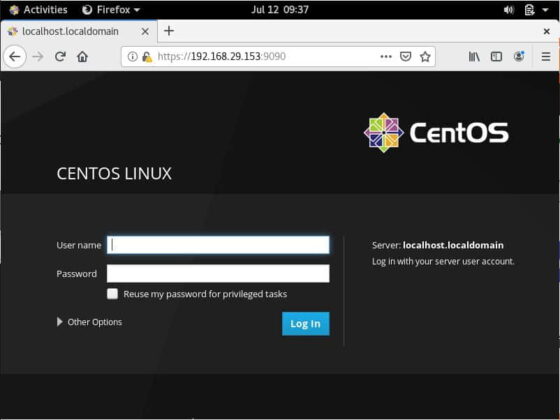
After successful installation, you can open your browser and use http://<your_ip_address>:9090 URL to open Login page as shown below. If your browser is on the same machine where cockpit is running then you can also use http://localhost:9090 URL. Here you need to provide your server valid user name and password and then Click Log In.
Step 6: Remove Cockpit
Once you are done with Cockpit, you can simply remove it by using yum remove cockpit command as shown below.
[root@localhost ~]# yum remove cockpit
Dependencies resolved.
=============================================================================================================================================================
Package Architecture Version Repository Size
=============================================================================================================================================================
Removing:
cockpit x86_64 238.2-1.el8 @BaseOS 56 k

Transaction Summary
=============================================================================================================================================================
Remove 1 Package

Freed space: 56 k
Is this ok [y/N]: Y