
Table of Contents
In this article, we will through Step by Step Guide to Create a Repository on Bitbucket. You might have used multiple git based repositories like Gitlab or Github but there is another very useful git based source code repository available for use called Bitbucket. It is currently available in both free as well as in commercial version. With powerful Dashboard features, Bitbucket provides easy access to your repositories and pull requests. Another very important aspect of using Bitbucket is its seamless integration with the JIRA tracking tool. More on Bitbucket-JIRA Integration.

Step by Step Guide to Create a Repository on Bitbucket
Also Read: How to Delete a Branch in Git Using 2 Easy Methods
Step 1: Prerequisites
a) You should have a valid Bitbucket user account.
b) You should have access to create a repository on Bitbucket.
c) You should have git utility installed to clone the repo.
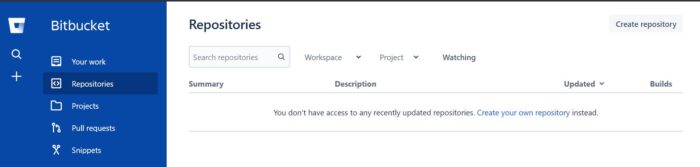
Step 2: Go to Dashboard
First you need to login to Bitbucket using valid User account and password. Once you logged in, you need to go to Dashboard as shown below. Here in the Repositories section you will be able to see an option Create repository as shown below. Click on Create repository.
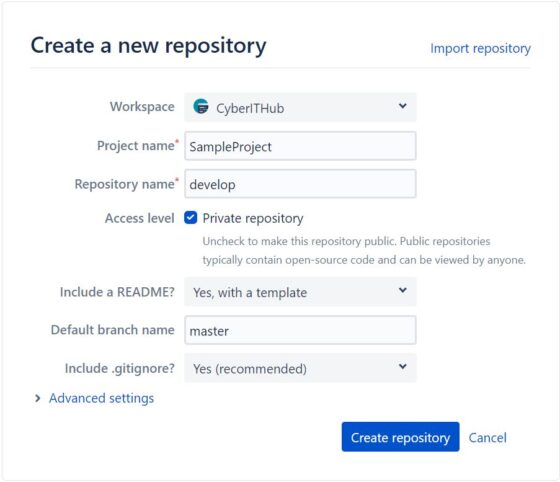
Step 3: Create Repository
Here you need to provide all the information relevant to repository creation. For now, we are providing all the below mandatory information along with the default branch name. You can also check the Advance Settings if you need to fill any extra details as required. Since we are not using that one so we will just click on Create Repository after filling all the details as shown below.
Project Name: SampleProject
Repository Name: develop
Include a README?: Yes, with a template
Default Branch Name: master
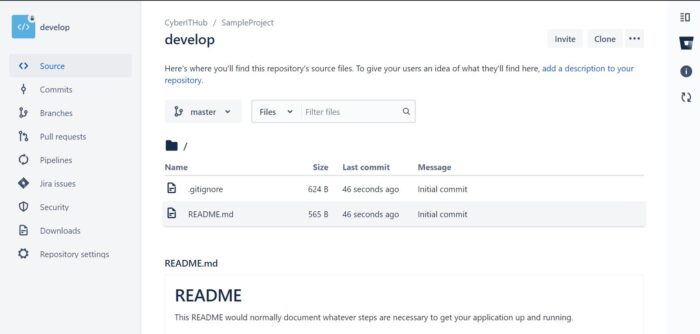
Step 4: Repository Created
Once it is created, it should look like below. As you can see there are two files automatically got created - .gitignore and README.md. To clone the repository to your local system, Click on Clone to get the URL. Usually there will be two ways to clone the repo - it is either through ssh or https protocol. Here we are cloning it through https protocol so we will copy the https URL.
Step 5: Clone Your Repository
You can open your Linux terminal and paste the copied URL here to clone your empty repo as shown below. This will create a local develop directory where you can go and edit or add your code. Similarly, if you are using windows then you need to install the git utility and run below command in CMD to clone your repo.
root@localhost:~# git clone https://CyberITHub@bitbucket.org/CyberITHub/develop.git
Cloning into 'develop'...
Password for 'https://CyberITHub@bitbucket.org':
remote: Enumerating objects: 4, done.
remote: Counting objects: 100% (4/4), done.
remote: Compressing objects: 100% (4/4), done.
remote: Total 4 (delta 0), reused 0 (delta 0), pack-reused 0
Unpacking objects: 100% (4/4), 965 bytes | 241.00 KiB/s, done.