
Table of Contents
In this git tutorial, i will take you through the steps to install GIT and clone repository in your local System. Whether you are a professional or an amateur developer, you've likely heard about the concept of version control. You may know that adding a new feature, fixing a broken one, or stepping back to a previous condition is a daily routine.
This requires the use of a powerful tool that can help you take care of your work, allowing you to move around your project quickly and without friction.There are many tools for this job on the market, both proprietary and open source. Usually, you will find Version Control Systems (VCS) and Distributed Version Control Systems (DVCS). Some examples of centralized tools are Concurrent Version System (CVS), Subversion (SVN), Team Foundation Server (TFS), and Perforce Helix. While in DVCS, you can find Bazaar, Mercurial, and Git.
The main difference between the two families is the constraint—in the centralized system—to have a remote server from which to get and in which to put your files; needless to say, if the network is down, you are in trouble. In DVCS, on the other hand, you can either have or not have a remote server (even more than one), but you can work offline, too. All your modifications are locally recorded so that you can sync them at some other time.
Today, Git is the DVCS that has gained more public favor than others, growing quickly from a niche tool to mainstream.Git has rapidly grown as the de facto source code versioning tool. It is the second famous child of Linus Torvalds, who, after creating the Linux kernel, forged this versioning software to keep track of his million lines of code.In this git tutorial, we will start at the very beginning, assuming that you do not have Git on your machine.
GIT Tutorial
Also Read: 30 Useful Commands to Manage Systemd Services through Systemctl
Step 1: Prerequisites
Below are the prerequisites required for going through this git tutorial:-
a)You need to have a running Linux System.
b)You should have ssh-keygen installed in your System.
c)You can either use root user or user with sudo access to run below commands. You can check How to Add User into Sudoers to provide sudo access to Users.
d)You must need to have a GITHUB Account. If you don't have an account, you can go to GITHUB Official Page and create one. This is required to create or use any example repository.
Step 2: Install GIT Tool
First, you need to install git tool in your System using below steps based on the Linux Flavor you are currently using. You will understand the usage of git command as we go through this git tutorial.
For CentOS/RedHat 7
To install in CentOS/RedHat 7 based systems, you need to use yum install git command. You can check Top 22 YUM Command Examples in RedHat/CentOS 7 to understand more about YUM command in detail through examples.
[root@localhost ~]# yum install git
Resolving Dependencies
--> Running transaction check
---> Package git.x86_64 0:1.8.3.1-21.el7_7 will be installed
--> Processing Dependency: perl-Git = 1.8.3.1-21.el7_7 for package: git-1.8.3.1-21.el7_7.x86_64
--> Processing Dependency: perl(Term::ReadKey) for package: git-1.8.3.1-21.el7_7.x86_64
--> Processing Dependency: perl(Git) for package: git-1.8.3.1-21.el7_7.x86_64
--> Processing Dependency: perl(Error) for package: git-1.8.3.1-21.el7_7.x86_64
--> Running transaction check
---> Package perl-Error.noarch 1:0.17020-2.el7 will be installed
---> Package perl-Git.noarch 0:1.8.3.1-21.el7_7 will be installed
---> Package perl-TermReadKey.x86_64 0:2.30-20.el7 will be installed
--> Finished Dependency Resolution
For Ubuntu 18.04/Debian 10.x
To install in Ubuntu/Debian based Systems you need to use sudo apt-get install git command as shown below.
root@localhost:~# sudo apt-get install git
Reading package lists... Done
Building dependency tree
Reading state information... Done
The following additional packages will be installed:
git-man liberror-perl
Suggested packages:
git-daemon-run | git-daemon-sysvinit git-doc git-el git-email git-gui gitk gitweb git-cvs git-mediawiki git-svn
The following NEW packages will be installed:
git git-man liberror-perl
0 upgraded, 3 newly installed, 0 to remove and 153 not upgraded.
Need to get 4,738 kB of archives.
After this operation, 33.9 MB of additional disk space will be used.
Do you want to continue? [Y/n] y
Step 3: Generate SSH Key Pair
To set up github authentication, you need to first generate ssh key pair(public/private key) using ssh-keygen tool as shown below. Here you can notice that we are using RSA Algorithm to generate 4096 bits of Key. For RSA keys, the minimum size is 1024 bits and the default is 2048 bits. We are also adding comment with -C Option.
[root@localhost ~]# ssh-keygen -t rsa -C "testlab" -b 4096
Generating public/private rsa key pair.
Enter file in which to save the key (/root/.ssh/id_rsa):
Enter passphrase (empty for no passphrase):
Enter same passphrase again:
Your identification has been saved in /root/.ssh/id_rsa.
Your public key has been saved in /root/.ssh/id_rsa.pub.
The key fingerprint is:
SHA256:5cH8x+DVbwzMgx6cIYhgHwhw/SX17S9dmPO9pNSG3M4 testlab
The key's randomart image is:
+---[RSA 4096]----+
|..oooo.o... .    |
| . .o.o.o+ + * . |
|   ..o * B * .   |
|    . o * = *.   |
|      S . = * =  |
|        .++=.    |
|         .+o=o   |
|            ..* .|
|              . E|
+----[SHA256]-----+
Step 4: Add Public Key
Now you need to follow below steps to add public key in your GITHUB Account that you created through ssh-keygen command in above step.
a)Login to Your GITHUB Account
b)Go To Settings->Deploy Key
c)Click on Add Deploy key and below details as shown.
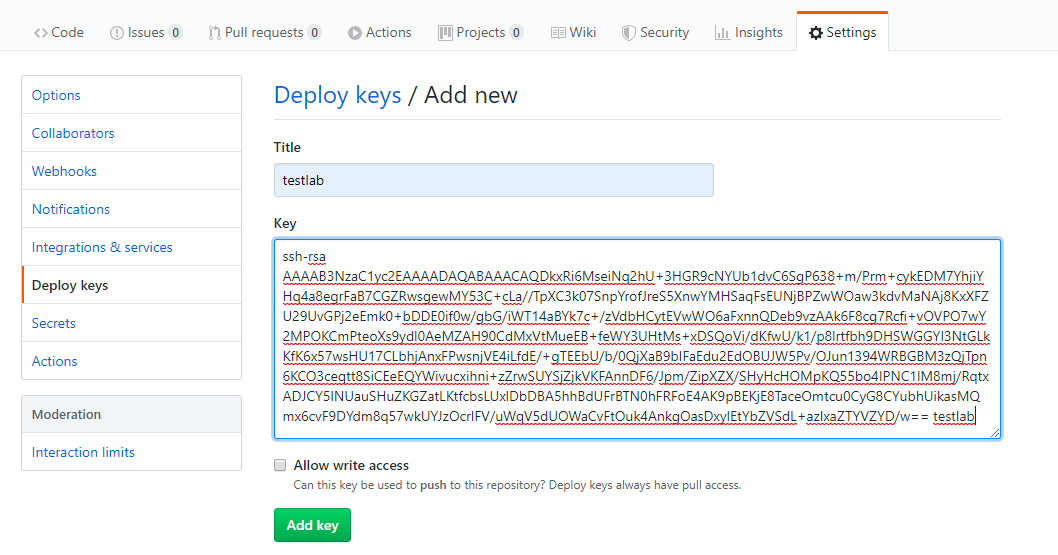
d)Once Added, Click on Add Key.
NOTE:
Step 5: Clone Repository Using git clone
In this git tutorial, I am cloning gittestrepo example repository from github. You can use any repository you want ,only required to have the access to connect and copy the repository files.
[root@localhost ~]# git clone git@github.com:gittestrepo/helloworld.git
Cloning into 'helloworld'...
Warning: Permanently added the RSA host key for IP address '16.65.143.76' to the list of known hosts.
remote: Enumerating objects: 306, done.
remote: Total 306 (delta 0), reused 0 (delta 0), pack-reused 306
Receiving objects: 100% (306/306), 95.57 KiB | 0 bytes/s, done.
Resolving deltas: 100% (70/70), done.
Step 6: Initialize Repository Using git init
Now you can initialize GIT Repository using git init command. You can see from the output an empty git repository is initialized under /root/.git/.
[root@localhost ~]# git init
Initialized empty Git repository in /root/.git/
Step 7: Check Repository Status Using git status
After initializing the repository, you can check the status by executing git status command. You can check all the current files, untracked files and if anything is added to commit or not from below output.
[root@localhost ~]# git status
# On branch master
#
# Initial commit
#
# Untracked files:
# (use "git add <file>..." to include in what will be committed)
#
# .bash_history
# .bash_logout
# .bash_profile
# .bashrc
# .config/
# .cshrc
# .kube/
# .ssh/
# .tcshrc
# 1908
# 87 File
# anaconda-ks.cfg
# example.js
# example.pl
# example/
# file
# file.txt
# example.txt
# helloworld/
# helm-rbac.yaml
# my.active.firewall.rules
# perl/
# test.sh
# test.yaml
nothing added to commit but untracked files present (use "git add" to track)
Also Read: GIT Essentials