
Table of Contents
Routing Information Protocol (RIP) is a distance vector dynamic protocol. This means that routers that are configured to implement this protocol share information about the entire network with their connected neighbors periodically. After this exchange, they update their respective routing tables to reflect the information. We will look briefly at how this protocol works and then go on to implement it in the Cisco packet tracer application.
How Routing Information Protocol(RIP) Works
RIP protocol-enabled routers, like most distance vector protocol devices, decide on the best path to follow to a given destination based on distance calculations. The vectors show the specific route to the destination of interest (hence, the distance vector). To fully understand RIP protocol let us briefly look at distance vectors protocol and its alternative the link state protocol.
Distance Vector vs Link State
The distance vector protocol is one of the classifications of dynamic routing protocols based on mode of operation. The other is the link state routing protocol.
The distance vector protocol calculates distance based on hop counts. A hop refers to a router in a network, therefore they would choose a link with less number of routers as the best route regardless of factors like bandwidth.
On the other hand, link state protocols like OSPF use a more sophisticated approach that considers bandwidth and other factors to decide the shortest path.
In terms of information sharing, RIP routers share the entire routing table with their neighbor routers while the link state routers usually have a complete snapshot of the existing network topology and send information about directly connected links to other routers when necessary.
RIP Cost metrics
Being a distance vector protocol, the RIP configured routers calculate cost based on the hops in a link. As explained earlier, this could result in less optimal paths being chosen.
RIP limitations and the improvements in RIPv2
While RIP requires little maintenance and can automatically reconfigure routing tables when changes occur in the network or when communication stops, it has several limitations. Some of them include :
- Slow convergence. They need to wait for their neighbor routers to advertise to each other in the network.
- Classful protocol hence cannot support subnetted addresses.
- They periodically pass copies of the entire routing table even if there's no change in the topology
- RIP protocol has a max hop count of 15. This means 16 routers in a link makes the router consider that link unreachable regardless of link speed.
To mitigate some of these limitations, RIPv2 was developed. Improvements to the newer version include:
- Classless protocol
- Support for variable length subnet masks
Though the issue of hop count and convergence persist.
How to configure Routing Information Protocol(RIP) on Cisco routers
Also Read: How to Implement OSPF Dynamic Routing Protocol on Cisco routers
The procedure for setting up routers to use RIP is quite similar to the ones for other protocols like OSPF and EIGRP. These protocols usually have a single line of command that puts the routers into the required mode. Then the selected interfaces can be individually configured. To demonstrate this RIP configuration of switches we will be using Cisco packet tracer software to simulate a real environment.
The network components we will be using are :-
- Two Layer-2 Routers and
- Two end devices.
- Connectors between the routers and end devices
Our procedure will be :-
- To configure the end devices and routers interfaces by assigning IP addresses to them. And then turning the interfaces on.
- Then enable RIP protocol. We will be configuring RIPv2 since this is the relevant version in use. But the setup for version one is nearly the same.
- Finally, we will test our connections and then verify our configuration to make sure the routers are truly RIP configured.
Step 1: Setup the Network
We will begin by setting up the network and assigning IP addresses to the various interfaces of our two routers and two end devices.
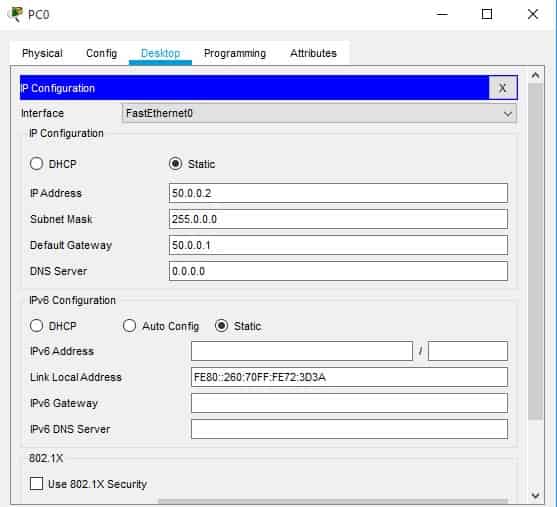
PC1 and PC2
We are going to set the IP address of PC1 to 50.0.0.2 and its default gateway to 50.0.0.1.
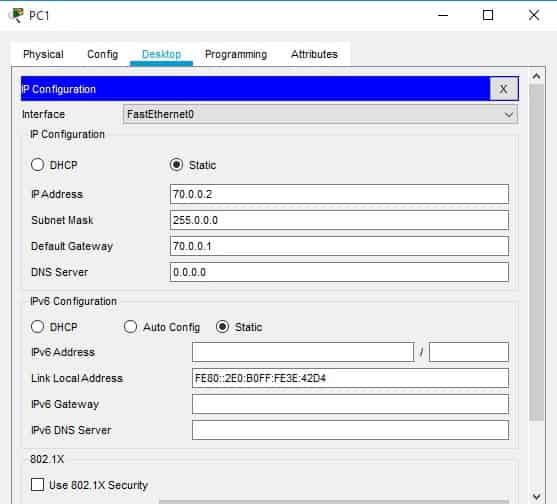
For PC2, set the IP address to 70.0.0.2 and the default gateway to 70.0.0.1.
Routers 1 and 2
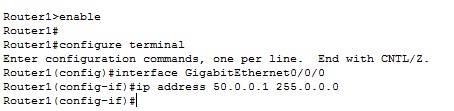
Router one has two interfaces - GigabitEthernet0/0/0 and GigabitEthernet0/0/1.
a) Router 1
- Set the IP address for GigabitEthernet0/0/0 to 0.0.1
- Set the IP address of GigabitEthernet0/0/1 to 60.0.0.1

Then we turn the interfaces on using the no shutdown command.

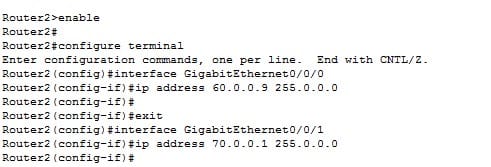
b) Router 2
Do the same thing for Router2's interfaces.
Step 2: Configure RIP
After setting up the network successfully, the next step is to set up the RIP protocol using the commands below.
RIP protocol commands:-
- Turn on RIP - router rip
- Select version - version 2
- Select the interfaces - network network-address.
We will be using these commands for our two routers.
a) Router 1
In the global config mode, enter the RIP commands as shown below :-
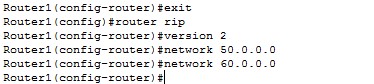
The router rip command first puts the router into the router configuration mode. Then the version 2 command specifically tells the protocol to configure the router for RIPv2. After that, the two interfaces are registered using the network command.
b) Router 2
Do the same thing for Router2's interfaces.

Step 3: Verify Configuration
After enabling the protocol in the procedure above, it's time to find out if we did it successfully and if our routers can now operate using the RIP protocol, we can do this by using various commands.
To verify RIP we can use:
- show ip protocols
- show ip route
In Router1, from privilege exec mode, type in the show ip protocols command:
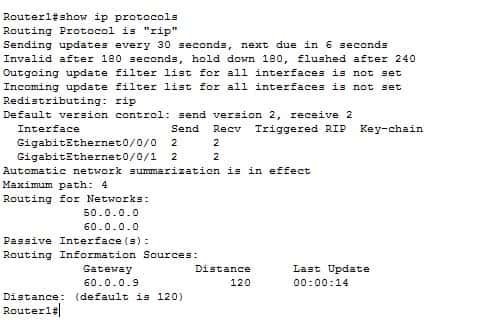
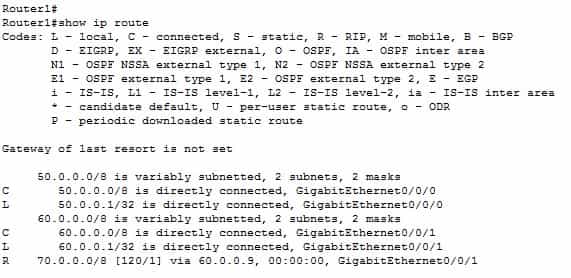
The second line in the screenshot above indicates that the routing protocol is rip. To verify the configuration, enter show ip route command from privilege exec mode on Router 1. You should be able to see below output.
Let's do the same for Router 2. Enter show ip protocols from Router2's privilege exec mode.
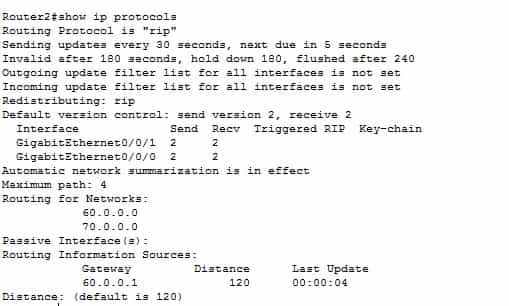
Router 2 indicates the same result. So we have succeeded in configuring RIPv2 in our routers. To configure for RIP version 1, the only change we would make in this process would be to omit the rip version command when setting up RIP in the routers.
Conclusion
Though in comparison to link state protocols such as OSPF, the RIP protocol might look like a poorer choice to someone trying to decide on what protocol to implement, It is worth noting that this protocol has its peculiar advantages which include limited maintenance and auto-configuration.