
Table of Contents
In this article, I will explain how to transfer files to AWS EC2 Instance Using WinSCP in 3 Easy Steps. Many times you might have encountered a scenario where you have to upload multiple files in AWS EC2 Instance(which might be a Linux Server) from your local Windows machine. There is no better tool than WinSCP which can do this job. It is a widely used tool in Windows Platform for the purpose of File Transfer to Linux Servers. Here we will go through an example to understand the steps to transfer files to AWS EC2 Instance.
Transfer Files to AWS EC2 Instance Using WinSCP
Also Read: How to Install MySQL 5.5. Server on CentOS 7 Using Easy Steps
Step 1: Prerequisites
a) You should have WinSCP Installed in Window 7/8/10. If you don't have winscp installed then you can download it from WinSCP Download Page and install it.
b) You should have a Running RHEL/CentOS 7/8 AWS EC2 Instance. You can check For Beginners: Create an EC2 Instance in AWS with 7 Easy Steps to know more about creating an instance in AWS.
c) You should have access to Login to AWS EC2 Instance.
Step 2: Login to AWS EC2 Instance Using WinSCP
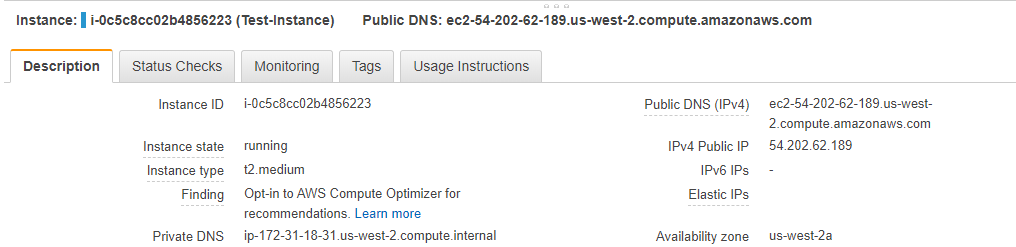
Here we are using an AWS EC2 instance Test-Instance with Public IP Address 54.202.62.189 as shown below. This instance is launched in US West 2 region with Minimum Configuration. You can create instance in any region with any configuration as per your requirement.
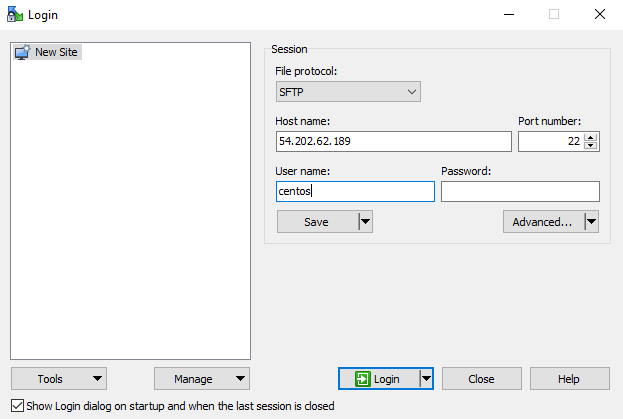
Once instance is created and you have the Public IP then you can go to WinSCP and fill in below details. File transfer uses SFTP protocol by default on SSH Port Number 22. Since our instance already has the default user CentOS and we are using Key based authentication here so we won't give the password. Instead we will go to Advanced->SSH->Authentication and select our private key in ppk format to use the key based authentication. You can use ssh-keygen utility to generate the Public/Private Key Pair in Linux Servers. You can check 20 Useful Linux/Unix ssh-keygen command examples(cheatsheet) to know more about the usage of this tool.
If you want you can use Password authentication as well but need to enable it during creation of instance. Once key details/Password information are provided you can click on Login. It will check the credentials and if it matches correctly then you will be allowed to Login.
Step 3: Transfer Files to AWS EC2 Instance
After Login in to the Instance you need to go to folder path where you kept all your files which need to be Transferred. Here I have Kept all the files under C:\Users\example folder so I will go to that path and select all the files. Now to transfer files to AWS EC2 Instance you either need to drag and drop all the files to right side of the WinSCP window or you can click on Upload Option to upload all the Files. Both ways you will be able to upload the files.
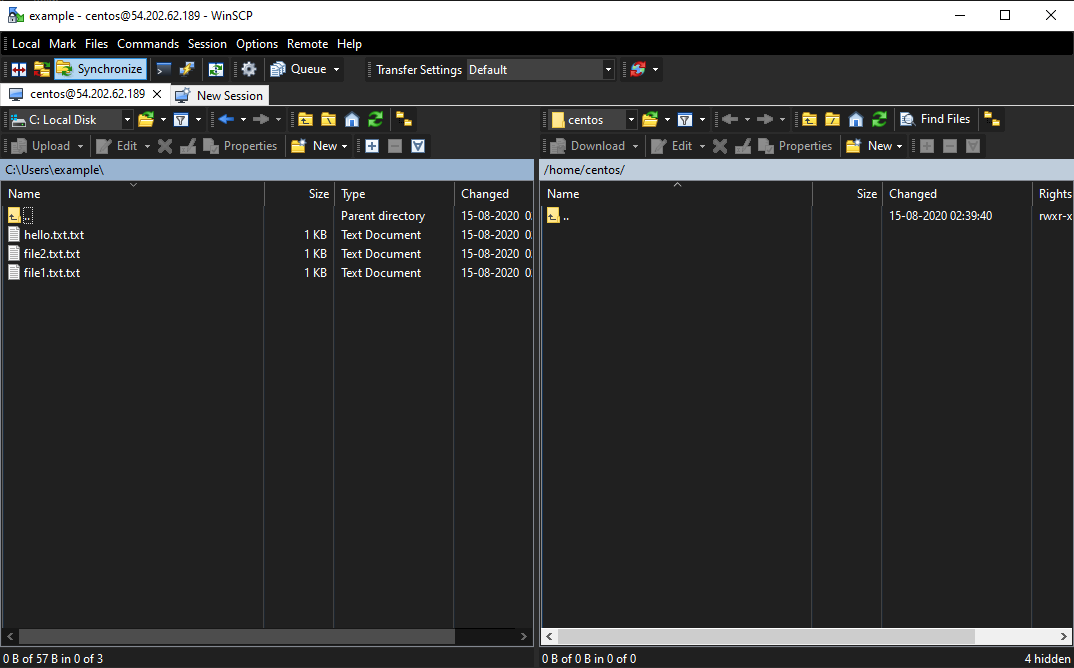
One important point to note here that the User through which you have logged in to WinSCP must have the Read and Write access to the destination path where you are trying to upload all the file otherwise you will get Permission Denied Error. Here when I am login through CentOS User, by default I will be redirected to User Home Directory path i.e to /home/centos path where User will have the full access.
Problem will come when you will change your path and go to other User Directory or to some other Path where User does not have the access to Upload. So you need to be very careful on that. I hope you found the steps to transfer files to AWS EC2 Instance useful.
Popular Recommendations:-
Introduction to SQL Injection Attacks in MySQL (v5.5)
How to Disable IPV6 on Linux (CentOS / RHEL 7/8) Using 4 Best Steps
How to Set MariaDB root Password in RHEL/CentOS 7/8 Using Simple mysql_secure_installation
How to Create Table in MySQL 5.5 with Easy Steps
How to Install Rust Programming Language in Linux Using 6 Best Steps
How to Install LEMP Stack on CentOS 8
Openssl Tutorial: Generate and Install Certificate on Apache Server in 8 Easy Steps
How to Enable or Disable SELinux Temporarily or Permanently on RedHat/CentOS 7/8
Top 12 Nmap Commands to Scan Remote Host with Best Practices