Table of Contents
In my earlier articles, we had setup Kubernetes Cluster on multiple environments using different tools and utilities. This time we are going to look into a complete guide to setup Kubernetes Cluster on EC2 Instance using Kops utility. Before starting to setup Kubernetes cluster, it is important to understand more about Kops utility that we are going to use here. Kops also known as Kubernetes Operations is a tool to manage Kubernetes Clusters in the Cloud. It will not only help you create, destroy, upgrade and maintain production-grade, highly available, Kubernetes cluster, but it will also provision the necessary cloud infrastructure.
Setup Kubernetes Cluster on EC2 Instance Using Kops
Also Read: How to Transfer Files to AWS EC2 Instance Using WinSCP in 3 Easy Steps
Step 1 : Create an EC2 Instance
We first will create an EC2 instance on which we will create and setup our cluster.
- Login to
AWS console - Switch to
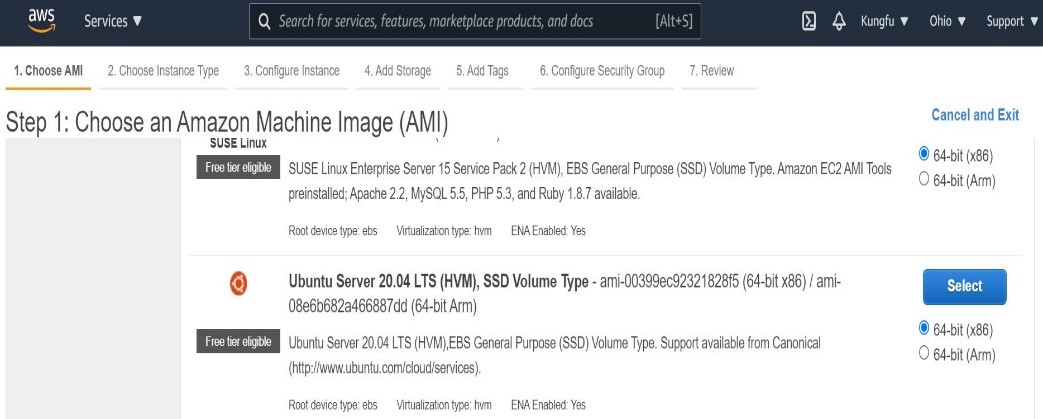
Services->EC2->Launch Instance - Select
‘Ubuntu’image which we will use for this tutorial as shown below.
- Create a tag for the instance(It’s a key value pair).
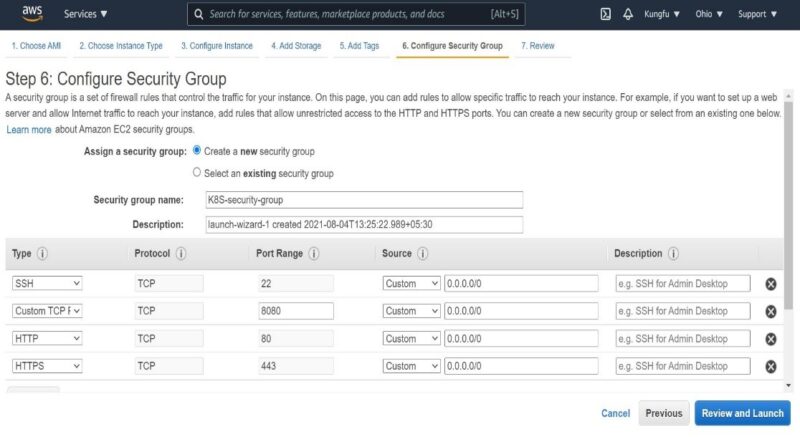
- Next, create a new security group as shown below. We need to open few ports to make Kubernetes setup work on EC2 instance. I have named the security group as
“K8S-security-group”as shown below
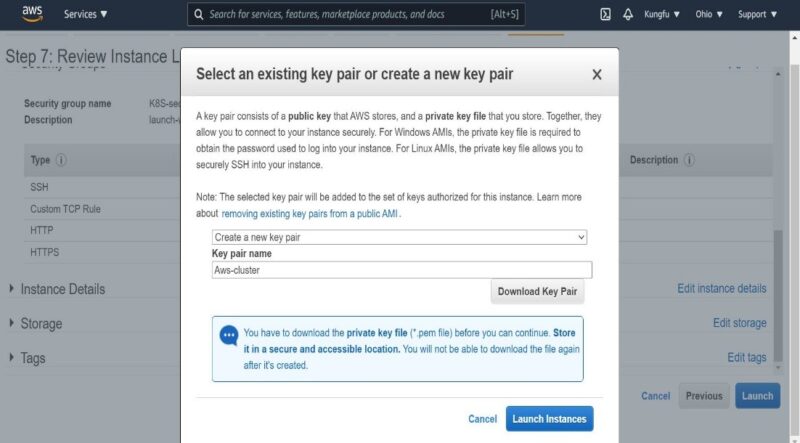
- Once everything is done, Click on
"Review and Launch"and then on"Launch". - During the launch, we may see a pop up to create a key-pair if we don't have an existing one. We can create it as shown below post which we can launch the instance.
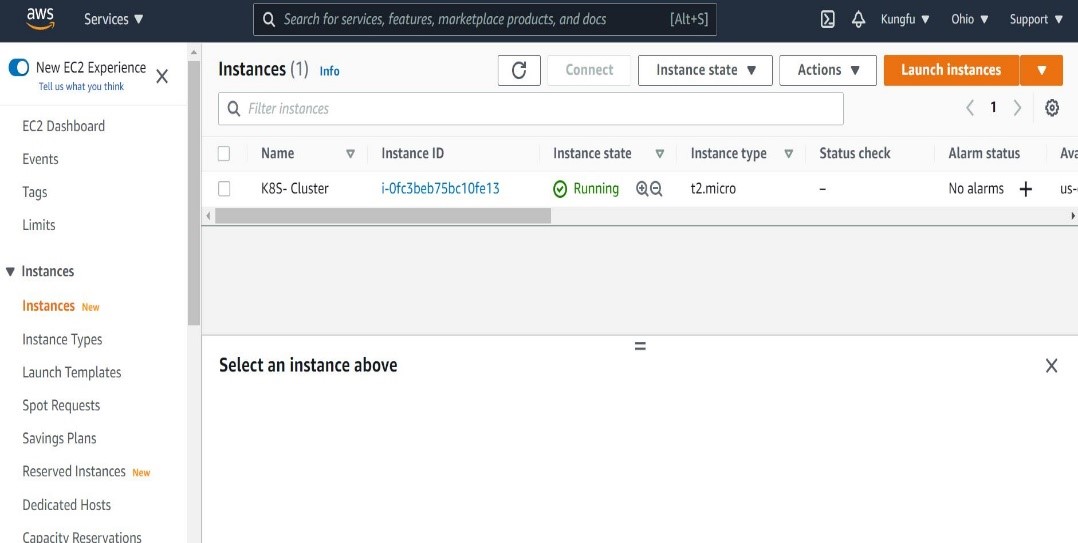
- Instance is now created successfully as shown below.
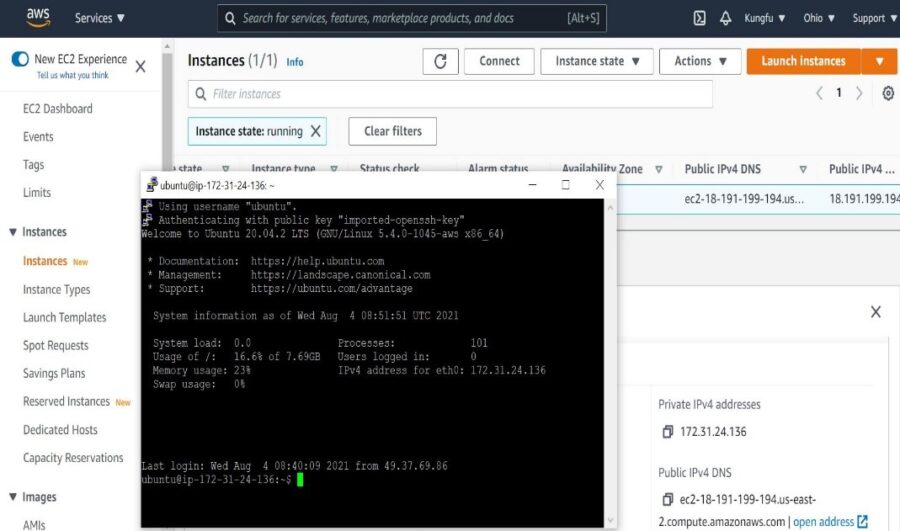
Now, we have to connect to the instance in order to perform the next step. We can connect using any SSH client (I am using Putty ). It should login using instance private IP as shown below.
Step 2: Install AWSCLI
We need to install and configure AWS CI on the instance to execute AWS commands. It will be required later on to interact with the Kubernetes cluster.
a) First, become root 'sudo su –'
root@ip-172-31-24-136:~# sudo apt-get update
b) To download the awscli zip file.
root@ip-172-31-24-136:~# curl "https://awscli.amazonaws.com/awscli-exe-linux-x86_64.zip" -o "awscliv2.zip"
c) To unzip the awscli file.
root@ip-172-31-24-136:~# unzip awscliv2.zip
d) To install the awscli.
root@ip-172-31-24-136:~# sudo ./aws/install
Once this is done, you should be able to check the version of aws cli installed on the instance.
root@ip-172-31-24-136:~# aws --version
aws-cli/2.2.26 Python/3.8.8 Linux/5.4.0-1045-aws exe/x86_64.ubuntu.20 prompt/off
Step 3: Install Kubectl
Kubectl utility is used to interact with control plane in the Kubernetes cluster. It allows us to use CLI commands to do so. Download the file from below path.
root@ip-172-31-24-136:~# curl -LO https://storage.googleapis.com/kubernetes-release/release/$(curl -s https://storage.googleapis.com/kubernetes-release/release/stable.txt)/bin/linux/amd64/kubectl
Assign execution permission to the file.
root@ip-172-31-24-136:~# chmod +x ./kubectl
Move the file to the specified location.
root@ip-172-31-24-136:~# sudo mv ./kubectl /usr/local/bin/kubectl
Step 4: Create an IAM user with Route53, EC2, IAM and S3 full access
We can also create IAM role in place of IAM user. EC2 instance will require to access above services while installing Kubernetes and setting up the cluster.
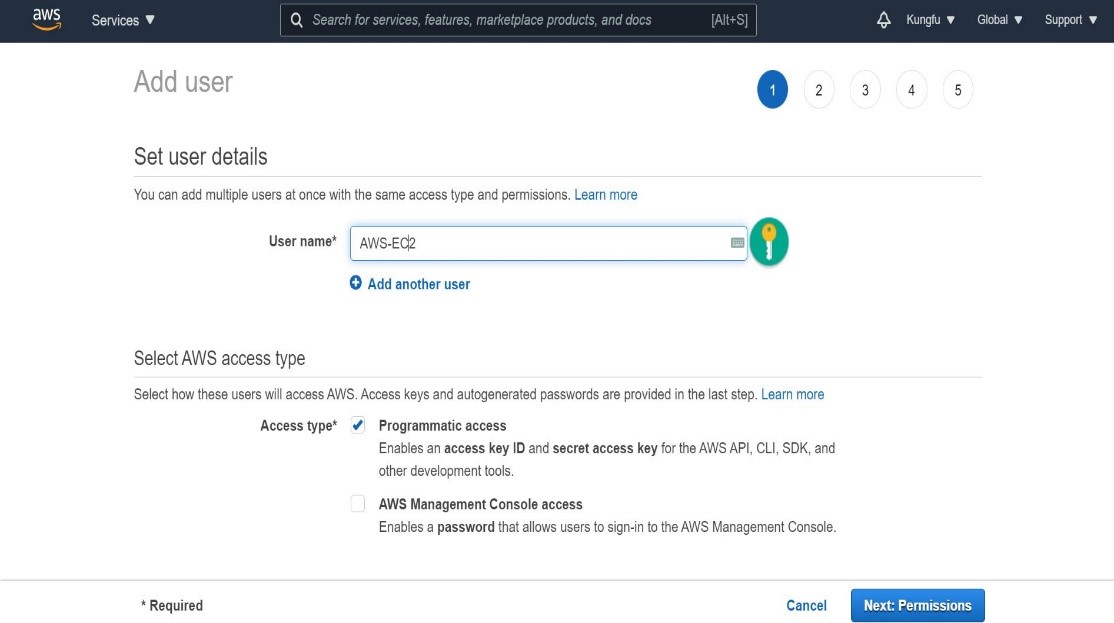
- Go to
IAM->Users - Click on
"Add users"and give user a name. In the next step give user permission and also create a tag as shown below.
- Click on
Next:Permissionsto proceed.
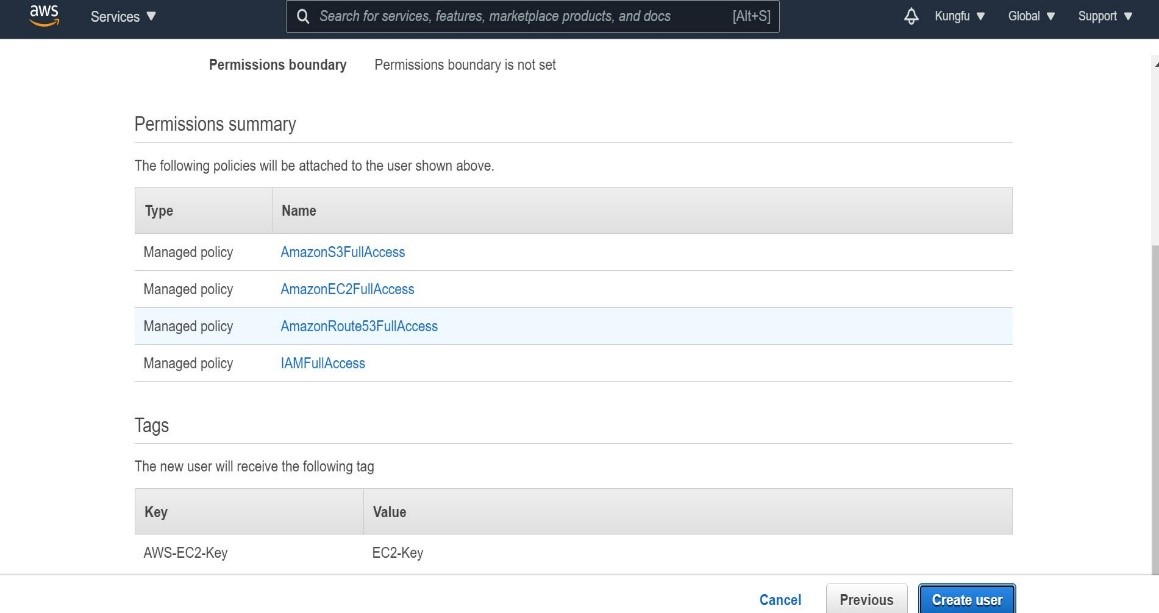
- Once done click on
"Create user" - Download the
.csvfile that contains Access key and Secret Key.
Step 5: Attach IAM user to ubuntu server
Now that we have created the IAM user with all needed permission, we will attach this user to the EC2 instance by following commands.
ubuntu@ip-172-31-24-136:~$ aws configure
AWS Access Key ID [None]: ****************O76J
AWS Secret Access Key [None]: ****************bI6i
Default region name [None]: us-east-2
Default output format [None]:
- Punch Access Key from the JSON file which we had downloaded in our previous step
- Punch Secret Key from the same JSON file
- Enter the region name which will be same as the region where our EC2 instance has been created
- Enter output format as JSON or keep it default.
Note: If you want to reset any value above later on, just rerun 'aws configure' command and punch the new value. It will get updated like below.
Here we are making below highlighted change.
ubuntu@ip-172-31-24-136:~$ aws configure
AWS Access Key ID [****************O76J]:
AWS Secret Access Key [****************bI6i]:
Default region name [us-east-2]: us-west-1
Default output format [None]: json
Now check the updated change.
ubuntu@ip-172-31-24-136:~$ aws configure
AWS Access Key ID [****************O76J]:
AWS Secret Access Key [****************bI6i]:
Default region name [us-west-1]:
Default output format [json]:
Step 6: Install Kops
Kops is a pre-requisite which is needed to create and manage AWS cluster. Use below curl command to download Kops utility from GitHub. More on Kops utility.
ubuntu@ip-172-31-24-136:~$ curl -LO https://github.com/kubernetes/kops/releases/download/$(curl -s https://api.github.com/repos/kubernetes/kops/releases/latest | grep tag_name | cut -d '"' -f 4)/kops-linux-amd64
To run the file, we need to provide execute permission by using chmod +x kops-linux-amd64 command as shown below.
ubuntu@ip-172-31-24-136:~$ chmod +x kops-linux-amd64
Then move the executable file to /usr/local/bin location using below mv command.
ubuntu@ip-172-31-24-136:~$ sudo mv kops-linux-amd64 /usr/local/bin/kops
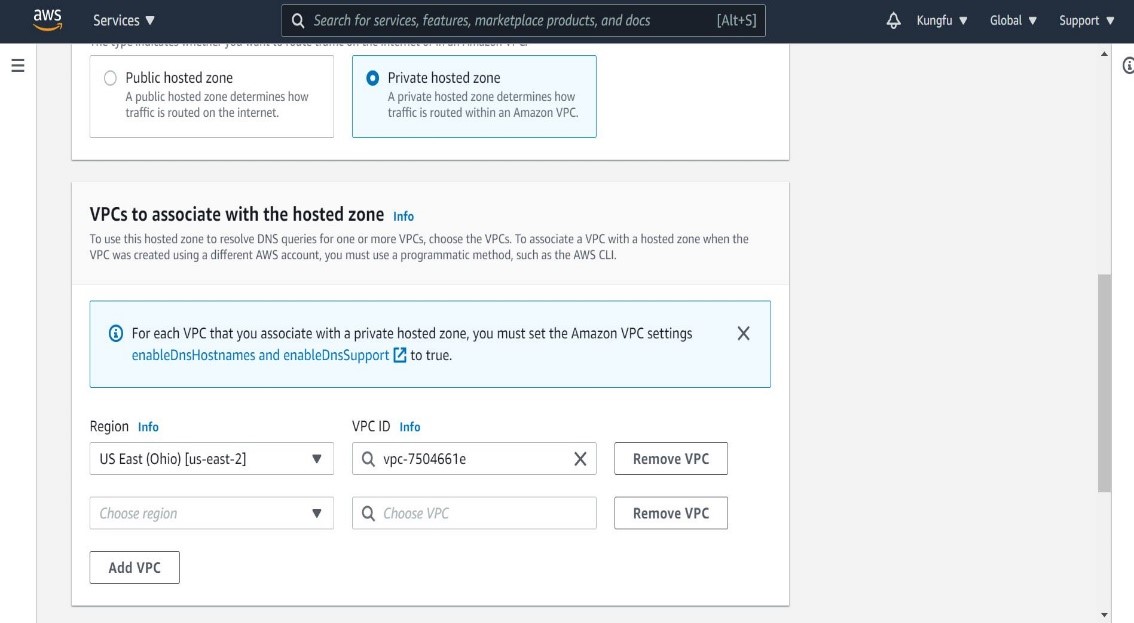
Step 7: Create a Route53 private hosted zone
Under services in AWS console go to Route53 -> DNS Management -> Create hosted zone. Give it a name, select VPC and type as shown below. Once done click on "Create hosted zone".
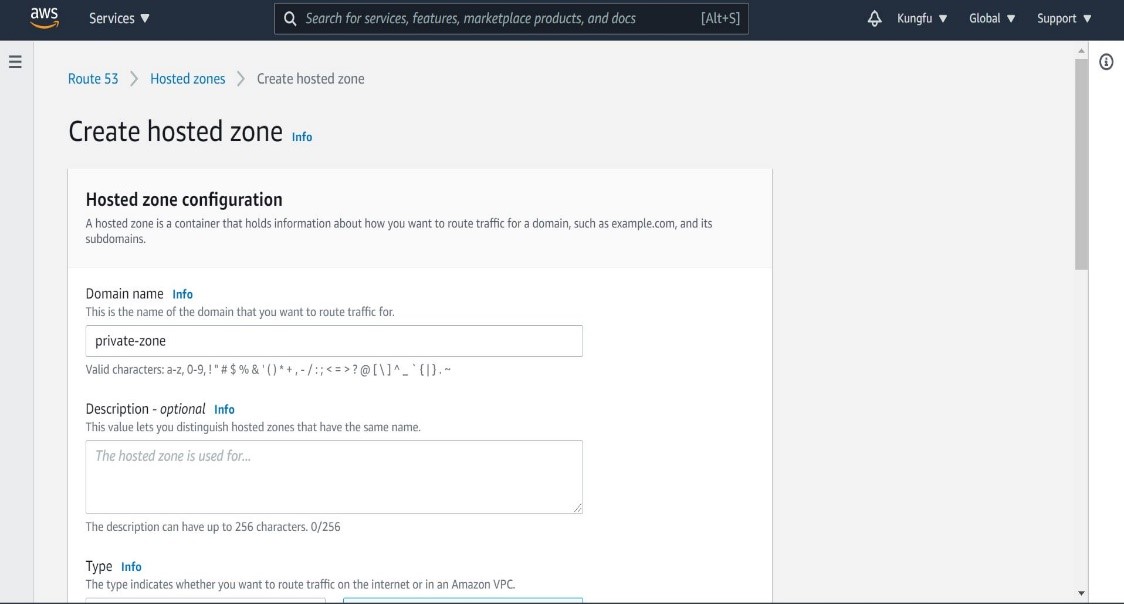
Then provide Region and VPC ID as shown below.
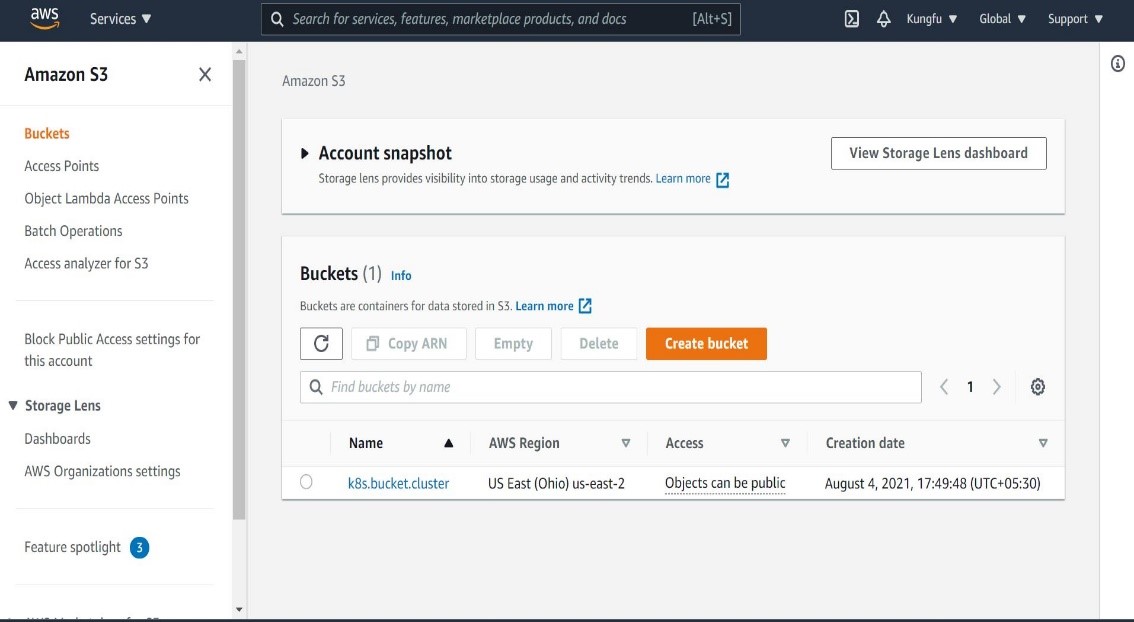
Step 8: Create S3 Bucket
All cluster information will get stored in the created bucket. Use below command to create the bucket.
ubuntu@ip-172-31-24-136:~$ aws s3 mb s3://k8s.bucket.cluster
make_bucket: k8s.bucket.cluster
Where,
mb -> make bucket
k8s.bucket.cluster -> name of the bucket
Once created, go to Amazon S3 service and validate if you can see the bucket created there as shown below.
Next expose the bucket which we just created to let Kubernetes know where to store cluster data. We can achieve this using environment variable.
ubuntu@ip-172-31-24-136:~$ export KOPS_STATE_STORE=s3://k8s.bucket.cluster
Step 9: Create SSH Keys
Generate the SSH Key pair to enable key based authentication for our Kubernetes cluster.
ubuntu@ip-172-31-24-136:~$ ssh-keygen
Generating public/private rsa key pair.
Enter file in which to save the key (/home/ubuntu/.ssh/id_rsa):
Enter passphrase (empty for no passphrase):
Enter same passphrase again:
Your identification has been saved in /home/ubuntu/.ssh/id_rsa
Your public key has been saved in /home/ubuntu/.ssh/id_rsa.pub
The key fingerprint is:
SHA256:/etXqMbmDm0d93jceA7ZqIwyjW61nKKoiMehVrty/jg ubuntu@ip-172-31-24-136
The key's randomart image is:
+---[RSA 3072]----+
|                 |
|                 |
|                 |
|         .       |
|        S .   ...|
|  ..      .o ..X+|
| o...    =.++.B.B|
|o+oE..  * ===o.= |
|+.===..+.+.*B.  .|
+----[SHA256]-----+
Step 10: Create Kubernetes Cluster Definitions on S3 bucket
Now you can create Kubernetes Cluster definitions on S3 bucket using below kops create cluster command.
ubuntu@ip-172-31-24-136:~$ kops create cluster --cloud=aws --zones=us-east-2b --name=k8s.bucket.cluster --dns-zone=private-zone --dns private --state s3://k8s.bucket.cluster
Step 11: Create Cluster
Finally to create the cluster use below kops update cluster command.
ubuntu@ip-172-31-24-136:~$ kops update cluster k8s.bucket.cluster --state s3://k8s.bucket.cluster –yes
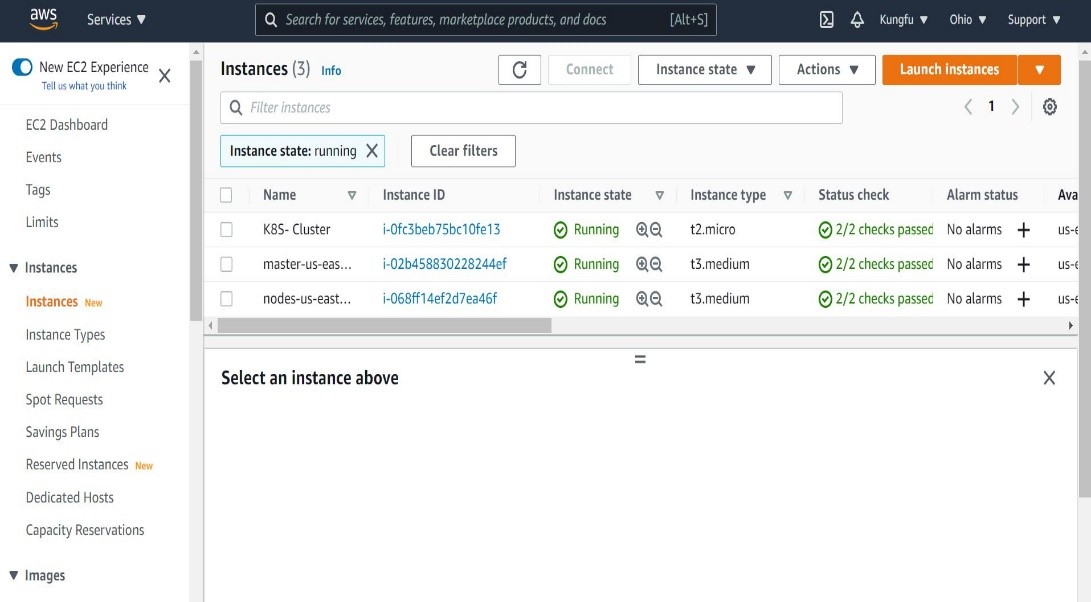
Once above command gets executed, you will see master and worker nodes created. Verify them under EC2 service as shown below.