
Table of Contents
In this article, I will take you through the steps to Install and Use i3 Window Manager on Ubuntu 20.04. i3 is a free and open source window tilling manager written in C language. It is mainly created for GUI Lovers and for those who likes to use shortcut keys a lot. It is very light weight and easy to use tilling Manager. More can be checked on Official User Guide.
What is Tilling Window Manager
It is a Window Manager with non-overlapping screen opened either in grid form or in tiles form as compared to normal window manager available in Mac, Window and Linux based systems which usually works on stacked model. It means when you open one window and then second window then in stack model second window overlaps the first window. Tilling Window Manager does not work like that. It opens the window either in grid form or in tiles form.
With the tilling Window Manager when you open a window, your tilling manager will positioned those windows for you and you can use your keyboard modifier keys to control them.
Features Provided by i3 Window Manager
- Low Resource utilization(RAM and CPU) as compared to other X Windows Applications.
- You can switch your Window to another workspace using $mod+Shift+num where num is the number of that target workspace.
- You can split the terminal vertically as well as horizontally to create multiple terminals.
- You can use handy dmenu search option to search and open any application from search window.
- Faster Access and Maneuverability.
- It uses Xcb instead of Xlib API Library.
- It is much better as compared to other tilling managers like bspwm and tilix.

How to Install and Use i3 Window Manager on Ubuntu 20.04
Also Read: Troubleshooting guide to Fix all Postfix Mail Server issues in Linux
Step 1: Prerequisites
a) You need to have a running Ubuntu 20.04 Server.
b) You should have apt tool installed in your Server. You can check 20 Useful apt get examples on Ubuntu. to know more about apt-get tool.
d) You should have sudo access to run Privileged Commands. Please Check How to Add User to Sudoers to know more about providing sudo access to the User.
Step 2: Update Your Server
Before you go through the installation steps it is always recommended to first update your Ubuntu machine with the latest available updates using sudo apt-get update command as shown below. This will download and install all the stable updates from Ubuntu Repository.
root@localhost:~# sudo apt-get update
Ign:1 https://pkg.jenkins.io/debian-stable binary/ InRelease
Get:2 https://pkg.jenkins.io/debian-stable binary/ Release [2,044 B]
Get:3 https://pkg.jenkins.io/debian-stable binary/ Release.gpg [833 B]
Hit:4 http://in.archive.ubuntu.com/ubuntu focal InRelease
Get:5 http://in.archive.ubuntu.com/ubuntu focal-updates InRelease [111 kB]
Get:6 http://security.ubuntu.com/ubuntu focal-security InRelease [107 kB]
Get:7 https://pkg.jenkins.io/debian-stable binary/ Packages [18.7 kB]
Get:8 http://in.archive.ubuntu.com/ubuntu focal-backports InRelease [98.3 kB]
Get:9 http://in.archive.ubuntu.com/ubuntu focal-updates/main i386 Packages [373 kB]
Get:10 http://in.archive.ubuntu.com/ubuntu focal-updates/main amd64 Packages [665 kB]
Get:11 http://in.archive.ubuntu.com/ubuntu focal-updates/main Translation-en [166 kB]
Get:12 http://in.archive.ubuntu.com/ubuntu focal-updates/main amd64 DEP-11 Metadata [236 kB]
Get:13 http://in.archive.ubuntu.com/ubuntu focal-updates/main DEP-11 48x48 Icons [51.6 kB]
Get:14 http://in.archive.ubuntu.com/ubuntu focal-updates/main DEP-11 64x64 Icons [86.5 kB]
Get:15 http://security.ubuntu.com/ubuntu focal-security/main i386 Packages [153 kB]
Get:16 http://in.archive.ubuntu.com/ubuntu focal-updates/main amd64 c-n-f Metadata [11.0 kB]
Get:17 http://in.archive.ubuntu.com/ubuntu focal-updates/restricted i386 Packages [13.4 kB]
Get:18 http://in.archive.ubuntu.com/ubuntu focal-updates/restricted amd64 Packages [95.7 kB]
Get:19 http://in.archive.ubuntu.com/ubuntu focal-updates/restricted Translation-en [14.8 kB]
Get:20 http://in.archive.ubuntu.com/ubuntu focal-updates/restricted amd64 c-n-f Metadata [348 B]
Get:21 http://in.archive.ubuntu.com/ubuntu focal-updates/universe amd64 Packages [690 kB]
Get:22 http://in.archive.ubuntu.com/ubuntu focal-updates/universe i386 Packages [513 kB]
Get:23 http://security.ubuntu.com/ubuntu focal-security/main amd64 Packages [368 kB]
Get:24 http://in.archive.ubuntu.com/ubuntu focal-updates/universe Translation-en [133 kB]
Get:25 http://in.archive.ubuntu.com/ubuntu focal-updates/universe amd64 DEP-11 Metadata [205 kB]
Step 3: Install i3 Window Manager
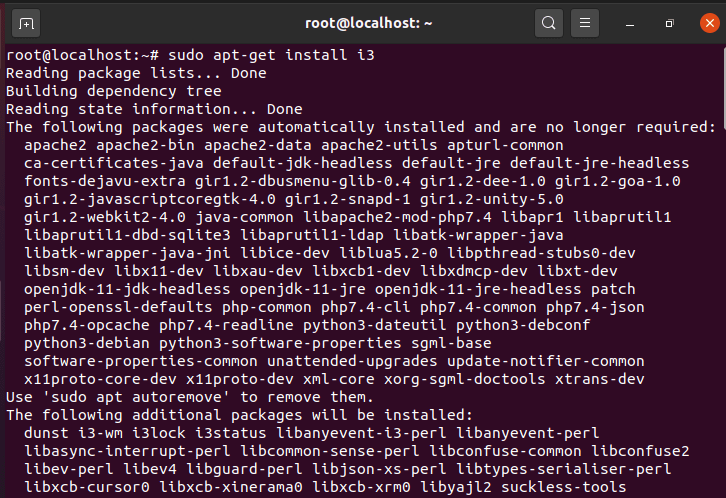
To install i3 Window Manager you need to use sudo apt-get install i3 command as shown below. This command will remove all the unnecessary packages and will download and install the i3 window manager along with its dependencies.
Step 4: Check i3 Window Manager Version
To check i3 window manager you can use i3 --version command as shown below. As you can see from output, current version is 4.17.1
![]()
![]()
Step 5: Configure i3 Window Manager on Ubuntu 20.04
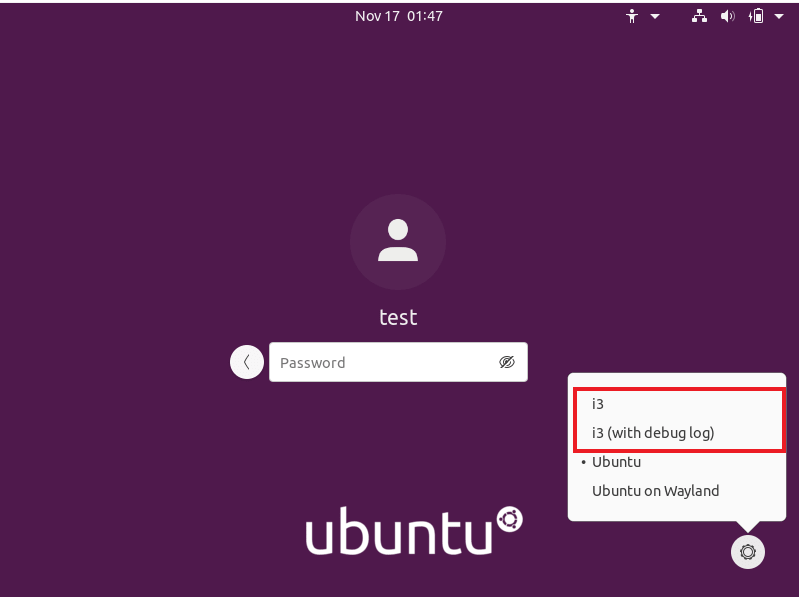
After installation of i3 window manager you need to restart your Server by using init 6 command and then start with its configuration. Immediately after the server restart you will see a login screen with different options. You need to select below highlighted i3 option here.
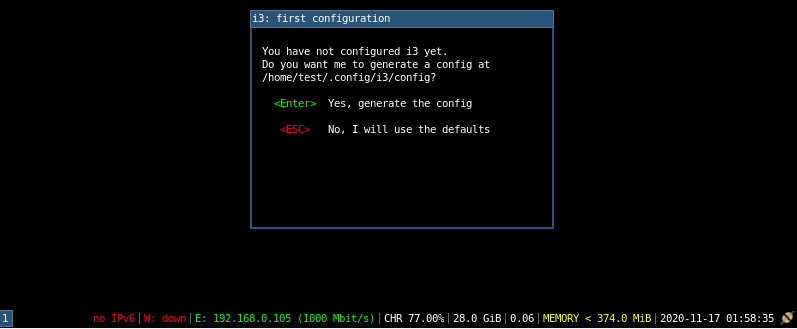
Once you select the i3 option and login with your user credentials, below screen will appear. Here you will see <Enter> to generate the config for i3 and <Esc> to use the default config. We will go with the First option and press <Enter>
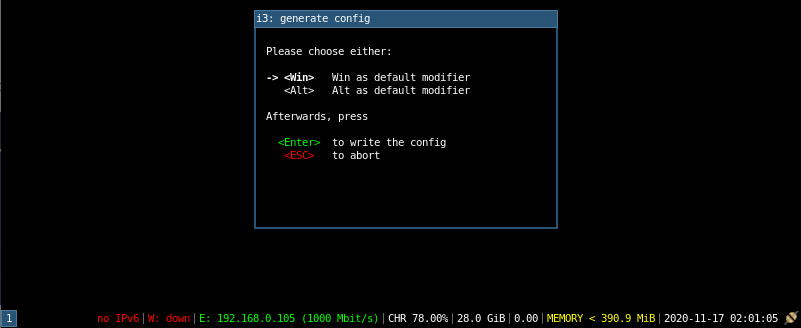
In the next step you will see below screen where you need to select either <Win> or <Alt> as your default modifier. Here we will select First Option i.e <Win> as the default modifier and then press <Enter>
In the next step you will see a blank screen which means configuration is completed and now you can start using it.
Step 6: Use i3 Window Manager on Ubuntu 20.04
To start with the use of i3 Window Manager you need to get familiar with few Keyboard Keys based on the Modifier you selected in the previous step.
<Win> + <Enter>- To open a terminal<Win> + f- To enter into fullscreen mode<Win> + <Shift> + q- To exit from fullscreen mode<Win> + d- To open a top menu where you can search<Win> + <Esc>- To close previously open menu
Step 7: Check Man Page of i3 Window Manager
You can also check the man page of i3 window manager using man i3 command as shown below.
root@localhost:~# man i3
I3(1) i3 Manual I3(1)

NAME
i3 - an improved dynamic, tiling window manager

SYNOPSIS
i3 [-a] [-c configfile] [-C] [-d all] [-v] [-V]

OPTIONS
-a
Disables autostart.

-c
Specifies an alternate configuration file path.

-C
Check the configuration file for validity and exit.

-d all
Enables debug logging. The all parameter is present for historical reasons.

-v
Display version number (and date of the last commit).

-V
Be verbose.
Popular Recommendations:-
How to Suppress all the output of a Linux Bash Shell Script
How to Convert/Change time to epoch time using date utility on Linux/Unix Server
25 Practical and Useful rpm command examples in Linux{cheatsheet}
How to Install jq(JSON Processor) on RHEL/CentOS 7/8
How to Defragment an XFS Filesystem in Linux(5 Simple and Effective Steps)
How to Install Arpwatch tool on RHEL/CentOS 7/8(Simple and Effective Steps)
How to Install and Configure Squid Proxy Server on RHEL/CentOS 7/8
Python3: ModuleNotFoundError: No Module Named "prettytable" in Linux