
Table of Contents
In this article, we will go through the steps to install Datalab in GCP(Google Cloud Platform). Google datalab is build on top of jupyter notebook with some added abilities including easy authentication with BigQuery data sets, fast operations to google cloud storage and SQL query support. Datalab in GCP is nothing but a compute engine with docker container. Datalab instances gets created in Compute Engine as VMs. It can also connect to multiple cloud services to make task easy.

Step by Step Guide to Install Datalab in GCP(Google Cloud Platform)
Also Read: How to Prevent Accidental Commit to Master and Dev Branch in GIT
Step 1: Prerequisites
a) You should have a valid Google Email ID and Password.
b) You should have a running Windows Server.
c) You should have access to run privileged Commands.
Step 2: Install and Initialize Cloud SDK
- Download the Cloud SDK installer.
- Once downloaded, launch the installer and follow the prompt to complete installation.
- Remember to check box
“Start Google Cloud SDK Shell”&“Run gcloud init”before finishing the installation. - Once install finishes, Google Cloud SDK Shell will prompt. From here we will proceed installing datalab.
Step 3: Create Project and Enable APIs
Next, Go to cloud console and either create new project or switch to any existing project. Enable below APIs to make install work. To do so, click on APIs and Services -> Library and search for the APIs. Also, make sure billing is enable for your project.
- Google Compute Engine
- Cloud Source Repositories APIs
Step 4: Install Datalab
In the shell, First select the project where you want to create instance of datalab like below. Then run gcloud components update command to update components.
C:\Users\cyberithub\AppData\Local\Google\Cloud SDK>gcloud components update
To help improve the quality of this product, we collect anonymized usage data and anonymized stack traces when crashes are encountered; additional information is available at <https://cloud.google.com/sdk/usage-statistics>. This data is handled in accordance with our privacy policy
<https://cloud.google.com/terms/cloud-privacy-notice>. You may choose to opt in this collection now (by choosing 'Y' at the below prompt), or at any time in the
future by running the following command:
gcloud config set disable_usage_reporting false
Do you want to opt-in (y/N)?  y
Beginning update. This process may take several minutes.
All components are up to date
a) Install the datalab by executing below command
You can install datalab in your Windows Server by using gcloud components install datalab command.
C:\Users\cyberithub\AppData\Local\Google\Cloud SDK>gcloud components install datalab
Restarting command:
$ gcloud components install datalab
b) Create an instance of Datalab
We will use the --verbosity=debug flag here to get more info if any error occur during instance creation.
C:\Users\cyberithub\AppData\Local\Google\Cloud SDK>datalab create --verbosity=debug  datalab-demo
Please specify a zone from one of:
 [1] us-east1-b
 [2] us-east1-c
 [3] us-east1-d
 [4] us-east4-c
 [5] us-east4-b
 [6] us-east4-a
 ---------------------
 [74] us-west4-a
 [75] us-west4-b
 [76] us-west4-c
Your selected zone: 54
DEBUG: Running [gcloud.compute.firewall-rules.list] with arguments: [--filter: "network~.*datalab-network$", --format: "value(name)", --verbosity: "debug"]
INFO: client_filter=None server_filter='network eq ".*(.*datalab-network$).*"'
INFO: client_filter=None server_filter='network eq ".*(.*datalab-network$).*"'
INFO: Display format: "    table(
c) Check if instance got created
You can check the Instance readiness by using datalab list command.
C:\Users\cyberithub\AppData\Local\Google\Cloud SDK>datalab list
 NAME                  ZONE             MACHINE_TYPE     PREEMPTIBLE   INTERNAL_IP   EXTERNAL_IP     STATUS
datalab-demo    asia-southeast2-b      n1-standard-1                   10.184.0.2    34.101.229.201  RUNNING
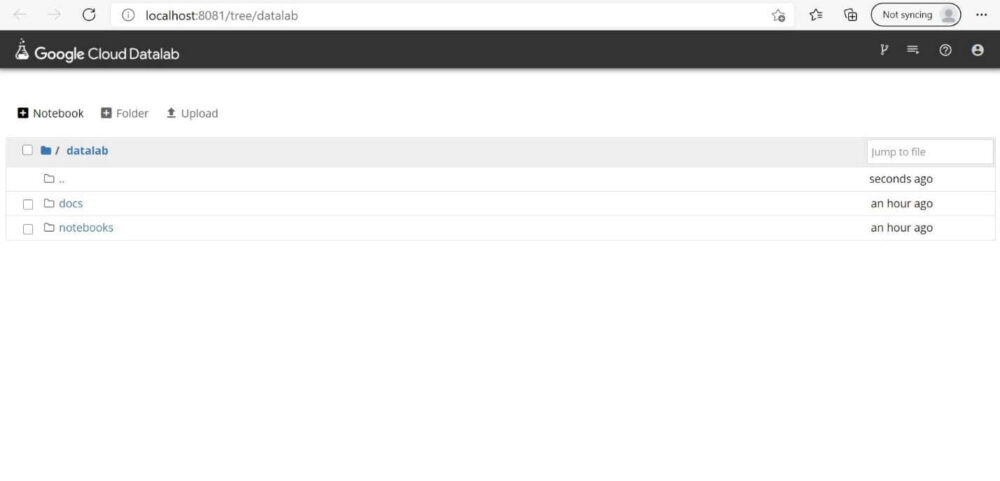
d) Finally, Launch the Datalab on default port 8081
By executing below command, you will automatically get redirected to the homepage of Datalab in browser as you can see below.
C:\Users\cyberithub\AppData\Local\Google\Cloud SDK>datalab connect datalab-demo --port=8081
Connecting to datalab-demo.
This will create an SSH tunnel and may prompt you to create an rsa key pair. To manage these keys, see https://cloud.google.com/compute/docs/instances/adding-removing-ssh-keys
Waiting for Datalab to be reachable at http://localhost:8081/
This tool needs to create the directory [C:\Users\cyberithub\.ssh] before being able to generate SSH keys.
Do you want to continue (Y/n)?  y
Updating project ssh metadata...|Updated [https://www.googleapis.com/compute/v1/projects/cloud-build-312308].
Updating project ssh metadata...done.
Waiting for SSH key to propagate.
The server's host key is not cached in the registry. You have no guarantee that the server is the computer you think it is.
The server's ssh-ed25519 key fingerprint is:
ssh-ed25519 255 eb:89:0d:29:92:d8:5b:62:74:3b:70:73:ff:6f:03:67
If you trust this host, enter "y" to add the key to
PuTTY's cache and carry on connecting.
If you want to carry on connecting just once, without
adding the key to the cache, enter "n".
If you do not trust this host, press Return to abandon the connection.
Store key in cache? (y/n)
The connection to Datalab is now open and will remain until this command is killed.

You can connect to Datalab at http://localhost:8081/
e) To reconnect to Datalab if session terminates
If session got disconnected then reconnect it by using datalab connect datalab-demo command.
C:\Users\cyberithub\AppData\Local\Google\Cloud SDK>datalab connect datalab-demo
Connecting to datalab-demo.
This will create an SSH tunnel and may prompt you to create an rsa key pair. To manage these keys, see https://cloud.google.com/compute/docs/instances/adding-removing-ssh-keys
Waiting for Datalab to be reachable at http://localhost:8081/
The connection to Datalab is now open and will remain until this command is killed.
You can connect to Datalab at http://localhost:8081/
f) To delete datalab instance and Persistent disk where notebooks are stored.
Lastly, to delete any datalab instance and persistent disk, you need to use datalab delete --delete-disk <instance-name> command.
datalab delete --delete-disk <instance-name>