

Table of Contents
In this article I will take you through the steps to install Apache Kafka on Ubuntu. Kafka was Originally developed at LinkedIn. Later on, in 2011 it became an Open Source Project. Since then it has evolved as a very important Real Time Data Pipeline application. Kafka basically provides a Distributed Streaming platform which you can utilize to store and process streams of records in a Fault Tolerant Way.
Apache Kafka Tutorial
In this Kafka tutorial, I will cover below Topics:-
- Kafka Architecture
- Install Apache Kafka Server
- Prerequisites
- Update System
- Apache Kafka Download
- Extract Tar File
- Start Zookeeper Service
- Start Kafka As a Service
- Create a Topic
- Send Messages using Kafka Console Producer
- Receive Messages using Kafka Console Consumer
- Kafka Delete Topic(optional)
- How to find out Kafka Version
- What is the Default Kafka Port?
Kafka Cluster Architecture
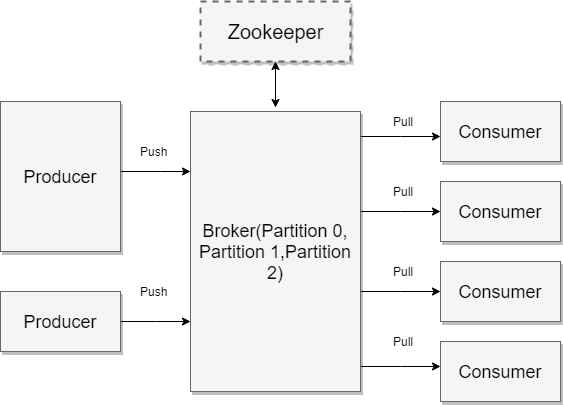
Some Terminology and Concepts:-
Producer: Producer write data to the topic and connect to one broker. In turn, Kafka will take care of routing of data to the right broker.
Consumer: Consumer read data from the topic and connect to one broker. Kafka will take care of pulling of the data from right broker.
Broker: Broker is a Kafka Server which does Load Balancing internally and choose the right broker to send the data or pull the data.
Topic: Topic is a Kafka Stream that we creates to send our data generated by the producer or consume the data using Consumer.
Partition: Partition is a part of Broker which is managed by broker itself.
Offset: Offset is a unique id for a message within a partition.
Consumer Groups: A group of Consumer acting as a Single Logical Unit.
Install Apache Kafka Server
Before going through the steps to install Apache Kafka Server, you need to fulfill the prerequisites criteria.
Also Read: How to Install and Configure Redis on CentOS 7
Step 1: Prerequisites
a) You need to have a running Ubuntu 18.04 machine in order to install Apache Kafka server.
b) Atleast 4GB memory is required for single node set up. It will require more for multi node setup running heavy processing.
Step 2: Update System
You need to update your all installed packages before proceeding with the steps to install Kafka Server.
root@znode1:~# apt-get update
Hit:1 http://in.archive.ubuntu.com/ubuntu bionic InRelease
Get:2 http://in.archive.ubuntu.com/ubuntu bionic-updates InRelease [88.7 kB]
Get:3 http://in.archive.ubuntu.com/ubuntu bionic-backports InRelease [74.6 kB]
Get:4 http://security.ubuntu.com/ubuntu bionic-security InRelease [88.7 kB]
Hit:5 http://ppa.launchpad.net/ansible/ansible/ubuntu bionic InRelease
Get:6 http://in.archive.ubuntu.com/ubuntu bionic-updates/main amd64 DEP-11 Metadata [294 kB]
................................................................................................................
Step 3: Download and Install Kafka
Download Apache Kafka through wget. At the time of Writing, Kafka_2.11.2.4.0 is the latest one. You can download the latest one from Apache Kafka Download Page depends on your requirement.
root@znode1:~# wget http://mirrors.estointernet.in/apache/kafka/2.4.0/kafka_2.11-2.4.0.tgz
--2020-01-01 21:14:48-- http://mirrors.estointernet.in/apache/kafka/2.4.0/kafka_2.11-2.4.0.tgz
Resolving mirrors.estointernet.in (mirrors.estointernet.in)... 103.97.84.254, 2403:8940:2::f
Connecting to mirrors.estointernet.in (mirrors.estointernet.in)|103.97.84.254|:80... connected.
HTTP request sent, awaiting response... 200 OK
Length: 70057083 (67M) [application/octet-stream]
Saving to: ‘kafka_2.11-2.4.0.tgz’

kafka_2.11-2.4.0.tgz 100%[=====================================================================================>] 66.81M 5.99MB/s in 10s

2020-01-01 21:14:59 (6.58 MB/s) - ‘kafka_2.11-2.4.0.tgz’ saved [70057083/70057083
Step 4: Extract Tar File
Extract Kafka download package using tar -xvf command in current directory.
root@znode1:~# tar -xvf kafka_2.11-2.4.0.tgz
And then move the extracted file into /opt directory.
root@znode1:~# mv kafka_2.11-2.4.0/ /opt
Step 5: Start Zookeeper Service
Go to Kafka directory and start the Zookeeper Service using below command in background.
root@znode1:~# cd /opt/kafka_2.11-2.4.0/
root@znode1:~/kafka_2.11-2.4.0# bin/zookeeper-server-start.sh config/zookeeper.properties &
[2020-01-02 07:42:55,381] INFO Reading configuration from: config/zookeeper.properties (org.apache.zookeeper.server.quorum.QuorumPeerConfig)
[2020-01-02 07:42:55,389] WARN config/zookeeper.properties is relative. Prepend ./ to indicate that you're sure! (org.apache.zookeeper.server.quorum.QuorumPeerConfig)
[2020-01-02 07:42:55,399] INFO clientPortAddress is 0.0.0.0/0.0.0.0:2181 (org.apache.zookeeper.server.quorum.QuorumPeerConfig)
[2020-01-02 07:42:55,400] INFO secureClientPort is not set

.......................................................................................................................
If you want to stop Zookeeper server, then run below command:-
root@znode1:~/kafka_2.11-2.4.0# bin/zookeeper-server-stop.sh
Step 6: Start Kafka as a Service
Once Zookeeper service started successfully, you can now go ahead and start Kafka Service in the background.
root@znode1:~/kafka_2.11-2.4.0# bin/kafka-server-start.sh config/server.properties &

[2020-01-02 07:43:28,733] INFO Registered kafka:type=kafka.Log4jController MBean (kafka.utils.Log4jControllerRegistration$)
[2020-01-02 07:43:29,451] INFO Registered signal handlers for TERM, INT, HUP (org.apache.kafka.common.utils.LoggingSignalHandler)
[2020-01-02 07:43:29,453] INFO starting (kafka.server.KafkaServer)
[2020-01-02 07:43:29,455] INFO Connecting to zookeeper on localhost:2181 (kafka.server.KafkaServer)
[2020-01-02 07:43:29,483] INFO [ZooKeeperClient Kafka server] Initializing a new session to localhost:2181. (kafka.zookeeper.ZooKeeperClient)

.............................................................................................................
If you want to stop Kafka Server, then run below command:-
root@znode1:~/kafka_2.11-2.4.0# bin/kafka-server-stop.sh
[2020-01-02 08:32:14,118] INFO Terminating process due to signal SIGTERM (org.apache.kafka.common.utils.LoggingSignalHandler)
[2020-01-02 08:32:14,120] INFO [KafkaServer id=0] shutting down (kafka.server.KafkaServer)
[2020-01-02 08:32:14,121] INFO [KafkaServer id=0] Starting controlled shutdown (kafka.server.KafkaServer)
[2020-01-02 08:32:14,171] INFO [KafkaServer id=0] Controlled shutdown succeeded (kafka.server.KafkaServer)

.........................................................................................................................
Step 7: Create a Topic
Once all the services are started successfully, you can now go ahead and create your first Topic using below command. Topic are nothing but Kafka Stream which you need to subscribe to send your data. It will connect to given Broker and choose the right broker internally to send the data.
root@znode1:~/kafka_2.11-2.4.0# bin/kafka-topics.sh --create --zookeeper localhost:2181 --replication-factor 1 --partitions 1 --topic FirstTopic
Created topic FirstTopic.
Verify topic by below command:-
root@znode1:~/kafka_2.11-2.4.0# bin/kafka-topics.sh --list --zookeeper localhost:2181
FirstTopic
Step 8: Send Data using Kafka Console Producer
It is now time to send data over your Kafka Stream using producer api. You can open a new shell and send some data. Once done, you can either close the shell or let it be like that.
root@znode1:~/kafka_2.11-2.4.0# bin/kafka-console-producer.sh --broker-list localhost:9092 --topic FirstTopic
>Hello
>from CyberITHub
>
Step 9: Receive Data using Kafka Console Consumer
You can simultaneously open another shell and run below command to consume the data sent by the Producer over the Kafka stream through Consumer API.
root@znode1:~/kafka_2.11-2.4.0# bin/kafka-console-consumer.sh --bootstrap-server localhost:9092 --topic FirstTopic --from-beginning
Hello
from CyberITHub
Step 10: Kafka Delete Topic(Optional)
If you want to delete some topic, you can do that by using below command.
root@znode1:~/kafka_2.11-2.4.0# bin/kafka-topics.sh --zookeeper localhost:2181 --delete --topic FirstTopic

[2020-01-02 08:26:17,170] INFO [Log partition=FirstTopic-0, dir=/tmp/kafka-logs] Deleting segments List(LogSegment(baseOffset=0, size=157, lastModifiedTime=1577932597085, largestTime=1577932596081)) (kafka.log.Log)
[2020-01-02 08:26:17,175] INFO Deleted log /tmp/kafka-logs/FirstTopic-0.4f1f7a0b4a4c461eb5dc638e7a7886cb-delete/00000000000000000000.log.deleted. (kafka.log.LogSegment)
[2020-01-02 08:26:17,185] INFO Deleted offset index /tmp/kafka-logs/FirstTopic-0.4f1f7a0b4a4c461eb5dc638e7a7886cb-delete/00000000000000000000.index.deleted. (kafka.log.LogSegment)
[2020-01-02 08:26:17,193] INFO Deleted time index /tmp/kafka-logs/FirstTopic-0.4f1f7a0b4a4c461eb5dc638e7a7886cb-delete/00000000000000000000.timeindex.deleted. (kafka.log.LogSegment)
[2020-01-02 08:26:17,204] INFO Deleted log for partition FirstTopic-0 in /tmp/kafka-logs/FirstTopic-0.4f1f7a0b4a4c461eb5dc638e7a7886cb-delete. (kafka.log.LogManager)
Topic FirstTopic is marked for deletion.
[2020-01-02 08:26:19,855] INFO [GroupMetadataManager brokerId=0] Group console-consumer-28412 transitioned to Dead in generation 4 (kafka.coordinator.group.GroupMetadataManager)

.............................................................................................................................................
How to find out Kafka Version ?
To check the Kafka version, you can run below command:-
root@znode1:~/kafka_2.11-2.4.0# bin/kafka-topics.sh --version
2.4.0 (Commit:77a89fcf8d7fa018)
What is the default Kafka Port ?
Kafka uses default TCP Kafka Port 9092
Also Read: How to Install Docker on CentOS 7
Reference: Kafka Documentation