
Table of Contents
In this article, I will take you through Zookeeper Installation on Ubuntu 18.04. Zookeeper is an external software used to track information that must be synchronized across your cluster. In a Real world Distributed System, Cluster might get into any kind of Failures like individual nodes went down, time drift between the nodes, network go down etc. To handle these kind of situations Zookeeper is the perfect tool which sits off your side and manage all this overhead for you.
In this article, you will learn about following topics:-
- Zookeeper Architecture
- What is Zookeeper
- How Zookeeper Leader Election Works
- Zookeeper Requirements
- Zookeeper Hostname Set Up
- Apache Zookeeper Download
- Create Server Id for Zookeeper Cluster
- Start Zookeeper Software
- Verify Zookeeper Configuration
Zookeeper Architecture
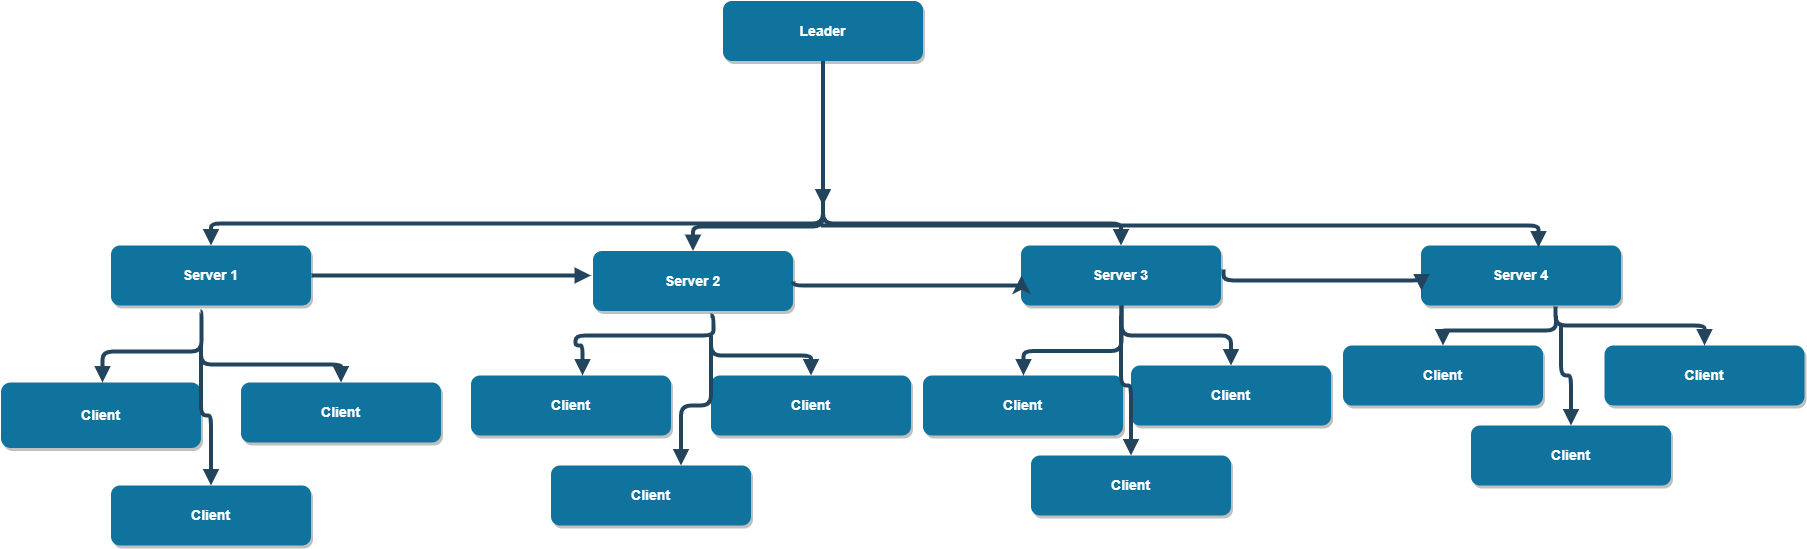
Before going through above, let's go through few Zookeeper Software Terminologies:-
Node: It could be any Ubuntu system running under Zookeeper cluster.
Master: A node which will be elected to perform Leader operations like assign tasks to worker nodes, recover from any partial failures etc.
Worker: A nodes which will follow the leader and will perform all the tasks given by the Leader.
Server: A node in Zookeeper ensemble which provides services to the client along with the acknowledgement that it is alive and running fine.
Client: A node in Zookeeper ensemble which connects with the Server and provides acknowledgement that it is up and running fine.

Install Apache Zookeeper
Before going through the steps to install Zookeeper, check Zookeeper requirements, perform Zookeeper download in all 3 nodes, setup Zookeeper configuration and start Zookeeper Cluster we first need to understand What is Zookeeper.
Also Read: How to install Perl on CentOS 7
What is Zookeeper
Zookeeper is a tool which applications can use to recover from partial failures. It keeps track of Master node, worker nodes, workers tasks and facilitate data synchronization across your cluster. It is an integral part of Applications like HBase, Kafka, Drill, Storm and many more.
How Zookeeper Leader Election Works
One node register itself as master and put a lock on it. Other nodes in the cluster cannot become master till this lock get released from the elected master. This lock also prevents to create multiple master within a Cluster.
Step 1: Zookeeper Requirements
a)You need to have 3 Ubuntu running Nodes.
b)Update your system
[root@znode1 ~]# apt-get update
c)Make sure java is installed
[root@znode1 ~]# java -version
d)You need to have an user with sudo access.
Step 2: Set up Hostname
You need to first set up your hostname in all the 3 nodes.
Node 1:-
root@znode1:~#hostnamectl set-hostname znode1
root@znode1:~#exec bash
root@znode1:~#vi /etc/hosts

192.168.0.106 znode1
192.168.0.105 znode2
192.168.0.110 znode3
Node 2:-
root@znode1:~#hostnamectl set-hostname znode2
root@znode1:~#exec bash
root@znode1:~#vi /etc/hosts

192.168.0.106 znode1
192.168.0.105 znode2
192.168.0.110 znode3
Node 3:-
root@znode1:~#hostnamectl set-hostname znode3
root@znode1:~#exec bash
root@znode1:~#vi /etc/hosts

192.168.0.106 znode1
192.168.0.105 znode2
192.168.0.110 znode3
Step 3: Apache Zookeeper Download
Download Apache Zookeeper using wget in all 3 nodes. At the time of writing, Zookeeper-3.5.6 is the Latest Release. You can choose the latest release from Zookeeper website as per your requirement.
Node 1:-
root@znode1:~# wget https://archive.apache.org/dist/zookeeper/zookeeper-3.5.6/apache-zookeeper-3.5.6.tar.gz
--2019-12-31 23:43:53-- https://archive.apache.org/dist/zookeeper/zookeeper-3.5.6/apache-zookeeper-3.5.6.tar.gz
Resolving archive.apache.org (archive.apache.org)... 163.172.17.199
Connecting to archive.apache.org (archive.apache.org)|163.172.17.199|:443... connected.
HTTP request sent, awaiting response... 200 OK
Length: 3132621 (3.0M) [application/x-gzip]
Saving to: ‘apache-zookeeper-3.5.6.tar.gz’

apache-zookeeper-3.5.6.tar.gz 100%[=====================================================================================>] 2.99M 333KB/s in 9.6s

2019-12-31 23:44:03 (318 KB/s) - ‘apache-zookeeper-3.5.6.tar.gz’ saved [3132621/3132621]
Node 2:-
root@znode1:~# wget https://archive.apache.org/dist/zookeeper/zookeeper-3.5.6/apache-zookeeper-3.5.6.tar.gz
--2019-12-31 23:43:53-- https://archive.apache.org/dist/zookeeper/zookeeper-3.5.6/apache-zookeeper-3.5.6.tar.gz
Resolving archive.apache.org (archive.apache.org)... 163.172.17.199
Connecting to archive.apache.org (archive.apache.org)|163.172.17.199|:443... connected.
HTTP request sent, awaiting response... 200 OK
Length: 3132621 (3.0M) [application/x-gzip]
Saving to: ‘apache-zookeeper-3.5.6.tar.gz’

apache-zookeeper-3.5.6.tar.gz 100%[=====================================================================================>] 2.99M 333KB/s in 9.6s

2019-12-31 23:44:03 (318 KB/s) - ‘apache-zookeeper-3.5.6.tar.gz’ saved [3132621/3132621]
Node 3:-
root@znode1:~# wget https://archive.apache.org/dist/zookeeper/zookeeper-3.5.6/apache-zookeeper-3.5.6.tar.gz
--2019-12-31 23:43:53-- https://archive.apache.org/dist/zookeeper/zookeeper-3.5.6/apache-zookeeper-3.5.6.tar.gz
Resolving archive.apache.org (archive.apache.org)... 163.172.17.199
Connecting to archive.apache.org (archive.apache.org)|163.172.17.199|:443... connected.
HTTP request sent, awaiting response... 200 OK
Length: 3132621 (3.0M) [application/x-gzip]
Saving to: ‘apache-zookeeper-3.5.6.tar.gz’

apache-zookeeper-3.5.6.tar.gz 100%[=====================================================================================>] 2.99M 333KB/s in 9.6s

2019-12-31 23:44:03 (318 KB/s) - ‘apache-zookeeper-3.5.6.tar.gz’ saved [3132621/3132621]
Step 4: Create an User
You need to create an user first to run all zookeeper commands.
Node 1:-
root@znode1:~# useradd -m zookeeper
Node 2:-
root@znode2:~# useradd -m zookeeper
Node 3:-
root@znode3:~# useradd -m zookeeper
Step 5: Extract Tar Files
Once downloaded, Go to /home/zookeeper directory and extract tar files in all the 3 nodes.
Node 1:-
root@znode1:~# cd /home/zookeeper/
root@znode1:~#chown zookeeper:zookeeper apache-zookeeper-3.5.6.tar.gz
zookeeper@znode1:~$ tar -xvf apache-zookeeper-3.5.6.tar.gz
Node 2:-
root@znode2:~# cd /home/zookeeper/
root@znode2:~#chown zookeeper:zookeeper apache-zookeeper-3.5.6.tar.gz
zookeeper@znode2:~$ tar -xvf apache-zookeeper-3.5.6.tar.gz
Node 3:-
root@znode3:~# cd /home/zookeeper/
root@znode3:~#chown zookeeper:zookeeper apache-zookeeper-3.5.6.tar.gz
zookeeper@znode3:~$ tar -xvf apache-zookeeper-3.5.6.tar.gz
Step 6: Create Data Directory for Zookeeper Software
Node 1:-
[zookeeper@znode1 zookeeper]#mkdir /var/lib/zookeeper;mkdir /var/log/zookeeper
Node 2:-
[zookeeper@znode2 zookeeper]#mkdir /var/lib/zookeeper;mkdir /var/log/zookeeper
Node 3:-
[zookeeper@znode3 zookeeper]#mkdir /var/lib/zookeeper;mkdir /var/log/zookeeper
Step 7: Create Server Id for Zookeeper Cluster
Here you need to create Server Id for Zookeeper cluster nodes. It could be any number between 1 and 255.
Node 1:-
zookeeper@znode1:/home/zookeeper$ echo '1' > /var/lib/zookeeper/myid
Node 2:-
zookeeper@znode2:/home/zookeeper$ echo '2' > /var/lib/zookeeper/myid
Node 3:-
zookeeper@znode3:/home/zookeeper$ echo '3' > /var/lib/zookeeper/myid
Step 8: Apache Zookeeper Configuration
Node 1:-
You will find zoo_sample.cfg configuration file under conf/ directory. You need to copy this configuration in zoo.cfg and do the necessary changes as given below:-
zookeeper@znode1:/home/zookeeper$ cd /home/zookeeper/apache-zookeeper-3.5.6/conf/
zookeeper@znode1:/home/zookeeper/apache-zookeeper-3.5.6/conf$ cp zoo_sample.cfg zoo.cfg
zookeeper@znode1:/home/zookeeper/apache-zookeeper-3.5.6/conf$vi zoo.cfg

dataDir=/var/lib/zookeeper
server.1=znode1:2888:3888
server.2=znode2:2888:3888
server.3=znode3:2888:3888
You will find another file called log4j.properties under conf/ directory. Here you need to provide the log file path where zookeeper.log will be generated.
zookeeper@znode1:/home/zookeeper/apache-zookeeper-3.5.6/conf$vi log4j.properties

zookeeper.log.dir=/var/log/zookeeper
Node 2:-
In Node 2 also, you need to do the same thing as above.
zookeeper@znode1:/home/zookeeper$ cd /home/zookeeper/apache-zookeeper-3.5.6/conf/
zookeeper@znode1:/home/zookeeper/apache-zookeeper-3.5.6/conf$ cp zoo_sample.cfg zoo.cfg
zookeeper@znode1:/home/zookeeper/apache-zookeeper-3.5.6/conf$cat zoo.cfg

dataDir=/var/lib/zookeeper
server.1=znode1:2888:3888
server.2=znode2:2888:3888
server.3=znode3:2888:3888
Configure log4j.properties here also and point the log file directory to /var/log/zookeeper
zookeeper@znode1:/home/zookeeper/apache-zookeeper-3.5.6/conf$vi log4j.properties

zookeeper.log.dir=/var/log/zookeeper
Node 3:-
Similarly perform the same steps in Node 3 as well.
zookeeper@znode1:/home/zookeeper$ cd /home/zookeeper/apache-zookeeper-3.5.6/conf/
zookeeper@znode1:/home/zookeeper/apache-zookeeper-3.5.6/conf$ cp zoo_sample.cfg zoo.cfg
zookeeper@znode1:/home/zookeeper/apache-zookeeper-3.5.6/conf$cat zoo.cfg

dataDir=/var/lib/zookeeper
server.1=znode1:2888:3888
server.2=znode2:2888:3888
server.3=znode3:2888:3888
Also set the log file directory as set in above nodes.
zookeeper@znode1:/home/zookeeper/apache-zookeeper-3.5.6/conf$vi log4j.properties

zookeeper.log.dir=/var/log/zookeeper
Step 9: Start Apache Zookeeper
Once configuration is completed, let's start the Zookeeper service through zkServer.sh start command.
Node 1:-
[zookeeper@znode1 data]$ /home/zookeeper/apache-zookeeper-3.5.6/bin/zkServer.sh start
/usr/bin/java
ZooKeeper JMX enabled by default
Using config: /home/zookeeper/apache-zookeeper-3.5.6/bin/../conf/zoo.cfg
Starting zookeeper ... STARTED
Node 2:-
[zookeeper@znode2 data]$ /home/zookeeper/apache-zookeeper-3.5.6/bin/zkServer.sh start
/usr/bin/java
ZooKeeper JMX enabled by default
Using config: /home/zookeeper/apache-zookeeper-3.5.6/bin/../conf/zoo.cfg
Starting zookeeper ... STARTED
Node 3:-
[zookeeper@znode3 ~]$ /home/zookeeper/apache-zookeeper-3.5.6/bin/zkServer.sh start
/usr/bin/java
ZooKeeper JMX enabled by default
Using config: /home/zookeeper/apache-zookeeper-3.5.6/bin/../conf/zoo.cfg
Starting zookeeper ... STARTED
Step 10: Verify the configuration
Once you are done through the steps to install Zookeeper, you need to validate your zookeeper configuration in all the 3 nodes. You can verify the Zookeeper configuration by running /home/zookeeper/apache-zookeeper-3.5.6/bin/zkServer.sh start-foreground command. It is very important to verify if Zookeeper Cluster configuration is working as expected or not.
Node 1:-
[zookeeper@znode1 conf]$ /home/zookeeper/apache-zookeeper-3.5.6/bin/zkServer.sh status
/bin/java
ZooKeeper JMX enabled by default
Using config: /home/zookeeper/apache-zookeeper-3.5.6/bin/../conf/zoo.cfg
Mode: follower
Node 2:-
[zookeeper@znode2 conf]$ /home/zookeeper/apache-zookeeper-3.5.6/bin/zkServer.sh status
/bin/java
ZooKeeper JMX enabled by default
Using config: /home/zookeeper/apache-zookeeper-3.5.6/bin/../conf/zoo.cfg
Mode: leader
Node 3:-
[zookeeper@znode3 conf]$ /home/zookeeper/apache-zookeeper-3.5.6/bin/zkServer.sh status
/bin/java
ZooKeeper JMX enabled by default
Using config: /home/zookeeper/apache-zookeeper-3.5.6/bin/../conf/zoo.cfg
Mode: follower
References: How to disable Transparent Huge Page