Table of Contents
You might have faced a situation where you need to deploy a container to multiple GCP Projects from a Central Source Repository and host with Cloud Run using Cloud Build Script. While you might have done a deployment using Google Cloud Services in a Project but when it comes to deployment into multiple projects then you need to take care of few things otherwise you end up in getting lot of permission and other errors. This tutorial will be helpful for anyone who is trying to deploy a service in Cloud Run for the very first time. It will also help those professionals who is trying to deploy the service but end up in getting multiple build errors.
Deploy a Container to Multiple GCP Projects and Host with Cloud Run
Also Read: What are the differences between Container Registry and Artifact Registry
Step 1: Prerequisites
a) You should have a valid Google Email ID and Password.
b) Cloud Build API should be enabled.
c) We are using two different projects here: sample-project-308612(Central Repo) and another-sample-project-311309(Cloud Run Deployment).
d) You should have access to create repo in Source Repositories.
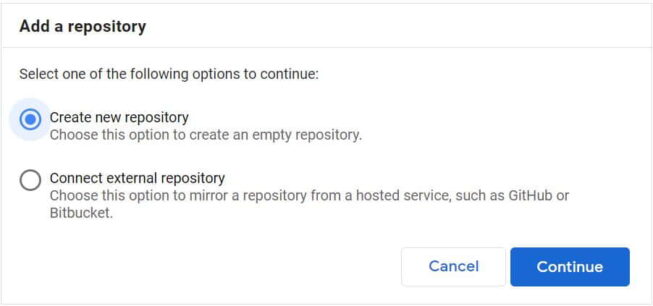
Step 2: Create Repo in Source Repositories
First you need to a create a repo in Google Source Repositories(GSR) to keep all your Project files. Here we are creating a repo called sample-project-repo from GSR as shown below. If you have any repo already available then you can use that as well.
Step 3: Create requirements.txt file
Next is to create a requirements.txt file and specify all the dependencies which are needed to build the docker image. For example, here we need gunicorn version 20.0.4, pandas version 1.1.1, flask version 1.1.2 and flash-api version 2.0.
cyberithub@cloudshell:~/sample-project-repo (sample-project-308612)$ vi requirements.txt
pandas==1.1.1
gunicorn==20.0.4
flask==1.1.2
flask-api==2.0
Step 4: Create Your Dockerfile
We are going to use below dockerfile for our example. In this file, we are using python version 3.6 as the base image. We are specifying /app as our working directory and then copying all the files using COPY instruction. In the next instruction, we are installing all the required dependencies from requirements.txt using pip command. Finally, we are running python based gunicorn web server on default port $PORT.
cyberithub@cloudshell:~/sample-project-repo (sample-project-308612)$ vi Dockerfile
FROM python:3.6-slim-buster

WORKDIR /app
COPY . .

RUN pip install -r requirements.txt

CMD exec gunicorn --bind :$PORT --workers 1 --threads 8 --timeout 0 app:app
Step 5: Create Cloudbuild.yaml Script
In the below script we are cloning repository first from sample-project-308612, then building the docker image and pushing it to GCR under another-sample-project-311309 project. Once image is pushed, we need to change the Project ID to the target project where we want to deploy the service and then deploy using gcloud utility.
cyberithub@cloudshell:~/sample-project-repo (sample-project-308612)$ vi cloudbuild.yaml
steps:
- name: 'gcr.io/cloud-builders/git'
args: ['clone','https://source.developers.google.com/p/${_PROJECT}/r/${_REPO_NAME}']

- name: 'gcr.io/cloud-builders/docker'
args: ['build','-t','gcr.io/${_ANPROJECT}/${_CONTAINERNAME}/${_VERSION}','.']

- name: 'gcr.io/cloud-builders/docker'
args: ['push','gcr.io/${_ANPROJECT}/${_CONTAINERNAME}/${_VERSION}']

- name: 'gcr.io/cloud-builders/gcloud'
args: ['config','set','project','${_ANPROJECT}']

- name: 'gcr.io/cloud-builders/gcloud'
args: ['run','deploy','demo-service','--image','gcr.io/${_ANPROJECT}/${_CONTAINERNAME}/${_VERSION}','--region','us-east1','--platform','managed']
images:
- 'gcr.io/${_ANPROJECT}/${_CONTAINERNAME}/${_VERSION}'

substitutions:
_PROJECT: sample-project-308612
_ANPROJECT: another-sample-project-311309
_REPO_NAME: sample-project-repo
_CONTAINERNAME: sample-container
_VERSION: '1.1'
Step 6: Provide Deployment Permission
When you are using a central project to run a single Cloud Build trigger that will build, push built container image in the project and deploy to Cloud Run services in other projects, then you need to provide below permissions.
In order for the Cloud Build trigger to be allowed to deploy to Cloud Run in other projects, you need to follow below instructions to grant the Cloud Build service agent the appropriate permission on the other projects. More on Google Cloud Official documentation.
- Go to the Service accounts page of the Google Cloud Console:
- Go to Service accounts.
- Select the Runtime Service Account of your Cloud Run (fully managed) service (By default it is
PROJECT_NUMBER-compute@developer.gserviceaccount.com). - Click Show Info Panel in the top right corner to show the Permissions tab.
- Click the Add member button.
- Enter the Cloud Build Service Account (
PROJECT_NUMBER@cloudbuild.gserviceaccount.com) - In the Select a role dropdown, select the
Service Accounts>Service Account User role. - Click Save.
In order for Cloud Run to be able to import images from the central project, make sure you follow below instructions for each Service agent of each project. More on Google Cloud Official documentation.
- In the Cloud Console, open the project for your Cloud Run service.
- Go to the
IAMpage. - Check the checkbox labelled Include Google-provided role grants.
- Copy the email of the Cloud Run service agent. It has the suffix
@serverless-robot-prod.iam.gserviceaccount.com. - Open the project that owns the container registry you want to use.
- Go to the IAM page.
- Click Add to add a new member.
- In the New members text box, paste in the email of the service account that you copied earlier.
- In the Select a role dropdown list, if you are using Container Registry, select the role
Storage->Storage Object Viewer. If you are using Artifact Registry, select the roleArtifact Registry->Artifact Registry Reader. - Deploy the container image to the project that contains your Cloud Run service.
Step 7: Cloud Run Deployment
So now we are going to commit all our files under sample-project-308612 project and the Cloud run deployment is going to happen under another-sample-project-311309 project.
cyberithub@cloudshell:~ (sample-project-308612)$ cd sample-project-repo/
cyberithub@cloudshell:~/sample-project-repo (sample-project-308612)$ ls
cloudbuild.yaml  Dockerfile  requirements.txt
Once we have all our project files created, we need to add these files to our sample-project-repo. To add all these files to your local git dev branch, you need to use git add . command and then commit all the changes using git commit -m "Cloud Run Deployment" command. Finally to push all the changes into your remote dev branch, you need to use git push -u origin dev command.
NOTE:
dev branch which we created before hand using git checkout -b dev command.cyberithub@cloudshell:~/sample-project-repo (sample-project-308612)$ git add . cyberithub@cloudshell:~/sample-project-repo (sample-project-308612)$ git commit -m "Cloud Run Deployment" [dev 1ac345e] Cloud Run Deployment 1 file changed, 1 insertion(+), 1 deletion(-) cyberithub@cloudshell:~/sample-project-repo (sample-project-308612)$ git push -u origin dev Enumerating objects: 5, done. Counting objects: 100% (5/5), done. Delta compression using up to 4 threads Compressing objects: 100% (3/3), done. Writing objects: 100% (3/3), 292 bytes | 292.00 KiB/s, done. Total 3 (delta 2), reused 0 (delta 0) remote: Resolving deltas: 100% (2/2) To https://source.developers.google.com/p/sample-project-308612/r/sample-project-repo e627282..1ac345e dev -> dev Branch 'dev' set up to track remote branch 'dev' from 'origin'.
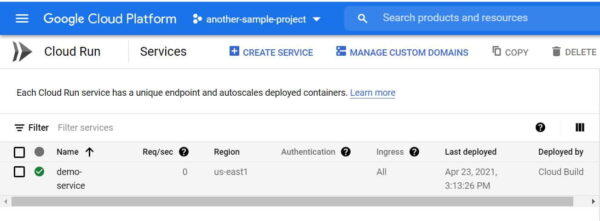
After successful deployment if you now go to another-sample-project and check the service deployment then you can see that a service called demo-service has been deployed successfully by Cloud Build.