Table of Contents
In this tutorial, we are going to look into a self hosted Server Monitoring Tool on Linux called Uptime Kuma. Uptime Kuma is a free and open source self-hosted server and website monitoring tool aimed to offer a self-hosting alternative to "Uptime Robot" project. Uptime Robot is known to be one of the best monitoring service available today but it's not a self-hosted service so developers thought to replace it with a self-hosting service called Uptime Kuma. This also provides a lot more monitoring features than Uptime Robot. It is easy to install in any of the Linux distributions. We will see the steps to install in below section.
Important Features
- It provides control over your data
- It saves lot of time and effort
- It is easy to use
- It provides much more configurable option than any other monitoring tool
- It is known to be self-sufficient
- It allows you to monitor services internally in your private network
Uptime Kuma: Self-Hosted Server Monitoring tool on Linux
Also Read: How to Install Issabel on CentOS 7 Using 6 Easy Steps
Step 1: Prerequisites
a) You should have a running Linux Server.
b) You should have a sudo or root access to run privileged commands.
c) You should have npm and docker installed in your Server.
Step 2: Update Your Server
Before proceeding further, it is important to update the system packages to the latest version using sudo apt update && sudo apt upgrade command as shown below.
cyberithub@ubuntu:~$ sudo apt update && sudo apt upgrade
Hit:1 https://brave-browser-apt-release.s3.brave.com stable InRelease
Hit:2 https://download.docker.com/linux/ubuntu focal InRelease
Hit:3 https://dl.winehq.org/wine-builds/ubuntu focal InRelease
Hit:4 https://dl.google.com/linux/chrome/deb stable InRelease
Err:1 https://brave-browser-apt-release.s3.brave.com stable InRelease
The following signatures couldn't be verified because the public key is not available: NO_PUBKEY A8580BDC82D3DC6C
Hit:5 http://deb.anydesk.com all InRelease
Hit:6 http://in.archive.ubuntu.com/ubuntu focal InRelease
Hit:7 http://ppa.launchpad.net/ubuntu-toolchain-r/test/ubuntu focal InRelease
Hit:8 https://repo.nordvpn.com//deb/nordvpn/debian stable InRelease
Ign:9 https://storage.googleapis.com/download.dartlang.org/linux/debian stable InRelease
Get:10 http://security.ubuntu.com/ubuntu focal-security InRelease [114 kB]
Get:11 http://in.archive.ubuntu.com/ubuntu focal-updates InRelease [114 kB]
Hit:12 http://ppa.launchpad.net/wireshark-dev/stable/ubuntu focal InRelease
Hit:13 https://storage.googleapis.com/download.dartlang.org/linux/debian stable Release
Hit:15 https://apt.boltops.com stable InRelease
Get:16 http://in.archive.ubuntu.com/ubuntu focal-backports InRelease [108 kB]
Fetched 336 kB in 1s (226 kB/s)
Reading package lists... Done
Building dependency tree
Reading state information... Done
Step 3: Install Uptime Kuma
You can use multiple ways to install Uptime Kuma Server monitoring tool on Linux depending on your requirements and tools availability.
a) Using NodeJS
You need to first update your npm using sudo npm install npm -g command as shown below.
cyberithub@ubuntu:~$ sudo npm install npm -g
[sudo] password for cyberithub:

removed 13 packages, changed 74 packages, and audited 223 packages in 3s

14 packages are looking for funding
run `npm fund` for details

found 0 vulnerabilities
Then clone the package uptime kuma from GitHub using below git clone command.
cyberithub@ubuntu:~$ git clone https://github.com/louislam/uptime-kuma.git
Cloning into 'uptime-kuma'...
remote: Enumerating objects: 19267, done.
remote: Counting objects: 100% (19267/19267), done.
remote: Compressing objects: 100% (4795/4795), done.
remote: Total 19267 (delta 14359), reused 19061 (delta 14246), pack-reused 0
Receiving objects: 100% (19267/19267), 13.07 MiB | 4.09 MiB/s, done.
Resolving deltas: 100% (14359/14359), done.
Switch to uptime-kuma directory using cd uptime-kuma command.
cyberithub@ubuntu:~$ cd uptime-kuma
Then run the setup using npm run setup command as shown below.
cyberithub@ubuntu:~/uptime-kuma$ npm run setup

> uptime-kuma@1.19.0-beta.0 setup
> git checkout 1.18.5 && npm ci --production && npm run download-dist

Note: switching to '1.18.5'.

You are in 'detached HEAD' state. You can look around, make experimental
changes and commit them, and you can discard any commits you make in this
state without impacting any branches by switching back to a branch.

If you want to create a new branch to retain commits you create, you may
do so (now or later) by using -c with the switch command. Example:

git switch -c <new-branch-name>

Or undo this operation with:

git switch -

Turn off this advice by setting config variable advice.detachedHead to false

HEAD is now at 2ee83788 Update to 1.18.5
npm WARN config production Use `--omit=dev` instead.
[#########.........] | reify:@azure/abort-controller: sill audit bulk request {
........................................................
Finally run the server using node server/server.js command as shown below.
cyberithub@ubuntu:~/uptime-kuma$ node server/server.js
Welcome to Uptime Kuma
Your Node.js version: 18
2022-11-12T07:32:51.817Z [SERVER] INFO: Welcome to Uptime Kuma
2022-11-12T07:32:51.818Z [SERVER] INFO: Node Env: production
2022-11-12T07:32:51.819Z [SERVER] INFO: Importing Node libraries
2022-11-12T07:32:51.820Z [SERVER] INFO: Importing 3rd-party libraries
2022-11-12T07:33:00.092Z [SERVER] INFO: Creating express and socket.io instance
2022-11-12T07:33:00.094Z [SERVER] INFO: Server Type: HTTP
2022-11-12T07:33:00.096Z [SERVER] INFO: Importing this project modules
2022-11-12T07:33:01.454Z [NOTIFICATION] INFO: Prepare Notification Providers
2022-11-12T07:33:02.975Z [SERVER] INFO: Version: 1.18.5
2022-11-12T07:33:03.985Z [DB] INFO: Data Dir: ./data/
2022-11-12T07:33:03.986Z [SERVER] INFO: Copying Database
2022-11-12T07:33:04.012Z [SERVER] INFO: Connecting to the Database
......................................................
Another option which is also the recommended one to install uptime kuma is through pm2 Node.js application. In this option, first you need to install pm2 on Linux using sudo npm install pm2 -g && pm2 install pm2-logrotate command as shown below.
cyberithub@ubuntu:~/uptime-kuma$ sudo npm install pm2 -g && pm2 install pm2-logrotate
[sudo] password for cyberithub:
npm WARN deprecated uuid@3.4.0: Please upgrade to version 7 or higher. Older versions may use Math.random() in certain circumstances, which is known to be problematic. See https://v8.dev/blog/math-random for details.

added 184 packages in 13s

12 packages are looking for funding
run `npm fund` for details

-------------

__/\\\\\\\\\\\\\____/\\\\____________/\\\\____/\\\\\\\\\_____
 _\/\\\/////////\\\_\/\\\\\\________/\\\\\\__/\\\///////\\\___
  _\/\\\_______\/\\\_\/\\\//\\\____/\\\//\\\_\///______\//\\\__
   _\/\\\\\\\\\\\\\/__\/\\\\///\\\/\\\/_\/\\\___________/\\\/___
    _\/\\\/////////____\/\\\__\///\\\/___\/\\\________/\\\//_____
     _\/\\\_____________\/\\\____\///_____\/\\\_____/\\\//________
      _\/\\\_____________\/\\\_____________\/\\\___/\\\/___________
       _\/\\\_____________\/\\\_____________\/\\\__/\\\\\\\\\\\\\\\_
        _\///______________\///______________\///__\///////////////__


Runtime Edition

PM2 is a Production Process Manager for Node.js applications
with a built-in Load Balancer.

Start and Daemonize any application:
$ pm2 start app.js

Load Balance 4 instances of api.js:
$ pm2 start api.js -i 4

Monitor in production:
$ pm2 monitor

Make pm2 auto-boot at server restart:
$ pm2 startup

To go further checkout:
http://pm2.io/


-------------

[PM2] Spawning PM2 daemon with pm2_home=/home/cyberithub/.pm2
[PM2] PM2 Successfully daemonized
[PM2][Module] Installing NPM pm2-logrotate module
[PM2][Module] Calling [NPM] to install pm2-logrotate ...

added 213 packages in 21s

18 packages are looking for funding
run `npm fund` for details
[PM2][Module] Module downloaded
[PM2][WARN] Applications pm2-logrotate not running, starting...
[PM2] App [pm2-logrotate] launched (1 instances)
Module: pm2-logrotate
$ pm2 set pm2-logrotate:max_size 10M
$ pm2 set pm2-logrotate:retain 30
$ pm2 set pm2-logrotate:compress false
$ pm2 set pm2-logrotate:dateFormat YYYY-MM-DD_HH-mm-ss
$ pm2 set pm2-logrotate:workerInterval 30
$ pm2 set pm2-logrotate:rotateInterval 0 0 * * *
$ pm2 set pm2-logrotate:rotateModule true
Modules configuration. Copy/Paste line to edit values.
[PM2][Module] Module successfully installed and launched
[PM2][Module] Checkout module options: `$ pm2 conf`
┌─────┬──────────────────┬─────────────┬─────────┬─────────┬──────────┬────────┬──────┬───────────┬──────────┬──────────┬──────────┬──────────┐
│ id  │ name             │ namespace   │version  │   mode  │   pid    │ uptime │ ↺   │status     │ cpu       │ mem      │ user     │ watching │
└─────┴──────────────────┴─────────────┴─────────┴─────────┴──────────┴────────┴──────┴───────────┴──────────┴──────────┴──────────┴──────────┘
Module
┌────┬──────────────────────────────┬───────────────┬──────────┬──────────┬──────┬──────────┬──────────┬──────────┐
│ id │ module                       │ version       │ pid      │ status   │ ↺    │ cpu      │ mem      │ user     │
├────┼──────────────────────────────┼───────────────┼──────────┼──────────┼──────┼──────────┼──────────┼──────────┤
│  0 │ pm2-logrotate                │ 2.7.0         │ 4439     │ online   │ 0    │ 0%       │ 64.1mb   │ cyb…     │
└────┴──────────────────────────────┴───────────────┴──────────┴──────────┴──────┴──────────┴──────────┴──────────┘
Then start the server by using pm2 start server/server.js --name uptime-kuma command as shown below.
cyberithub@ubuntu:~/uptime-kuma$ pm2 start server/server.js --name uptime-kuma
[PM2] Starting /home/cyberithub/uptime-kuma/server/server.js in fork_mode (1 instance)
[PM2] Done.
┌─────┬──────────────────┬─────────────┬─────────┬─────────┬──────────┬────────┬──────┬───────────┬──────────┬──────────┬──────────┬──────────┐
│ id  │ name             │ namespace   │ version │ mode    │ pid      │ uptime │ ↺    │ status    │ cpu      │ mem      │ user     │ watching │
├─────┼──────────────────┼─────────────┼─────────┼─────────┼──────────┼────────┼──────┼───────────┼──────────┼──────────┼──────────┼──────────┤
│ 1   │ uptime-kuma      │ default     │ 1.18.5  │ fork    │ 4683     │ 0s     │ 0    │ online    │ 0%       │ 43.6mb   │ cyb…     │ disabled │
└─────┴──────────────────┴─────────────┴─────────┴─────────┴──────────┴────────┴──────┴───────────┴──────────┴──────────┴──────────┴──────────┘
Module
┌────┬──────────────────────────────┬───────────────┬──────────┬──────────┬──────┬──────────┬──────────┬──────────┐
│ id │ module                       │ version       │ pid      │ status   │ ↺    │ cpu     │  mem      │ user     │
├────┼──────────────────────────────┼───────────────┼──────────┼──────────┼──────┼──────────┼──────────┼──────────┤
│  0 │ pm2-logrotate                │ 2.7.0         │ 4439     │ online   │ 0    │ 0%       │ 64.1mb   │ cyb…     │
└────┴──────────────────────────────┴───────────────┴──────────┴──────────┴──────┴──────────┴──────────┴──────────┘
b) Using Docker
Another best option you have is to run the application as a docker container by using below docker command.
cyberithub@ubuntu:~$ sudo docker run -d --restart=always -p 3001:3001 -v uptime-kuma:/app/data --name uptime-kuma louislam/uptime-kuma:1
[sudo] password for cyberithub:
Unable to find image 'louislam/uptime-kuma:1' locally
1: Pulling from louislam/uptime-kuma
4b7b4a8876e2: Already exists
e05e9bb59438: Pull complete
911c1003bc81: Pull complete
00d25b468f79: Pull complete
acbb79e9e26e: Pull complete
846ef4780c5d: Pull complete
d4ca0209da08: Pull complete
a1370fa12225: Pull complete
5c67314e6b08: Pull complete
fcd07c4be961: Pull complete
Digest: sha256:a84767d7934f833010b886f3dfc57b9d23ca69e85e48f378b28b5c25c5043e1d
Status: Downloaded newer image for louislam/uptime-kuma:1
79199132bebf60228029a7899cba0afcbc937ec142baec3bb9f335f1d54ba263
Then check the container running status by using sudo docker ps -a command as shown below.
cyberithub@ubuntu:~$ sudo docker ps -a
CONTAINER ID IMAGE                  COMMAND                CREATED       STATUS                      PORTS                   NAMES
79199132bebf louislam/uptime-kuma:1 "/usr/bin/dumb-init …" 2 minutes ago Up About a minute (healthy) 0.0.0.0:3001->3001/tcp, :::3001->3001/tcp uptime-kuma
Step 4: Launch Uptime Kuma
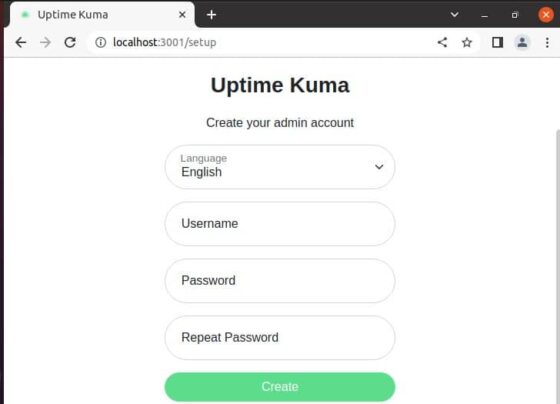
Go to your favorite web browser and open URL https://localhost:3001. First time when you access, it will redirect you to below page where it will ask you to create your admin account.
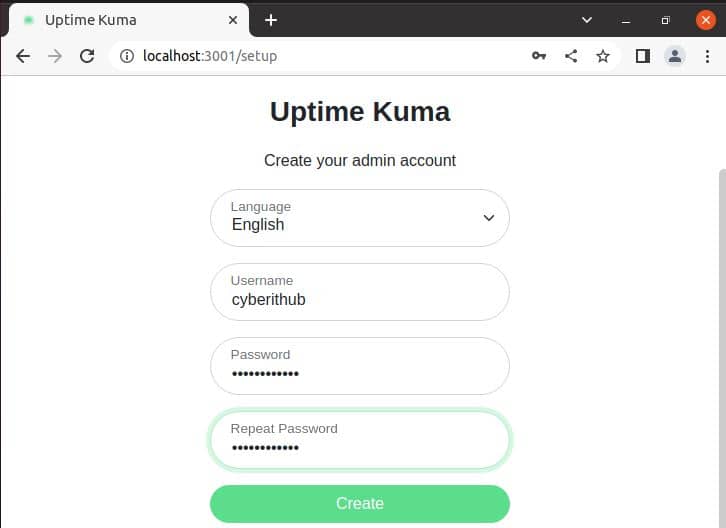
You can create the account by providing username and password as shown below.
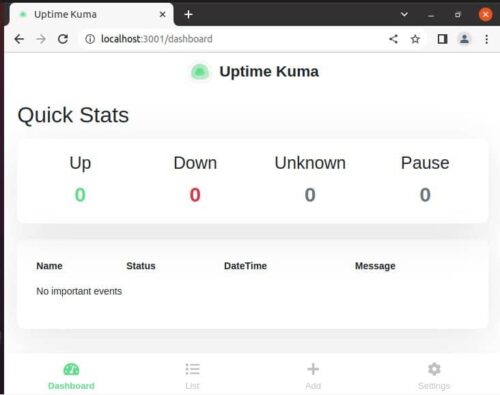
Once clicked on Create, you will be redirected to below Uptime Kuma Dashboard. This confirms successful installation and setup of Uptime Kuma server monitoring tool.