
Table of Contents
In this article, we will look into how to setup and use Atlantis for Terraform Pull Request Automation in Linux. According to Official website, Atlantis is an advanced application for automating Terraform via pull requests. It is deployed as a standalone application into your infrastructure. It is so secure that no third-party will be able to access your credentials.
Atlantis listens for all the popular version control like GitHub, GitLab or Bitbucket webhooks about Terraform pull requests. It then runs terraform plan and comments with the output back on the pull request. Then if you want to apply the changes then you can comment atlantis apply on the pull request and Atlantis will run terraform apply and comment back with the output. We will go through an example to understand the concept further in below section.
How to Setup and Use Atlantis for Terraform Pull Request Automation
Also Read: How to Install and Use Snapd on RHEL/CentOS 7/8 Using 10 Easy Steps
Step 1: Prerequisites
a) You should have a running Linux Server.
b) You should have wget or curl and unzip utility installed in your Server.
c) You should have sudo or root access to run privileged commands in your Server.
Step 2: Update Your Server
Before installing a new package, it is always a good idea to check for any latest available updates by using yum update or dnf update command. If any of the packages needs upgradation then you can run yum upgrade or dnf upgrade to upgrade the packages.
[root@cyberithub ~]# yum update
Loaded plugins: fastestmirror, langpacks
Loading mirror speeds from cached hostfile
* base: centos-hcm.viettelidc.com.vn
* extras: centos-hcm.viettelidc.com.vn
* updates: centos-hcm.viettelidc.com.vn
Resolving Dependencies
--> Running transaction check
---> Package bind-export-libs.x86_64 32:9.11.4-26.P2.el7_9.8 will be updated
---> Package bind-export-libs.x86_64 32:9.11.4-26.P2.el7_9.9 will be an update
---> Package bind-libs.x86_64 32:9.11.4-26.P2.el7_9.8 will be updated
---> Package bind-libs.x86_64 32:9.11.4-26.P2.el7_9.9 will be an update
---> Package bind-libs-lite.x86_64 32:9.11.4-26.P2.el7_9.8 will be updated
---> Package bind-libs-lite.x86_64 32:9.11.4-26.P2.el7_9.9 will be an update
........................
Step 3: Install Terraform
To install terraform from Hashicorp repo, you need to follow below steps.
a) Install yum-config-manager
First you need to install yum-config-manager using yum install -y yum-utils command. Since I already have the latest version installed so it does not look for any further updates.
[root@cyberithub ~]# yum install -y yum-utils
Loaded plugins: fastestmirror, langpacks
Loading mirror speeds from cached hostfile
* base: centos-hcm.viettelidc.com.vn
* extras: centos-hcm.viettelidc.com.vn
* updates: centos-hcm.viettelidc.com.vn
Package yum-utils-1.1.31-54.el7_8.noarch already installed and latest version
Nothing to do
b) Add Hashicorp Repo
Next step is to add the Hashicorp repo using below yum-config-manager command.
[root@cyberithub ~]# yum-config-manager --add-repo https://rpm.releases.hashicorp.com/RHEL/hashicorp.repo
Loaded plugins: fastestmirror, langpacks
adding repo from: https://rpm.releases.hashicorp.com/RHEL/hashicorp.repo
grabbing file https://rpm.releases.hashicorp.com/RHEL/hashicorp.repo to /etc/yum.repos.d/hashicorp.repo
repo saved to /etc/yum.repos.d/hashicorp.repo
c) Install Terraform
Then install terraform from the recently added repo using yum -y install terraform command as shown below.
[root@cyberithub ~]# yum -y install terraform
Loaded plugins: fastestmirror, langpacks
Loading mirror speeds from cached hostfile
* base: centos-hcm.viettelidc.com.vn
* extras: centos-hcm.viettelidc.com.vn
* updates: centos-hcm.viettelidc.com.vn
Resolving Dependencies
--> Running transaction check
---> Package terraform.x86_64 0:1.1.7-1 will be installed
--> Finished Dependency Resolution

Dependencies Resolved

=============================================================================================================================================================
Package Arch Version Repository Size
=============================================================================================================================================================
Installing:
terraform x86_64 1.1.7-1 hashicorp 12 M

Transaction Summary
=============================================================================================================================================================
Install 1 Package

Total download size: 12 M
Installed size: 60 M
Downloading packages:
warning: /var/cache/yum/x86_64/7/hashicorp/packages/terraform-1.1.7-1.x86_64.rpm: Header V4 RSA/SHA512 Signature, key ID a3219f7b: NOKEY 10 MB 00:00:00 ETA
Public key for terraform-1.1.7-1.x86_64.rpm is not installed
terraform-1.1.7-1.x86_64.rpm | 12 MB 00:00:07
Retrieving key from https://rpm.releases.hashicorp.com/gpg
Importing GPG key 0xA3219F7B:
Userid : "HashiCorp Security (HashiCorp Package Signing) <security+packaging@hashicorp.com>"
Fingerprint: e8a0 32e0 94d8 eb4e a189 d270 da41 8c88 a321 9f7b
From : https://rpm.releases.hashicorp.com/gpg
Running transaction check
Running transaction test
Transaction test succeeded
Running transaction
Installing : terraform-1.1.7-1.x86_64 1/1
Verifying : terraform-1.1.7-1.x86_64 1/1

Installed:
terraform.x86_64 0:1.1.7-1

Complete!
Step 4: Install Ngrok
Atlantis needs Ngrok to be installed in the System. It is available as snap package in Snap store so to install this snap we can use snap install ngrok command as shown below.
[root@cyberithub ~]# snap install ngrok
2022-03-16T02:48:14-04:00 INFO Waiting for automatic snapd restart...
ngrok 2.3.40 from Kyle Wenholz (kyle-ngrok) installed
Step 5: Install Git
Atlantis need git utility to clone the repo hence we can install this utility by using yum install git command as shown below.
[root@cyberithub ~]# yum install git
Loaded plugins: fastestmirror, langpacks
Loading mirror speeds from cached hostfile
* base: centos-hcm.viettelidc.com.vn
* epel: mirrors.thzhost.com
* extras: centos-hcm.viettelidc.com.vn
* updates: centos-hcm.viettelidc.com.vn
Resolving Dependencies
--> Running transaction check
---> Package git.x86_64 0:1.8.3.1-23.el7_8 will be installed
--> Processing Dependency: perl-Git = 1.8.3.1-23.el7_8 for package: git-1.8.3.1-23.el7_8.x86_64
--> Processing Dependency: perl(Term::ReadKey) for package: git-1.8.3.1-23.el7_8.x86_64
--> Processing Dependency: perl(Git) for package: git-1.8.3.1-23.el7_8.x86_64
--> Processing Dependency: perl(Error) for package: git-1.8.3.1-23.el7_8.x86_64
--> Running transaction check
---> Package perl-Error.noarch 1:0.17020-2.el7 will be installed
---> Package perl-Git.noarch 0:1.8.3.1-23.el7_8 will be installed
---> Package perl-TermReadKey.x86_64 0:2.30-20.el7 will be installed
--> Finished Dependency Resolution
.....................................
Step 6: Download Atlantis
You can go to GitHub website and download the latest atlantis version by using any file transfer tool like wget as shown below. It will download the zip package in the current local directory.
[root@cyberithub ~]# wget -q https://github.com/runatlantis/atlantis/releases/download/v0.19.2/atlantis_linux_amd64.zip
[root@cyberithub ~]# ls -lrt atlantis_linux_amd64.zip
-rw-r--r--. 1 root root 8776711 Mar 11 08:55 atlantis_linux_amd64.zip
Step 7: Unzip Package
Next step is to extract the package by using unzip utility as shown below. You can either extract to current location or to some specific directory.
[root@cyberithub ~]# unzip atlantis_linux_amd64.zip
Archive: atlantis_linux_amd64.zip
inflating: atlantis
Step 8: Copy Binary File
You can either copy the binary file to some standard binary location which is visible to the System or you can just put it into some directory and export to make it visible across the System. Here we are just copying the binary file to /usr/bin/ directory.
[root@cyberithub ~]# cp atlantis /usr/bin/
Step 9: Check Version
You can check the working of atlantis binary utility by using atlantis version command as shown below.
[root@cyberithub ~]# atlantis version
atlantis 0.19.2
Step 10: Generate Token
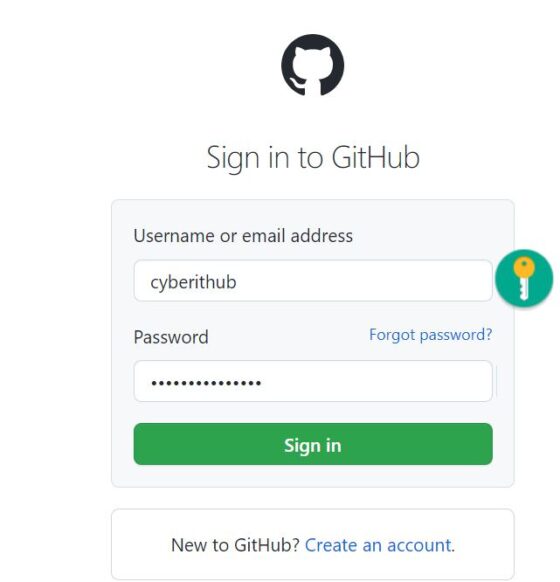
a) Login to GitHub
You need to open GitHub Sign In Page and login using your Username or email address and Password as shown below. If you don't have any GitHub account then you can first Create an account and then login.
b) Go to Settings
Once logged in, you can go to top right corner and open Settings from there as highlighted below.

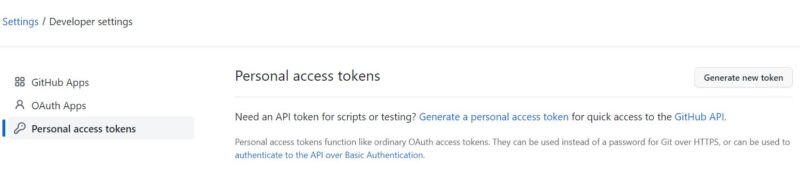
c) Go to Developer settings -> Personal Access Tokens
In the settings, you can find Developer settings on the left side column. Click on it and then you will see below option where you need to click on Personal access tokens. You will see an option to Generate new token. Click on it to fill the details.
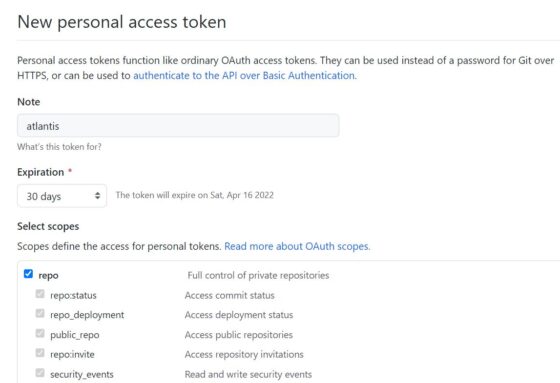
d) Generate new token
Here you can provide Note as atlantis and select scopes for repo only. You can also change the Expiration date of your token but as of now I will leave it as default and then click on Generate Token. After this, you will see a token generated which you need to copy and keep it handy to use in next step.
Step 11: Setup Atlantis
Now we need to setup Atlantis on a test repo so that we can try it out. For that you just need to run atlantis testdrive command as shown below. It will first ask you provide github.com username which is cyberithub in our case. You can provide your account username here. Then Press Enter to proceed.
Next it will ask you to provide GitHub Access Token to fork a new project for you. Here you can paste the token which you have copied in the previous step. Remember that token will remain hidden so you won't be able to see the pasted items. Then Press Enter to proceed and now wait till a pull request is created in GitHub and Atlantis shows in running state as shown below.
[root@cyberithub ~]# atlantis testdrive
Welcome to Atlantis testdrive!

This mode sets up Atlantis on a test repo so you can try it out. We will
- fork an example terraform project to your username
- install terraform (if not already in your PATH)
- install ngrok so we can expose Atlantis to GitHub
- start Atlantis

Press Ctrl-c at any time to exit

github.com username: cyberithub

To continue, we need you to create a GitHub personal access token
with "repo" scope so we can fork an example terraform project.

Follow these instructions to create a token (we don't store any tokens):
https://help.github.com/articles/creating-a-personal-access-token-for-the-command-line/#creating-a-token
- use "atlantis" for the token description
- add "repo" scope
- copy the access token

GitHub access token (will be hidden):
=> forking repo
=> fork completed!
=> terraform found in $PATH!
=> downloading ngrok
=> downloaded ngrok successfully!
=> creating secure tunnel
=> started tunnel!
=> starting atlantis server
⠹ => atlantis server is now securely exposed at https://1106-49-37-74-25.ngrok.io

=> creating atlantis webhook => atlantis webhook created!
=> creating a new pull request
=> pull request created!
=> opening pull request
atlantis is running
[press Ctrl-c to exit]
⠇
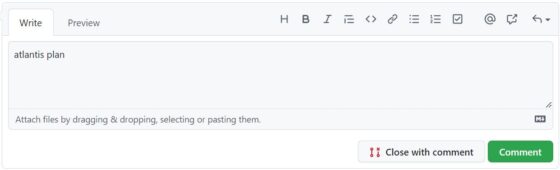
Step 12: Run atlantis plan
You can now come back to your GitHub account and see there is an example project created for you along with a pull request. You can go to that Project and click on Conversation. Here you can come on bottom and write atlantis plan in the comment section and then click on Comment. This will start running terraform plan on the background.
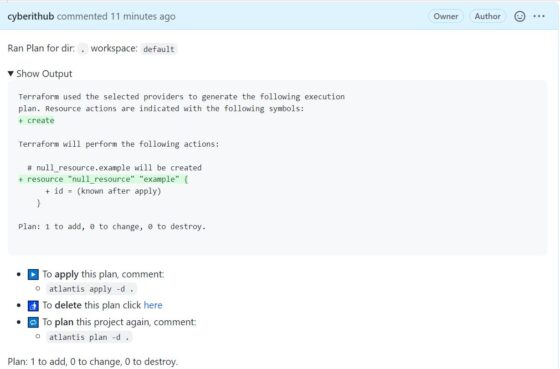
Once successful, it will show you output like below where it will show you the resources plan which is going to get created after applying this plan.
Step 13: Run atlantis apply
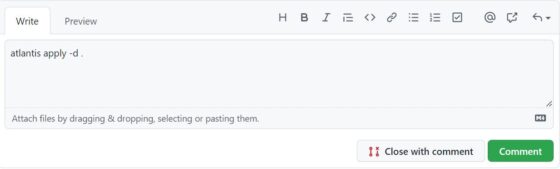
To apply the plan shown in the previous step, you can run atlantis apply -d . in the comment box section as shown below and then Click on Comment. This will start creating the resources based on the plan on the background.
Once it is completed, it will show you the output like below.
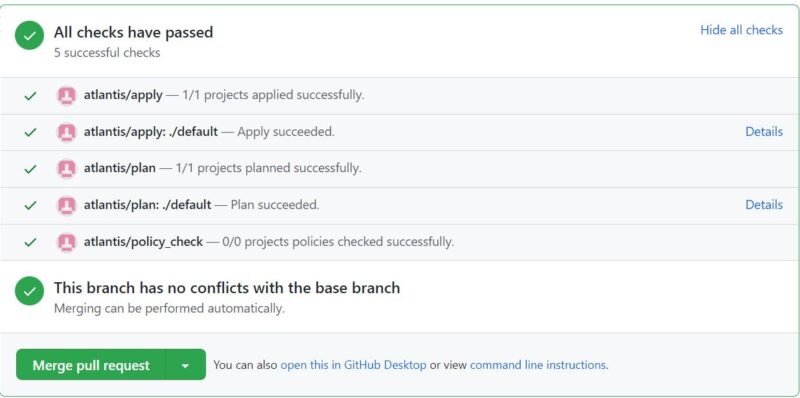
Step 14: Merge Pull Request
Now you can merge the pull request as shown below. Then you can also delete the example branch if you would like to.
