Table of Contents
In this article, I will take you through the steps to install Hashicorp vault on Ubuntu 20.04 LTS but before that let me ask you a question - Do you think Security is an important aspect when you shift your Infrastructure from on-premise environment to a Dynamic Environment ? To me, it is an utmost important thing to worry about. But don't worry, here comes the Hashicorp Vault for our rescue. Hashicorp Vault is used to secure, store and tightly control access to tokens, passwords, certificates, encryption keys for protecting secrets and other sensitive data using a UI, CLI, or HTTP API. We will see the steps to install this application on Ubuntu 20.04 LTS in below section. More about Hashicorp Vault.

How to Install Hashicorp Vault on Ubuntu 20.04 LTS
Also Read: 23 Practical gpg Command Examples to Manage Your Keys in Linux
Step 1: Prerequisites
a) You should have a running Ubuntu 20.04 LTS Server.
b) You should have sudo or root access to run privileged commands.
c) You should have apt or apt-get utility installed in your Server.
d) You should also have curl, apt-key and apt-add-repository utility installed in your Server.
Step 2: Add GPG Key
First you need to add the Hashicorp GPG Key using curl -fsSL https://apt.releases.hashicorp.com/gpg | sudo apt-key add - command as shown below.
NOTE:
root user to run all the below commands. You can use any user with sudo access to run all these commands. For more information Please check Step by Step: How to Add User to Sudoers to provide sudo access to the User.root@localhost:~# curl -fsSL https://apt.releases.hashicorp.com/gpg | sudo apt-key add -
OK
Step 3: Add Repository
To download the vault package from the Hashicorp repository, you need to first add this repository to /etc/apt/sources.list file. This can be done by using an utility called apt-add-repository. You can run below command to add the Repository information.
root@localhost:~# apt-add-repository "deb [arch=amd64] https://apt.releases.hashicorp.com $(lsb_release -cs) main"
Hit:1 http://in.archive.ubuntu.com/ubuntu focal InRelease
Get:2 http://in.archive.ubuntu.com/ubuntu focal-updates InRelease [114 kB]
Get:3 https://packages.microsoft.com/repos/edge stable InRelease [7,343 B]
Get:4 https://apt.releases.hashicorp.com focal InRelease [4,419 B]
Get:5 http://in.archive.ubuntu.com/ubuntu focal-backports InRelease [101 kB]
Get:6 http://security.ubuntu.com/ubuntu focal-security InRelease [114 kB]
Get:7 https://packages.microsoft.com/repos/edge stable/main amd64 Packages [7,859 B]
Ign:8 http://ppa.launchpad.net/oguzhaninan/stacer/ubuntu focal InRelease
Get:9 https://apt.releases.hashicorp.com focal/main amd64 Packages [34.5 kB]
Get:10 http://in.archive.ubuntu.com/ubuntu focal-updates/main amd64 Packages [1,294 kB]
Get:11 http://ppa.launchpad.net/micahflee/ppa/ubuntu focal InRelease [17.5 kB]
Get:12 http://in.archive.ubuntu.com/ubuntu focal-updates/main i386 Packages [550 kB]
Get:13 http://in.archive.ubuntu.com/ubuntu focal-updates/main Translation-en [269 kB]
Step 4: Update Your Server
After adding repository, you can update the Server by using apt update or apt-get update command. This command will also update the package cache with packages from Hashicorp repository.
root@localhost:~# apt update
Hit:1 http://in.archive.ubuntu.com/ubuntu focal InRelease
Get:2 http://in.archive.ubuntu.com/ubuntu focal-updates InRelease [114 kB]
Hit:3 https://apt.releases.hashicorp.com focal InRelease
Get:4 http://in.archive.ubuntu.com/ubuntu focal-backports InRelease [101 kB]
Hit:5 https://packages.microsoft.com/repos/edge stable InRelease
Get:6 http://security.ubuntu.com/ubuntu focal-security InRelease [114 kB]
Ign:7 http://ppa.launchpad.net/oguzhaninan/stacer/ubuntu focal InRelease
Get:8 http://in.archive.ubuntu.com/ubuntu focal-updates/main amd64 DEP-11 Metadata [283 kB]
Get:9 http://ppa.launchpad.net/micahflee/ppa/ubuntu focal InRelease [17.5 kB]
Step 5: Install Vault
Next step is to install Vault application by using apt install vault -y command as shown below. This will download and install the vault package from newly added repository.
root@localhost:~# apt install vault -y
Reading package lists... Done
Building dependency tree
The following NEW packages will be installed:
vault
0 upgraded, 1 newly installed, 0 to remove and 0 not upgraded.
Need to get 66.7 MB of archives.
After this operation, 179 MB of additional disk space will be used.
Get:1 https://apt.releases.hashicorp.com focal/main amd64 vault amd64 1.8.4 [66.7 MB]
Fetched 66.7 MB in 12s (5,452 kB/s)
Selecting previously unselected package vault.
(Reading database ... 199918 files and directories currently installed.)
Preparing to unpack .../archives/vault_1.8.4_amd64.deb ...
Unpacking vault (1.8.4) ...
Setting up vault (1.8.4) ...
Generating Vault TLS key and self-signed certificate...
Generating a RSA private key
.............................................................++++
.......++++
writing new private key to 'tls.key'
-----
Vault TLS key and self-signed certificate have been generated in '/opt/vault/tls'.
Step 6: Check Vault version
You can check the current installed version of vault application by using vault --version command as shown below. As you can see current version is 1.8.4.
root@localhost:~# vault --version
Vault v1.8.4 (925bc650ad1d997e84fbb832f302a6bfe0105bbb)
Step 7: Check Vault Configuration
After vault installation, by default you should see below configuration which has HTTPS Listener address set to 0.0.0.0:8200. This configuration allows us to access the Vault UI using locally set IP Address. So I will leave the configuration as it is. But if you want you can modify the configuration based on your requirements.
root@localhost:~# nano /etc/vault.d/vault.hcl
# Full configuration options can be found at https://www.vaultproject.io/docs/configuration

ui = true

#mlock = true
#disable_mlock = true

storage "file" {
path = "/opt/vault/data"
}

#storage "consul" {
# address = "127.0.0.1:8500"
# path = "vault"
#}

# HTTP listener
#listener "tcp" {
# address = "127.0.0.1:8200"
# tls_disable = 1
#}

# HTTPS listener
listener "tcp" {
address = "0.0.0.0:8200"
tls_cert_file = "/opt/vault/tls/tls.crt"
tls_key_file = "/opt/vault/tls/tls.key"
}
............................................
Step 8: Start Vault Service
After setting up the required configuration, you can now start the vault service by using systemctl start vault command and then check the status by using systemctl status vault command as shown below.
root@localhost:~# systemctl start vault
root@localhost:~# systemctl status vault
● vault.service - "HashiCorp Vault - A tool for managing secrets"
Loaded: loaded (/lib/systemd/system/vault.service; disabled; vendor preset: enabled)
Active: active (running) since Thu 2021-10-21 11:51:31 IST; 5s ago
Docs: https://www.vaultproject.io/docs/
Main PID: 5346 (vault)
Tasks: 7 (limit: 2312)
Memory: 173.8M
CGroup: /system.slice/vault.service
└─5346 /usr/bin/vault server -config=/etc/vault.d/vault.hcl

Oct 21 11:51:34 localhost vault[5346]: Listener 1: tcp (addr: "0.0.0.0:8200", cluster address: "0.0.0.0:8201", max_request_duration: "1m30s", >
Oct 21 11:51:34 localhost vault[5346]: Log Level: info
Oct 21 11:51:34 localhost vault[5346]: Mlock: supported: true, enabled: true
Oct 21 11:51:34 localhost vault[5346]: Recovery Mode: false
Oct 21 11:51:34 localhost vault[5346]: Storage: file
Oct 21 11:51:34 localhost vault[5346]: Version: Vault v1.8.4
Oct 21 11:51:34 localhost vault[5346]: Version Sha: 925bc650ad1d997e84fbb832f302a6bfe0105bbb
Oct 21 11:51:34 localhost vault[5346]: ==> Vault server started! Log data will stream in below:
Oct 21 11:51:34 localhost vault[5346]: 2021-10-21T11:51:32.256+0530 [INFO] proxy environment: http_proxy="" https_proxy="" no_proxy=""
You can also enable the service by using systemctl enable vault command.
root@localhost:~# systemctl enable vault
Created symlink /etc/systemd/system/multi-user.target.wants/vault.service → /lib/systemd/system/vault.service.
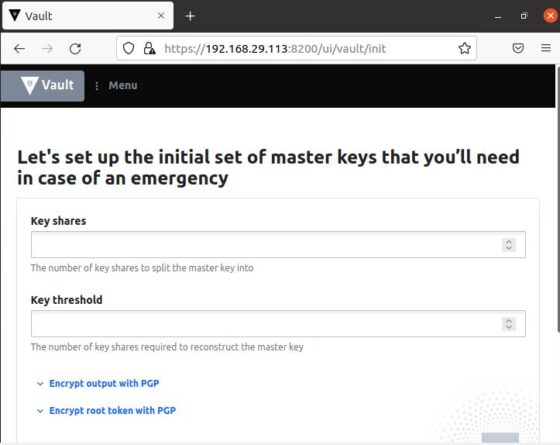
Step 9: Access Vault UI
You can now open Web Browser and use https://<your_ip_address>:8200 URL to access the Vault UI Page. Since my local IP Address is 192.168.29.113 so I am using https://192.168.29.113:8200 URL to access the Page. It could be different for you.