
Table of Contents
In this article, we will see how to install xterm on Ubuntu 22.04 LTS. xterm is a terminal emulator for the X Window System. This system provides a graphical interface for networked Unix-like operating systems, including various distributions of Linux. The role of xterm is to emulate the functionality of the X terminal (X terminal is a terminal connected to a Unix system via the X Window System) within a window on the desktop, offering users a way to interact with the shell and run command-line programs.
xterm is known for its stability and efficiency and is considered one of the standard terminal emulators for the X Window System. It's often used by system administrators, developers, and power users who work extensively with Unix-like systems. Here we will see the steps to install xterm on Ubuntu 22.04 LTS system.
Key Features
- Text-based Interface: xterm provides a text-based interface to the shell. It's where you can type commands and see their output, much like the command prompt or terminal in other operating systems.
- Customization: Users can customize various aspects of xterm such as font size, colors, and window size. This makes it adaptable to different user preferences and working environments.
- Support for Multiple Sessions: Like other terminal emulators, xterm allows users to open multiple sessions at the same time, either in different windows or as tabs, depending on the user's settings and preferences.
- Compatibility with X Window System: xterm is specifically designed for the X Window System, a windowing system for bitmap displays that is common on UNIX-like operating systems. It provides the standard terminal interface for these systems.
- Basic Features of Terminal Emulation: It supports the basic features expected of a terminal emulator, such as keyboard shortcuts, copying and pasting text, and support for different terminal types.
- Use in Remote Connections: xterm can be used in remote connections to other Unix-like systems via SSH or other protocols, providing a terminal session on the remote machine.

How to Install xterm on Ubuntu 22.04 LTS (Jammy Jellyfish)
Also Read: How to Install .NET 8 SDK on Ubuntu 20.04
Step 1: Prerequisites
a) You should have a running Ubuntu 22.04 LTS Server.
b) You should have sudo or root access to run privileged commands.
c) You should have apt or apt-get utility available in your Server.
d) You should have aptitude package manager available in your system in case you would like to use this package manager for xterm installation.
Step 2: Update Your Server
To install all the latest security patches and updates, run sudo apt update && sudo apt upgrade command as shown below. This will safeguard your system from all security vulnerabilities and keep the system stable.
cyberithub@ubuntu:~$ sudo apt update && sudo apt upgrade
[sudo] password for cyberithub:
Hit:1 http://in.archive.ubuntu.com/ubuntu jammy InRelease
Hit:2 https://dl.google.com/linux/chrome/deb stable InRelease
Get:3 http://in.archive.ubuntu.com/ubuntu jammy-updates InRelease [119 kB]
Get:4 http://security.ubuntu.com/ubuntu jammy-security InRelease [110 kB]
Hit:5 https://ppa.launchpadcontent.net/libreoffice/ppa/ubuntu jammy InRelease
Hit:6 https://ppa.launchpadcontent.net/unit193/encryption/ubuntu jammy InRelease
Hit:7 https://ngrok-agent.s3.amazonaws.com buster InRelease
Hit:8 https://artifacts.elastic.co/packages/8.x/apt stable InRelease
Hit:9 http://in.archive.ubuntu.com/ubuntu jammy-backports InRelease
Fetched 229 kB in 3s (68.4 kB/s)
Reading package lists... Done
Building dependency tree... Done
Reading state information... Done
103 packages can be upgraded. Run 'apt list --upgradable' to see them.
Reading package lists... Done
Building dependency tree... Done
Reading state information... Done
Calculating upgrade... Done
The following packages were automatically installed and are no longer required:
liborcus-0.17-0 liborcus-parser-0.17-0 libxmlsec1-nss
Use 'sudo apt autoremove' to remove them.
The following NEW packages will be installed:
libreoffice-uiconfig-calc libreoffice-uiconfig-common libreoffice-uiconfig-draw libreoffice-uiconfig-impress libreoffice-uiconfig-math
libreoffice-uiconfig-writer linux-headers-6.2.0-39-generic linux-hwe-6.2-headers-6.2.0-39 linux-image-6.2.0-39-generic linux-modules-6.2.0-39-generic
linux-modules-extra-6.2.0-39-generic
..............................................................
Step 3: Install xterm
In the next step, you can install xterm by using any of the below methods depending on your needs and requirements.
a) Using apt or apt-get
This method requires you to have apt or apt-get utility available in your system. You can easily install xterm from default Ubuntu repo by using either sudo apt install xterm or sudo apt-get install xterm command as shown below. This will download and install the package along with all its dependencies.
cyberithub@ubuntu:~$ sudo apt install xterm
[sudo] password for cyberithub:
Reading package lists... Done
Building dependency tree... Done
Reading state information... Done
The following packages were automatically installed and are no longer required:
liborcus-0.17-0 liborcus-parser-0.17-0 libxmlsec1-nss linux-headers-6.2.0-36-generic linux-hwe-6.2-headers-6.2.0-36 linux-image-6.2.0-36-generic
linux-modules-6.2.0-36-generic linux-modules-extra-6.2.0-36-generic
Use 'sudo apt autoremove' to remove them.
The following additional packages will be installed:
libutempter0 xbitmaps
Suggested packages:
xfonts-cyrillic
The following NEW packages will be installed:
libutempter0 xbitmaps xterm
0 upgraded, 3 newly installed, 0 to remove and 0 not upgraded.
Need to get 889 kB of archives.
After this operation, 2,748 kB of additional disk space will be used.
Do you want to continue? [Y/n] y
Get:1 http://in.archive.ubuntu.com/ubuntu jammy/main amd64 libutempter0 amd64 1.2.1-2build2 [8,848 B]
Get:2 http://in.archive.ubuntu.com/ubuntu jammy/main amd64 xbitmaps all 1.1.1-2.1ubuntu1 [23.4 kB]
Get:3 http://in.archive.ubuntu.com/ubuntu jammy/universe amd64 xterm amd64 372-1ubuntu1 [857 kB]
Fetched 889 kB in 5s (192 kB/s)
Selecting previously unselected package libutempter0:amd64.
(Reading database ... 274773 files and directories currently installed.)
Preparing to unpack .../libutempter0_1.2.1-2build2_amd64.deb ...
Unpacking libutempter0:amd64 (1.2.1-2build2) ...
Selecting previously unselected package xbitmaps.
Preparing to unpack .../xbitmaps_1.1.1-2.1ubuntu1_all.deb ...
Unpacking xbitmaps (1.1.1-2.1ubuntu1) ...
Selecting previously unselected package xterm.
Preparing to unpack .../xterm_372-1ubuntu1_amd64.deb ...
Unpacking xterm (372-1ubuntu1) ...
Setting up libutempter0:amd64 (1.2.1-2build2) ...
Setting up xbitmaps (1.1.1-2.1ubuntu1) ...
Setting up xterm (372-1ubuntu1) ...
Processing triggers for desktop-file-utils (0.26-1ubuntu3) ...
Processing triggers for hicolor-icon-theme (0.17-2) ...
Processing triggers for gnome-menus (3.36.0-1ubuntu3) ...
Processing triggers for libc-bin (2.35-0ubuntu3.5) ...
Processing triggers for man-db (2.10.2-1) ...
Processing triggers for mailcap (3.70+nmu1ubuntu1) ...
b) Using aptitude
You can also install xterm package by using aptitude package manager. You just have to run sudo aptitude install xterm command as shown below.
cyberithub@ubuntu:~$ sudo aptitude install xterm
[sudo] password for cyberithub:
The following NEW packages will be installed:
xterm
0 packages upgraded, 1 newly installed, 0 to remove and 0 not upgraded.
Need to get 857 kB of archives. After unpacking 2,448 kB will be used.
Get: 1 http://in.archive.ubuntu.com/ubuntu jammy/universe amd64 xterm amd64 372-1ubuntu1 [857 kB]
Fetched 857 kB in 1s (609 kB/s)
(Reading database ... 238199 files and directories currently installed.)
Preparing to unpack .../xterm_372-1ubuntu1_amd64.deb ...
Unpacking xterm (372-1ubuntu1) ...
Setting up xterm (372-1ubuntu1) ...
Processing triggers for desktop-file-utils (0.26-1ubuntu3) ...
Processing triggers for hicolor-icon-theme (0.17-2) ...
Processing triggers for gnome-menus (3.36.0-1ubuntu3) ...
Processing triggers for man-db (2.10.2-1) ...
Processing triggers for mailcap (3.70+nmu1ubuntu1) ...
Step 4: Verify Installation
If you installed xterm through apt or apt-get package manager then you can verify the installation status by using dpkg -s xterm command as shown below.
cyberithub@ubuntu:~$ dpkg -s xterm
Package: xterm
Status: install ok installed
Priority: optional
Section: x11
Installed-Size: 2391
Maintainer: Ubuntu Developers <ubuntu-devel-discuss@lists.ubuntu.com>
Architecture: amd64
Multi-Arch: foreign
Version: 372-1ubuntu1
Provides: x-terminal-emulator
Depends: xbitmaps, libc6 (>= 2.34), libfontconfig1 (>= 2.12.6), libfreetype6 (>= 2.2.1), libice6 (>= 1:1.0.0), libtinfo6 (>= 6), libutempter0 (>= 1.1.5), libx11-6, libxaw7, libxext6, libxft2 (>> 2.1.1), libxinerama1 (>= 2:1.1.4), libxmu6 (>= 2:1.1.3), libxpm4, libxt6
Recommends: luit | x11-utils (<< 7.7+6~)
Suggests: xfonts-cyrillic
Conffiles:
/etc/X11/app-defaults/KOI8RXTerm e904665737663827da6ff9b9651910df
/etc/X11/app-defaults/KOI8RXTerm-color d2d26270262950b81921694506281cfe
/etc/X11/app-defaults/UXTerm 4fed9b6c87c4b3161908e99770a514d3
/etc/X11/app-defaults/UXTerm-color 446ecb44b3bec790d5c7ac8582ef6ca5
/etc/X11/app-defaults/XTerm 1b6c52df947279c5ad547344194af0bc
/etc/X11/app-defaults/XTerm-color 0ceac6d8b2f3e33be29edddb64394d96
......................................................
Step 5: Check Version
To check the current installed version, you can use xterm -version command as shown below.
cyberithub@ubuntu:~$ xterm -version
XTerm(372)
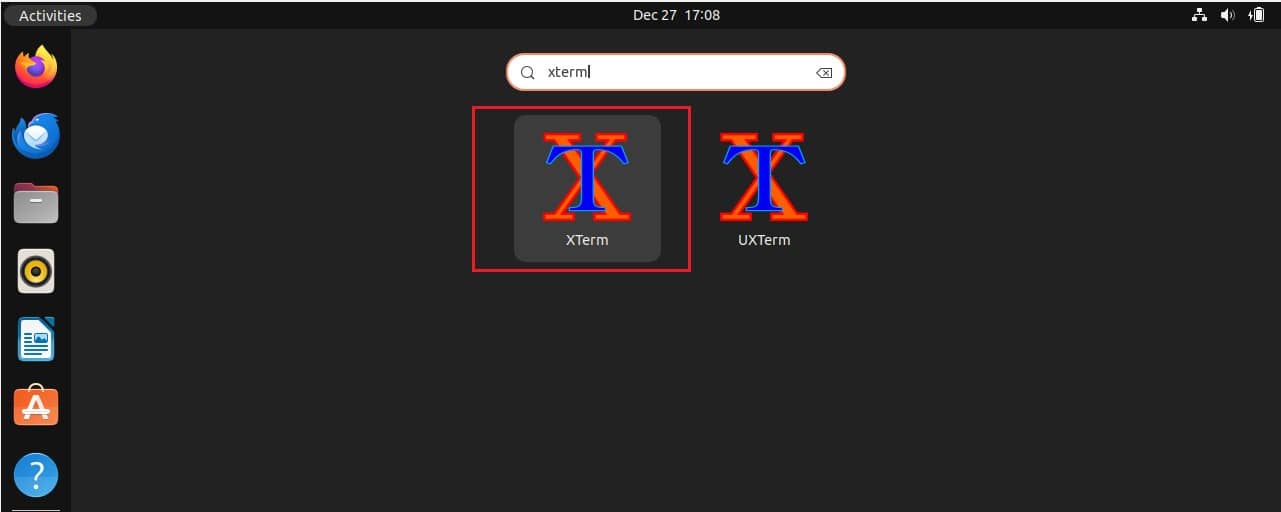
Step 6: Launch xterm
To launch xterm, go to Desktop and click on Activities. Then search xterm in the search bar as shown below. Once it appears, click on it to open.
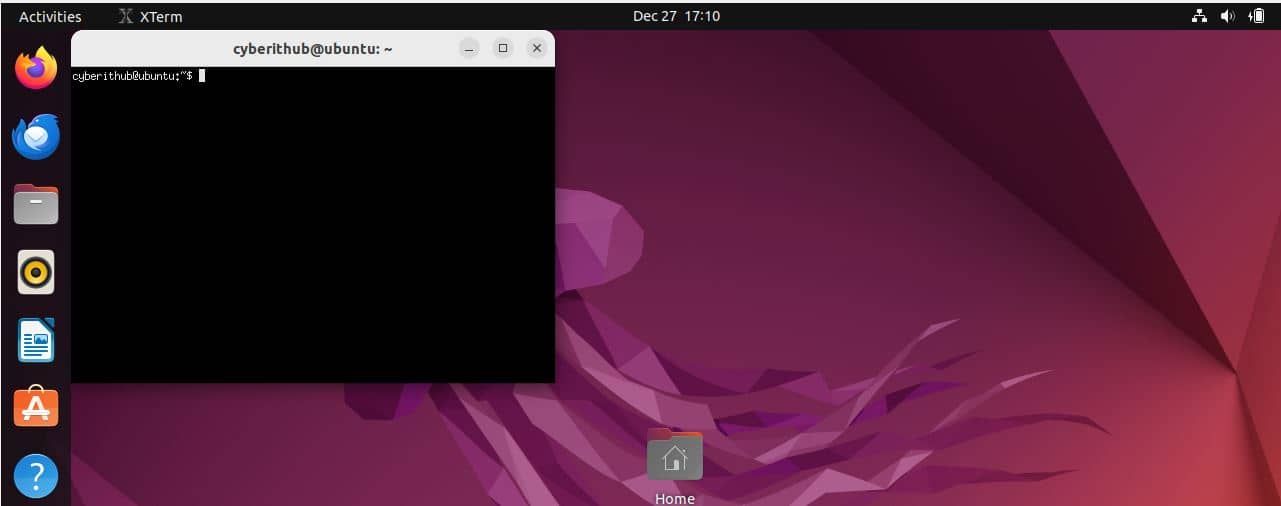
It should open like below. Now you can use xterm to perform your required task.
Step 7: Check all available options
You can also explore all the options available with xterm utility by using xterm -help command as shown below.
cyberithub@ubuntu:~$ xterm -help
XTerm(372) usage:
    xterm [-options ...] [-e command args]

where options include:
    -/+132                       turn on/off 80/132 column switching
    -C                           intercept console messages
    -Sccn                        slave mode on "ttycc", file descriptor "n"
    -T string                    title name for window
    -/+ah                        turn on/off always highlight
    -/+ai                        turn off/on active icon
    -/+aw                        turn on/off auto wraparound
    -b number                    internal border in pixels
    -baudrate rate               set line-speed (default 38400)
    -/+bc                        turn on/off text cursor blinking
    -bcf milliseconds            time text cursor is off when blinking
    -bcn milliseconds            time text cursor is on when blinking
    -bd color                    border color
    -/+bdc                       turn off/on display of bold as color
    -bg color                    background color
    -bw number                   border width in pixels
....................................................
Step 8: Uninstall xterm
Once you are done using xterm utility, you can choose to uninstall it from your system by using any of the below methods depending on how you installed it.
a) Using apt or apt-get
If you installed xterm using either apt or apt-get package manager then to uninstall you have to run either sudo apt remove xterm or sudo apt-get remove xterm command as shown below. You can also remove all the dependencies along with the package by using --auto-remove option. But be careful before using this option as sometimes dependent packages may be used by some other active applications in your system. Removing those packages can cause irreparable losses to your system.
cyberithub@ubuntu:~$ sudo apt remove xterm
Reading package lists... Done
Building dependency tree... Done
Reading state information... Done
The following packages were automatically installed and are no longer required:
libutempter0 xbitmaps
Use 'sudo apt autoremove' to remove them.
The following packages will be REMOVED:
xterm
0 upgraded, 0 newly installed, 1 to remove and 0 not upgraded.
After this operation, 2,448 kB disk space will be freed.
Do you want to continue? [Y/n] Y
(Reading database ... 238020 files and directories currently installed.)
Removing xterm (372-1ubuntu1) ...
Processing triggers for hicolor-icon-theme (0.17-2) ...
Processing triggers for gnome-menus (3.36.0-1ubuntu3) ...
Processing triggers for man-db (2.10.2-1) ...
Processing triggers for mailcap (3.70+nmu1ubuntu1) ...
Processing triggers for desktop-file-utils (0.26-1ubuntu3) ...
If you would like to remove all the configuration files as well along with the package then you can use either sudo apt purge xterm or sudo apt-get purge xterm command. To remove all the dependencies with its all configuration files, you can use --auto-remove option as well.
cyberithub@ubuntu:~$ sudo apt purge xterm
b) Using aptitude
If you installed xterm application through aptitude package manager then to uninstall use sudo aptitude remove xterm command as shown below.
cyberithub@ubuntu:~$ sudo aptitude remove xterm
The following packages will be REMOVED:
libutempter0{u} xbitmaps{u} xterm
0 packages upgraded, 0 newly installed, 3 to remove and 0 not upgraded.
Need to get 0 B of archives. After unpacking 2,748 kB will be freed.
Do you want to continue? [Y/n/?] Y
(Reading database ... 238239 files and directories currently installed.)
Removing xterm (372-1ubuntu1) ...
Removing libutempter0:amd64 (1.2.1-2build2) ...
Removing xbitmaps (1.1.1-2.1ubuntu1) ...
Processing triggers for hicolor-icon-theme (0.17-2) ...
Processing triggers for gnome-menus (3.36.0-1ubuntu3) ...
Processing triggers for libc-bin (2.35-0ubuntu3.5) ...
Processing triggers for man-db (2.10.2-1) ...
Processing triggers for mailcap (3.70+nmu1ubuntu1) ...
Processing triggers for desktop-file-utils (0.26-1ubuntu3) ...