
Table of Contents
In this article, I will take you through the steps to install pulse secure VPN Client on Ubuntu 20.04 LTS. Pulse Secure VPN Client package is one of the standard tool from Pulse Secure to connect Virtual Private Network. It can be easily downloaded and installed in a Linux based Systems like Ubuntu, CentOS, Fedora etc. Here we will see the steps to install Pulse Secure VPN Client package on Ubuntu based System. Check more about Pulse Secure on its official website.
How to Install Pulse Secure VPN Client on Ubuntu 20.04 LTS (Focal Fossa)
Also Read: How to Install Podman on RHEL/CentOS 7/8 [Step by Step]
Step 1: Prerequisites
a) You should have a running Ubuntu 20.04 LTS Server.
b) You should have sudo or root access to run privileged commands.
c) You should have apt-get, dpkg and wget utility available in your System.
Step 2: Update Your Server
You can choose to download and install all the latest available updates from Ubuntu Repo by using apt-get update command as shown below. In case any of the packages needs to be upgraded then it can be done by using apt-get upgrade command.
root@cyberithub:~# apt-get update
Hit:1 http://in.archive.ubuntu.com/ubuntu focal InRelease
Get:3 http://in.archive.ubuntu.com/ubuntu focal-updates InRelease [114 kB]
Hit:4 http://ppa.launchpad.net/nilarimogard/webupd8/ubuntu focal InRelease
Get:5 http://in.archive.ubuntu.com/ubuntu focal-backports InRelease [108 kB]
Get:6 http://security.ubuntu.com/ubuntu focal-security InRelease [114 kB]
Get:7 https://dl.google.com/linux/chrome/deb stable InRelease [1,811 B]
Get:8 http://apt.postgresql.org/pub/repos/apt focal-pgdg InRelease [86.6 kB]
Get:9 http://in.archive.ubuntu.com/ubuntu focal-updates/main i386 Packages [629 kB]
Get:10 http://in.archive.ubuntu.com/ubuntu focal-updates/main amd64 Packages [1,712 kB]
Get:11 http://in.archive.ubuntu.com/ubuntu focal-updates/main Translation-en [320 kB]
Get:12 http://in.archive.ubuntu.com/ubuntu focal-updates/main amd64 DEP-11 Metadata [277 kB]
Get:13 http://in.archive.ubuntu.com/ubuntu focal-updates/main amd64 c-n-f Metadata [14.9 kB]
Get:14 http://in.archive.ubuntu.com/ubuntu focal-updates/restricted amd64 Packages [917 kB]
Get:15 http://in.archive.ubuntu.com/ubuntu focal-updates/restricted Translation-en [131 kB]
Step 3: Install Dependencies
There are few dependencies which needs to be pre installed before installing pulse secure vpn client package. It can be installed by using below apt-get install command.
root@cyberithub:~# apt-get install libcurl4 libnss3-tools
Reading package lists... Done
Building dependency tree
Reading state information... Done
libcurl4 is already the newest version (7.68.0-1ubuntu2.7).
libcurl4 set to manually installed.
The following packages were automatically installed and are no longer required:
dmeventd libaio1 libdevmapper-event1.02.1 liblvm2cmd2.03 thin-provisioning-tools
Use 'apt autoremove' to remove them.
The following NEW packages will be installed:
libnss3-tools
0 upgraded, 1 newly installed, 0 to remove and 165 not upgraded.
Need to get 997 kB of archives.
After this operation, 4,918 kB of additional disk space will be used.
Do you want to continue? [Y/n] y
Get:1 http://in.archive.ubuntu.com/ubuntu focal-updates/universe amd64 libnss3-tools amd64 2:3.49.1-1ubuntu1.6 [997 kB]
Fetched 997 kB in 1s (1,126 kB/s)
Selecting previously unselected package libnss3-tools.
(Reading database ... 191920 files and directories currently installed.)
Preparing to unpack .../libnss3-tools_2%3a3.49.1-1ubuntu1.6_amd64.deb ...
Unpacking libnss3-tools (2:3.49.1-1ubuntu1.6) ...
Setting up libnss3-tools (2:3.49.1-1ubuntu1.6) ...
Processing triggers for man-db (2.9.1-1) ...
Step 4: Download Pulse Secure
Next step is to download the Pulse Secure VPN client package by using below wget command. This will download the package in your local system directory.
root@cyberithub:~# wget https://dl.technion.ac.il/docs/cis/public/ssl-vpn/ps-pulse-ubuntu-debian.deb
--2022-04-11 10:26:24-- https://dl.technion.ac.il/docs/cis/public/ssl-vpn/ps-pulse-ubuntu-debian.deb
Resolving dl.technion.ac.il (dl.technion.ac.il)... 132.68.239.54
Connecting to dl.technion.ac.il (dl.technion.ac.il)|132.68.239.54|:443... connected.
HTTP request sent, awaiting response... 200 OK
Length: 5655292 (5.4M) [application/x-debian-package]
Saving to: ‘ps-pulse-ubuntu-debian.deb’

ps-pulse-ubuntu-debian.deb 100%[============================================================================>] 5.39M 440KB/s in 18s

2022-04-11 10:26:47 (315 KB/s) - ‘ps-pulse-ubuntu-debian.deb’ saved [5655292/5655292]
Step 5: Install Pulse Secure
Once downloaded you can install it by using dpkg -i ps-pulse-ubuntu-debian.deb command as shown below.
root@cyberithub:~# dpkg -i ps-pulse-ubuntu-debian.deb
Selecting previously unselected package pulsesecure.
(Reading database ... 191965 files and directories currently installed.)
Preparing to unpack ps-pulse-ubuntu-debian.deb ...
Unpacking pulsesecure (9.1.R14) ...
Setting up pulsesecure (9.1.R14) ...
Created symlink /etc/systemd/system/multi-user.target.wants/pulsesecure.service → /lib/systemd/system/pulsesecure.service.
Processing triggers for gnome-menus (3.36.0-1ubuntu1) ...
Processing triggers for desktop-file-utils (0.24-1ubuntu3) ...
Processing triggers for mime-support (3.64ubuntu1) ...
Processing triggers for dbus (1.12.16-2ubuntu2.1) ...
Processing triggers for man-db (2.9.1-1) ...
Step 6: Start Pulse UI
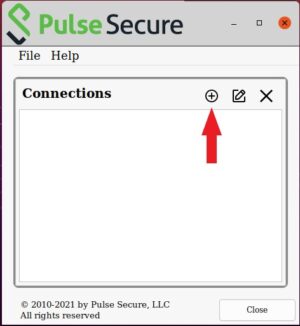
To start Pulse UI, go to Activities and search pulse in the Search box as shown below. Once Pulse UI shows, click on that.

You will see it opened like below. Now from here you can start adding your Connections by clicking on (+) as shown below.
Step 7: Uninstall Pulse Secure
Once you are done with Pulse Secure VPN Client package then you can also choose to uninstall it from your System by using dpkg -r pulsesecure command as shown below.
root@cyberithub:~# dpkg -r pulsesecure
(Reading database ... 192089 files and directories currently installed.)
Removing pulsesecure (9.1.R14) ...
Removed /etc/systemd/system/multi-user.target.wants/pulsesecure.service.
Save all current Pulse Secure configuration settings?[Yy/Nn]y
Processing triggers for dbus (1.12.16-2ubuntu2.1) ...
Processing triggers for man-db (2.9.1-1) ...
Processing triggers for gnome-menus (3.36.0-1ubuntu1) ...
Processing triggers for desktop-file-utils (0.24-1ubuntu3) ...
Processing triggers for mime-support (3.64ubuntu1) ...
Great thanks.
Works for me on 22.04
works for me too
Awesome works for me, jammy 22.04, the next era has begun hopefully will retire before I have to do this again...
Did you encounter any similar error using pulse secure with 2FA ?
EAP Authentication FAILED: Error: 1309
Complete log after OTP submit
00195,09 2022/11/14 15:05:52.970 1 root /opt/pulsesecure/bin/pulsesecure iftProvider p1260 t13C0B channelProviderImplEap.cpp:424 - 'iftProvider' EAP Authentication FAILED: Error: 1309 0x51d State: 3 0x3
00191,09 2022/11/14 15:05:52.970 3 root /opt/pulsesecure/bin/pulsesecure iftProvider p1260 t13C0B channelProviderImplEap.cpp:437 - 'iftProvider' retrieved TNC state, authenticated with a new session
00160,09 2022/11/14 15:05:52.970 1 root /opt/pulsesecure/bin/pulsesecure iftProvider p1260 t13C0B channelProviderImplEap.cpp:446 - 'iftProvider' Eap failed 1309 0x51d
can't install for 32 bit linux! can you give me the correct command line?