
Table of Contents
In this article, I will take you through the steps to install ProtonVPN on Ubuntu 20.04 LTS. When we think about using a free and relatively safer VPN service then ProtonVPN is the one which first comes in mind. It is due to the fact that over the years ProtonVPN has gained a lot of trust in the Market. Whether it's a matter of Security, Privacy or Freedom, ProtonVPN offers all in one advantage. With an easy to use feature, you can enable the secure traffic through encrypted tunnel over the Internet. It is available in both free as well as in paid plans depending on the customer use cases.
What is VPN
VPN, also known as Virtual Private Network is a secure encrypted tunnel over the Internet behind which your data securely transit from source to destination hence providing complete protection to your data.
Features
- Simplified interface provides easy to use service.
- There is no risk of secretly selling of your browsing history.
- It provides multi platform support.
- VPN Accelerator provides increase in speed up to 400%.
- Faster speed and lot of extra features available in paid plan.
- It protects us from malware, blocks ads, and prevents website trackers from following us as we surf the web.
- It has support of almost all secure protocols including OpenVPN, IKEv2, and WireGuard.
- It protect the traffic for any external attacks and vulnerabilities.

How to Install ProtonVPN on Ubuntu 20.04 LTS (Focal Fossa)
Also Read: How to Install PureVPN on Ubuntu 20.04 LTS (Focal Fossa)
Step 1: Prerequisites
a) You should have a running Ubuntu 20.04 LTS System.
b) You should have sudo or root access to run privileged commands.
c) You should have apt-get and wget utility installed in your Server.
Step 2: Download Repo Package
Since ProtonVPN is not available from Ubuntu repo, we need to first setup the required repo to download and install the package using package manager. For that, you need to go to ProtonVPN official website and download the latest repo package using wget utility as shown below. This will download the package in your local system directory.
root@cyberithub:~# wget https://protonvpn.com/download/protonvpn-stable-release_1.0.1-1_all.deb
--2022-04-12 20:21:41-- https://protonvpn.com/download/protonvpn-stable-release_1.0.1-1_all.deb
Resolving protonvpn.com (protonvpn.com)... 185.159.159.140
Connecting to protonvpn.com (protonvpn.com)|185.159.159.140|:443... connected.
HTTP request sent, awaiting response... 200 OK
Length: 3264 (3.2K) [application/octet-stream]
Saving to: ‘protonvpn-stable-release_1.0.1-1_all.deb’

protonvpn-stable-release_1.0.1-1_all.de 100%[============================================================================>] 3.19K --.-KB/s in 0s

2022-04-12 20:21:42 (201 MB/s) - ‘protonvpn-stable-release_1.0.1-1_all.deb’ saved [3264/3264]
Step 3: Install Repo
Then install the repo package by using dpkg -i protonvpn-stable-release_1.0.1-1_all.deb command as shown below.
root@cyberithub:~# dpkg -i protonvpn-stable-release_1.0.1-1_all.deb
Selecting previously unselected package protonvpn-stable-release.
(Reading database ... 191970 files and directories currently installed.)
Preparing to unpack protonvpn-stable-release_1.0.1-1_all.deb ...
Unpacking protonvpn-stable-release (1.0.1-1) ...
Setting up protonvpn-stable-release (1.0.1-1) ...
Step 4: Update Your Server
To update System cache about the newly added repo, you need to run apt-get update command as shown below.
root@cyberithub:~# apt-get update
Hit:2 http://in.archive.ubuntu.com/ubuntu focal InRelease
Get:3 http://in.archive.ubuntu.com/ubuntu focal-updates InRelease [114 kB]
Hit:4 http://ppa.launchpad.net/nilarimogard/webupd8/ubuntu focal InRelease
Get:5 http://in.archive.ubuntu.com/ubuntu focal-backports InRelease [108 kB]
Hit:6 https://dl.google.com/linux/chrome/deb stable InRelease
Get:7 http://security.ubuntu.com/ubuntu focal-security InRelease [114 kB]
Get:8 http://in.archive.ubuntu.com/ubuntu focal-updates/main amd64 Packages [1,712 kB]
Hit:9 http://apt.postgresql.org/pub/repos/apt focal-pgdg InRelease
Get:10 https://repo.protonvpn.com/debian stable InRelease [2,519 B]
Get:11 http://in.archive.ubuntu.com/ubuntu focal-updates/main amd64 DEP-11 Metadata [278 kB]
Get:12 http://in.archive.ubuntu.com/ubuntu focal-updates/universe amd64 Packages [916 kB]
Get:13 http://in.archive.ubuntu.com/ubuntu focal-updates/universe Translation-en [204 kB]
Get:14 http://in.archive.ubuntu.com/ubuntu focal-updates/universe amd64 DEP-11 Metadata [391 kB]
Get:15 http://in.archive.ubuntu.com/ubuntu focal-updates/multiverse amd64 DEP-11 Metadata [944 B]
Get:16 http://in.archive.ubuntu.com/ubuntu focal-backports/main amd64 DEP-11 Metadata [7,984 B]
Get:17 http://in.archive.ubuntu.com/ubuntu focal-backports/universe amd64 DEP-11 Metadata [30.8 kB]
Hit:1 https://downloads.apache.org/cassandra/debian 40x InRelease
Get:18 https://repo.protonvpn.com/debian stable/main all Packages [45.6 kB]
Step 5: Install ProtonVPN
Once the repo information is updated, we can install the protonvpn package by using apt-get install protonvpn command as shown below. This will download and install the package along with all its dependencies.
root@cyberithub:~# apt-get install protonvpn
Reading package lists... Done
Building dependency tree
Reading state information... Done
The following packages were automatically installed and are no longer required:
dmeventd libaio1 libdevmapper-event1.02.1 liblvm2cmd2.03 thin-provisioning-tools
Use 'apt autoremove' to remove them.
The following additional packages will be installed:
dialog javascript-common libjs-jquery libjs-sphinxdoc libjs-underscore libsecret-tools protonvpn-cli protonvpn-gui python3-dialog python3-dnspython
python3-gnupg python3-jinja2 python3-openssl python3-proton-client python3-protonvpn-nm-lib python3-psutil
Suggested packages:
apache2 | lighttpd | httpd gir1.2-appindicator3-0.1 python3-doc python-jinja2-doc python-openssl-doc python3-openssl-dbg python-psutil-doc
The following NEW packages will be installed:
dialog javascript-common libjs-jquery libjs-sphinxdoc libjs-underscore libsecret-tools protonvpn protonvpn-cli protonvpn-gui python3-dialog
python3-dnspython python3-gnupg python3-jinja2 python3-openssl python3-proton-client python3-protonvpn-nm-lib python3-psutil
0 upgraded, 17 newly installed, 0 to remove and 184 not upgraded.
Need to get 5,362 kB of archives.
After this operation, 16.1 MB of additional disk space will be used.
Do you want to continue? [Y/n] y
..........................................
Step 6: Install System Tray Icon(Optional)
If you want to enable the System Tray Icon for your Desktop, then you can do that by installing below packages using apt install command.
root@cyberithub:~# apt-get install gnome-shell-extension-appindicator gir1.2-appindicator3-0.1
Reading package lists... Done
Building dependency tree
Reading state information... Done
The following packages were automatically installed and are no longer required:
dmeventd libaio1 libdevmapper-event1.02.1 liblvm2cmd2.03 thin-provisioning-tools
Use 'apt autoremove' to remove them.
The following NEW packages will be installed:
gir1.2-appindicator3-0.1
The following packages will be upgraded:
gnome-shell-extension-appindicator
1 upgraded, 1 newly installed, 0 to remove and 183 not upgraded.
Need to get 31.2 kB of archives.
After this operation, 28.7 kB of additional disk space will be used.
Get:1 http://in.archive.ubuntu.com/ubuntu focal/main amd64 gir1.2-appindicator3-0.1 amd64 12.10.1+20.04.20200408.1-0ubuntu1 [3,448 B]
Get:2 http://in.archive.ubuntu.com/ubuntu focal-updates/main amd64 gnome-shell-extension-appindicator all 33.1-0ubuntu0.20.04.2 [27.7 kB]
Fetched 31.2 kB in 1s (54.3 kB/s)
Selecting previously unselected package gir1.2-appindicator3-0.1.
(Reading database ... 193483 files and directories currently installed.)
................................................
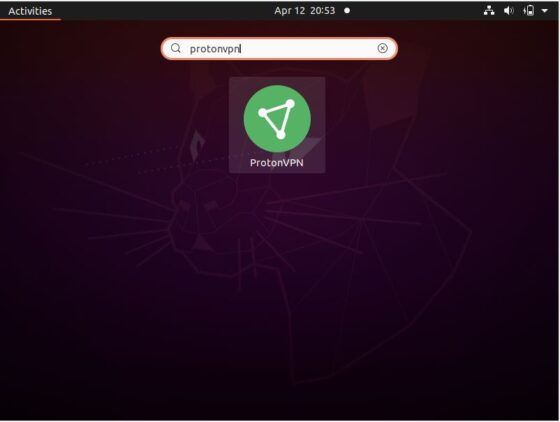
Step 7: Start ProtonVPN
To start ProtonVPN, go to Activities and search for protonvpn in the Search box. Once it shows up, Click on it to open.
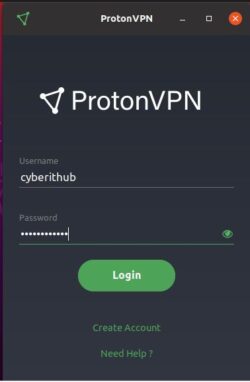
Once opened, it should show like below where it will ask you login using username and password. If you don't have account then you can create one by clicking on Create Account option shown below. Once created, provide your username and password and then Click on Login.
Step 8: Uninstall ProtonVPN
Once you are done with ProtonVPN, you can choose to uninstall it from your system by using apt-get install protonvpn command as shown below.
root@cyberithub:~# apt-get remove protonvpn
Reading package lists... Done
Building dependency tree
Reading state information... Done
The following packages were automatically installed and are no longer required:
dmeventd javascript-common libaio1 libdevmapper-event1.02.1 libjs-jquery libjs-sphinxdoc libjs-underscore liblvm2cmd2.03 libsecret-tools protonvpn-cli
protonvpn-gui python3-dialog python3-dnspython python3-gnupg python3-jinja2 python3-proton-client python3-protonvpn-nm-lib python3-psutil
thin-provisioning-tools
Use 'apt autoremove' to remove them.
The following packages will be REMOVED:
protonvpn
0 upgraded, 0 newly installed, 1 to remove and 183 not upgraded.
After this operation, 9,216 B disk space will be freed.
Do you want to continue? [Y/n] y
(Reading database ... 193487 files and directories currently installed.)
Removing protonvpn (1.0.0-3) ...
This is really helpful and easy to understand.
Nice job.
Thanks.
well ... i can't get this to work. receive the following error -
Ign:1 https://repo.protonvpn.com/debian stable InRelease
Hit:2 https://brave-browser-apt-release.s3.brave.com stable InRelease
Hit:3 http://us.archive.ubuntu.com/ubuntu focal InRelease
Err:4 https://repo.protonvpn.com/debian stable Release
Certificate verification failed: The certificate is NOT trusted. The certificate chain uses expired certificate. Could not handshake: Error in the certificate verification. [IP: 172.67.196.250 443]
Hit:5 http://us.archive.ubuntu.com/ubuntu focal-updates InRelease
Hit:6 http://us.archive.ubuntu.com/ubuntu focal-backports InRelease
Hit:7 http://security.ubuntu.com/ubuntu focal-security InRelease
Reading package lists... Done
E: The repository 'https://repo.protonvpn.com/debian stable Release' does not have a Release file.
N: Updating from such a repository can't be done securely, and is therefore disabled by default.
N: See apt-secure(8) manpage for repository creation and user configuration details.