
Table of Contents
In this article, I will take you through the steps to install Clonezilla on Ubuntu 20.04 LTS (Focal Fossa). Clonezilla is a free and open source drive cloning and drive imaging program available for almost all the Linux Systems. It helps you to do system deployment, bare metal backup and recovery. To increase the clone efficiency, it saves and restores only used blocks in the hard disk. Clonezilla can clone as many as 40+ computers simultaneously. It is very similar to True Image or Norton Ghost Program which you might be already aware of. There are three types of Clonezilla currently available - Clonezilla live, Clonezilla lite server, and Clonezilla SE (server edition). More on official website.
Features
- It supports almost all the popular file systems you can think of such as ext2, ext3, ext4, FAT12, FAT16, FAT32 etc.
- LVM2 under GNU/Linux is supported.
- The image file can be saved under USB drive, local disk, ssh server, samba server etc.
- Images can be encrypted using tool like ecryptfs.
- One image restoring to multiple local devices is supported.
- Unattended mode is supported.
- Boot loader, including grub (version 1 and version 2) and syslinux, could be reinstalled.
- Data access, storage and transfer can be secured using AES-256 encryption.
- Bittorrent (BT) is supported in Clonezilla lite server, which is suitable for massive deployment.
Limitations
- The destination partition must be equal or larger than the source one.
- Differential/incremental backup is not implemented yet.
- Online imaging/cloning is not implemented yet. The partition to be imaged or cloned has to be unmounted.
- Due to the image format limitation, the image can not be explored or mounted.
- Recovery Clonezilla live with multiple CDs or DVDs is not implemented yet
How to Install Clonezilla on Ubuntu 20.04 LTS (Focal Fossa)
Also Read: How to Install Vivaldi Browser on Ubuntu 20.04 LTS (Focal Fossa)
Step 1: Prerequisites
a) You should have a running Ubuntu 20.04 LTS Server.
b) You should have sudo or root access to run privileged commands.
c) You should have apt utility available in your Server.
Step 2: Update Your Server
In the first step, you need to sync your server with the remote repository using apt update command as shown below. This will update the package cache with all the latest package details from all the enabled repositories.
root@cyberithub:~# apt update
Hit:1 http://in.archive.ubuntu.com/ubuntu focal InRelease
Get:2 http://in.archive.ubuntu.com/ubuntu focal-updates InRelease [114 kB]
Get:3 http://in.archive.ubuntu.com/ubuntu focal-backports InRelease [108 kB]
Get:4 https://dl.google.com/linux/chrome/deb stable InRelease [1,811 B]
Get:5 http://security.ubuntu.com/ubuntu focal-security InRelease [114 kB]
Get:6 http://in.archive.ubuntu.com/ubuntu focal-updates/main i386 Packages [652 kB]
Get:7 http://in.archive.ubuntu.com/ubuntu focal-updates/main amd64 Packages [1,793 kB]
Get:8 http://in.archive.ubuntu.com/ubuntu focal-updates/main amd64 DEP-11 Metadata [277 kB]
Get:9 http://in.archive.ubuntu.com/ubuntu focal-updates/universe amd64 Packages [924 kB]
Get:10 http://in.archive.ubuntu.com/ubuntu focal-updates/universe i386 Packages [679 kB]
Get:11 http://in.archive.ubuntu.com/ubuntu focal-updates/universe amd64 DEP-11 Metadata [391 kB]
Get:12 http://in.archive.ubuntu.com/ubuntu focal-updates/multiverse amd64 DEP-11 Metadata [944 B]
Get:13 http://in.archive.ubuntu.com/ubuntu focal-backports/main i386 Packages [35.1 kB]
Get:14 http://in.archive.ubuntu.com/ubuntu focal-backports/main amd64 Packages [44.5 kB]
Get:15 http://in.archive.ubuntu.com/ubuntu focal-backports/main Translation-en [10.9 kB]
Step 3: Upgrade Your Server
If any of the packages needs to be upgraded then use apt upgrade command as shown below.
root@cyberithub:~# apt upgrade
Reading package lists... Done
Building dependency tree
Reading state information... Done
Calculating upgrade... Done
The following packages were automatically installed and are no longer required:
libfwupdplugin1 libllvm11
Use 'apt autoremove' to remove them.
The following packages will be upgraded:
apport apport-gtk apt apt-utils bolt gnome-control-center gnome-control-center-data gnome-control-center-faces google-chrome-stable gvfs gvfs-backends
gvfs-bin gvfs-common gvfs-daemons gvfs-fuse gvfs-libs iio-sensor-proxy libapt-pkg6.0 libc-bin libc-dev-bin libc6 libc6-dbg libc6-dev libldap-2.4-2
libldap-common libnss-systemd libpam-systemd libpcre3 libsensors-config libsensors5 libsystemd0 libudev1 linux-firmware locales login openssh-client
openssh-server openssh-sftp-server passwd python3-apport python3-problem-report sbsigntool snapd systemd systemd-sysv systemd-timesyncd
ubuntu-advantage-tools ubuntu-drivers-common udev
49 upgraded, 0 newly installed, 0 to remove and 0 not upgraded.
7 standard security updates
Need to get 294 MB of archives.
After this operation, 30.2 MB disk space will be freed.
Do you want to continue? [Y/n] Y
............................................................
Step 4: Install Clonezilla
Next step is to install Clonezilla along with all its dependencies from default Ubuntu repo by using apt install clonezilla command as shown below.
root@cyberithub:~# apt install clonezilla
Reading package lists... Done
Building dependency tree
Reading state information... Done
The following packages were automatically installed and are no longer required:
libfwupdplugin1 libllvm11
Use 'apt autoremove' to remove them.
The following additional packages will be installed:
dialog drbl ipcalc nilfs-tools partclone partimage pigz wakeonlan
Suggested packages:
cifs-utils udpcast sshfs
The following NEW packages will be installed:
clonezilla dialog drbl ipcalc nilfs-tools partclone partimage pigz wakeonlan
0 upgraded, 9 newly installed, 0 to remove and 49 not upgraded.
Need to get 3,217 kB of archives.
After this operation, 14.4 MB of additional disk space will be used.
Do you want to continue? [Y/n] Y
.....................................................
Step 5: Launch Clonezilla
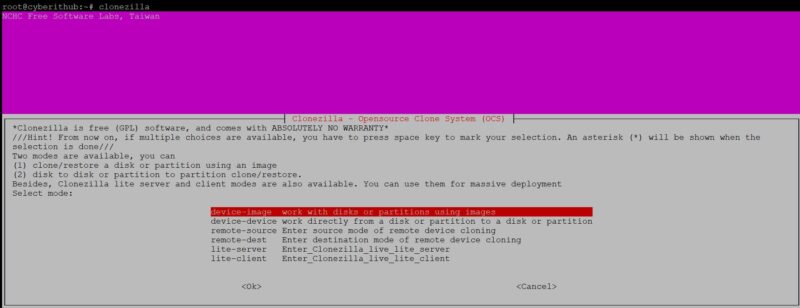
You can launch Clonezilla from terminal by running clonezilla command as shown below. Once launched, it will ask to select from below options. Since here we are going to use a USB drive to save the images so we will select the default work with disks or partitions using images option and then use Tab to choose Ok to proceed.
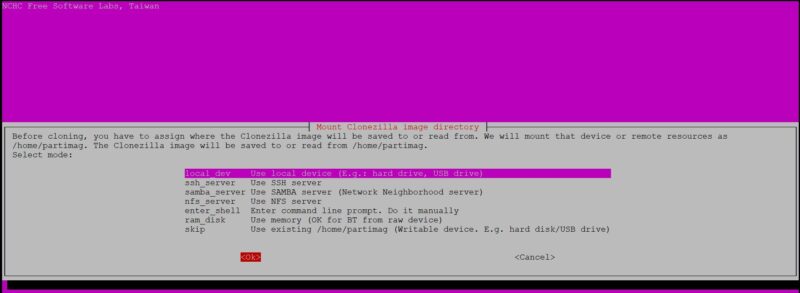
Before cloning, you need to assign the destination where the image needs to be saved. The destination could be a hard drive, USB drive, SSH Server, SAMBA Server etc. Since here we are using a USB drive so we will select that option and then use Tab to choose Ok to proceed.
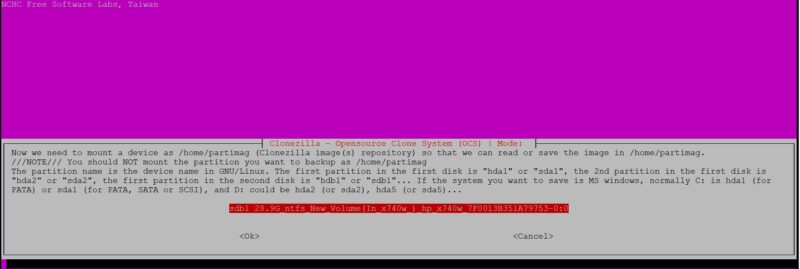
Once the USB drive is detected, it should show like below. In your case, it might be a hard drive, SSH Server, Samba server etc. The device will be mounted over /home/partimag mount point with the partition created as per the Linux system. Then use Tab to choose Ok to proceed.
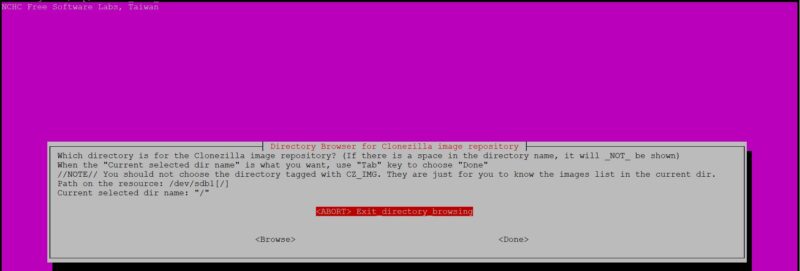
If you want to select a directory then browse and browse the path where you want to save the images. If you want to use the default directory path then use Tab key to choose Done.
Next, you need to select the mode to run the wizard. Here we are selecting Beginner mode with default options and then use Tab to choose Ok.

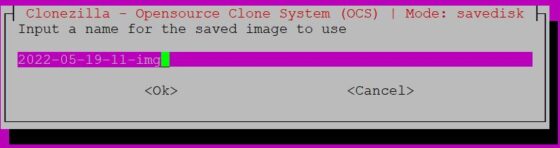
Finally you can provide a name for the saved image to use and then use Tab to choose Ok.
After finishing the setup, you will see below output on the terminal.
Clonezilla mode is device-image
ocsroot device is local_dev
Preparing the mount point /home/partimag...
If you want to use USB device as a Clonezilla image repository, please
* Insert USB device into this machine *now*
* Wait for about 5 secs
* Press Enter key
so that the OS can detect the USB device and later we can mount it as /home/partimag.
Press "Enter" to continue......
/usr/sbin/prep-ocsroot: line 50: type: screen: not found
Mounting local dev as /home/partimag...
Excluding busy partition or disk...
Excluding busy partition or disk...
Finding partitions..
Partition number: 1
Getting /dev/sdb1 info...
/dev/sdb1 filesystem: ntfs
ntfs-3g /dev/sdb1 /home/partimag -o noatime
Scanning dir /tmp/ocsroot_bind_root..Running: mount --bind -o noatime,nodiratime /tmp/ocsroot_bind_root /home/partimag
The file system disk space usage:
*****************************************************.
SOURCE    FSTYPE  SIZE  USED  AVAIL USE% TARGET
/dev/sdb1 fuseblk 28.9G 63.2M 28.9G 0%   /home/partimag
*****************************************************.
Press "Enter" to continue......
done!
Step 6: Uninstall Clonezilla
Once you are done with Clonezilla, you can remove the application by using apt remove clonezilla command as shown below.
root@cyberithub:~# apt remove clonezilla
Reading package lists... Done
Building dependency tree
Reading state information... Done
The following packages were automatically installed and are no longer required:
drbl ipcalc libfwupdplugin1 libllvm11 partclone partimage pigz wakeonlan
Use 'apt autoremove' to remove them.
The following packages will be REMOVED:
clonezilla
0 upgraded, 0 newly installed, 1 to remove and 0 not upgraded.
After this operation, 3,143 kB disk space will be freed.
Do you want to continue? [Y/n] y
(Reading database ... 196838 files and directories currently installed.)
Removing clonezilla (3.35.2-1) ...