
Table of Contents
In this article, we will see the steps to install catdoc(xls2csv) on macOS Using 9 Easy Steps. catdoc is a free and open source program which reads one or more Microsoft word files(.doc), very much similar like cat utility which is used for reading ASCII text files in linux and unix based systems. It comes with some of the useful utilities like xls2csv(used for converting xls file to csv file) and catppt(used for extracting textual information from powerpoint files).
So when you install catdoc in your system, you will have all these utilities available to perform different formatting operations. It is easy to install in almost all the Unix and Linux based systems including Mac system. Here we will see steps to install catdoc on macOS based systems in great detail.
How to Install catdoc(xls2csv) on macOS Using 9 Easy Steps
Also Read: How to Install TablePlus on macOS Using 5 Easy Steps
Step 1: Prerequisites
a) You should have a running macOS System.
b) You should have permission to download and install formulae in your System.
c) You should have brew, tar and make utility available in your System.
d) You should have gcc compiler available in your System.
Step 2: Update Your System
In the first step, you need to update all your outdated formulae by using brew update command as shown below.
cyberithub@macos1066 ~ % brew update
Step 3: Download Source file
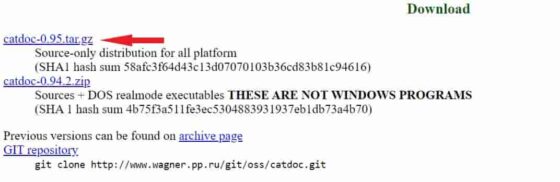
In the next step, you need to visit official website and download latest catdoc tar.gz file from below given link.
Step 4: Extract Source File
After downloading source file, you need to extract it either in your current path or to some other path by using tar command. For example, in our case we are extracting all the files in current directory by using tar -xzvf catdoc.tar.gz command as shown below.
cyberithub@macos1066 ~ % tar -xzvf catdoc-0.95.tar.gz
x catdoc-0.95/
x catdoc-0.95/CODING.STD
x catdoc-0.95/INSTALL
x catdoc-0.95/configure
x catdoc-0.95/missing
x catdoc-0.95/configure.in
x catdoc-0.95/compat/
x catdoc-0.95/compat/langinfo.c
x catdoc-0.95/compat/.cvsignore
x catdoc-0.95/compat/strftime.c
x catdoc-0.95/compat/strftime.h
x catdoc-0.95/compat/langinfo.h
x catdoc-0.95/compat/unistd.h
x catdoc-0.95/INSTALL.dos
x catdoc-0.95/doc/
......................................................
Step 5: Configure Settings
Then you need to switch to the extracted directory by using cd catdoc-0.95 command and run configure script with proper input and output arguments to configure all the settings as per your local system.
cyberithub@macos1066 ~ % cd catdoc-0.95
cyberithub@macos1066 catdoc-0.95 % ./configure --with-input=mac-roman --with-output=mac-roman
checking for gcc... gcc
checking whether the C compiler works... yes
checking for C compiler default output file name... a.out
checking for suffix of executables...
checking whether we are cross compiling... no
checking for suffix of object files... o
checking whether we are using the GNU C compiler... yes
checking whether gcc accepts -g... yes
checking for gcc option to accept ISO C89... none needed
checking how to run the C preprocessor... gcc -E
checking for grep that handles long lines and -e... /usr/bin/grep
checking for egrep... /usr/bin/grep -E
checking for ANSI C header files... yes
.........................................................
Step 6: Compile Source Files
In the next step, you need to compile the code and generate object files by using either make or make all command as shown below.
cyberithub@macos1066 catdoc-0.95 % make all
for i in src doc charsets; do\
           (cd $i; /Applications/Xcode.app/Contents/Developer/usr/bin/make all);\
        done
gcc -I. -g -02 -DHAVE_CONFIG_H -DCATDOC_VERSION=\"0.95\" -DCHARSETPATH=\"/usr/local/share/catdoc\" -DSYSTEMRC=\"/usr/local/etc/catdocrc\" -DUSERRC=\".catdocrc\" -DHAVE_CONFIG_H -c -o catdoc.o catdoc.c
gcc -I. -g -02 -DHAVE_CONFIG_H -DCATDOC_VERSION=\"0.95\" -DCHARSETPATH=\"/usr/local/share/catdoc\" -DSYSTEMRC=\"/usr/local/etc/catdocrc\" -DUSERRC=\".catdocrc\" -DHAVE_CONFIG_H -c -o reader.o reader.c
gcc -I. -g -02 -DHAVE_CONFIG_H -DCATDOC_VERSION=\"0.95\" -DCHARSETPATH=\"/usr/local/share/catdoc\" -DSYSTEMRC=\"/usr/local/etc/catdocrc\" -DUSERRC=\".catdocrc\" -DHAVE_CONFIG_H -c -o writer.o writer.c
gcc -I. -g -02 -DHAVE_CONFIG_H -DCATDOC_VERSION=\"0.95\" -DCHARSETPATH=\"/usr/local/share/catdoc\" -DSYSTEMRC=\"/usr/local/etc/catdocrc\" -DUSERRC=\".catdocrc\" -DHAVE_CONFIG_H -c -o analyze.o analyze.c
gcc -I. -g -02 -DHAVE_CONFIG_H -DCATDOC_VERSION=\"0.95\" -DCHARSETPATH=\"/usr/local/share/catdoc\" -DSYSTEMRC=\"/usr/local/etc/catdocrc\" -DUSERRC=\".catdocrc\" -DHAVE_CONFIG_H -c -o rtfread.o rtfread.c
gcc -I. -g -02 -DHAVE_CONFIG_H -DCATDOC_VERSION=\"0.95\" -DCHARSETPATH=\"/usr/local/share/catdoc\" -DSYSTEMRC=\"/usr/local/etc/catdocrc\" -DUSERRC=\".catdocrc\" -DHAVE_CONFIG_H -c -o charsets.o charsets.c
gcc -I. -g -02 -DHAVE_CONFIG_H -DCATDOC_VERSION=\"0.95\" -DCHARSETPATH=\"/usr/local/share/catdoc\" -DSYSTEMRC=\"/usr/local/etc/catdocrc\" -DUSERRC=\".catdocrc\" -DHAVE_CONFIG_H -c -o substmap.o substmap.c
gcc -I. -g -02 -DHAVE_CONFIG_H -DCATDOC_VERSION=\"0.95\" -DCHARSETPATH=\"/usr/local/share/catdoc\" -DSYSTEMRC=\"/usr/local/etc/catdocrc\" -DUSERRC=\".catdocrc\" -DHAVE_CONFIG_H -c -o fileutil.o fileutil.c
gcc -I. -g -02 -DHAVE_CONFIG_H -DCATDOC_VERSION=\"0.95\" -DCHARSETPATH=\"/usr/local/share/catdoc\" -DSYSTEMRC=\"/usr/local/etc/catdocrc\" -DUSERRC=\".catdocrc\" -DHAVE_CONFIG_H -c -o confutil.o confutil.c
gcc -I. -g -02 -DHAVE_CONFIG_H -DCATDOC_VERSION=\"0.95\" -DCHARSETPATH=\"/usr/local/share/catdoc\" -DSYSTEMRC=\"/usr/local/etc/catdocrc\" -DUSERRC=\".catdocrc\" -DHAVE_CONFIG_H -c -o numutils.o numutils.c
gcc -I. -g -02 -DHAVE_CONFIG_H -DCATDOC_VERSION=\"0.95\" -DCHARSETPATH=\"/usr/local/share/catdoc\" -DSYSTEMRC=\"/usr/local/etc/catdocrc\" -DUSERRC=\".catdocrc\" -DHAVE_CONFIG_H -c -o ole.o ole.c
gcc -o catdoc catdoc.o reader.o writer.o analyze.o rtfread.o charsets.o substmap.o fileutil.o confutil.o numutils.o ole.o
..........................................................
Step 7: Install Binaries
Once all the binaries are generated, you can install them by using below make command. This will install catdoc, xls2csv and catppt formulae in your mac system.
cyberithub@macos1066 catdoc-0.95 % make --directory=src install; make --directory=doc install; make --directory=charsets install
../mkinstalldirs /usr/local/bin
/usr/bin/install -c -m 755 catdoc /usr/local/bin/catdoc
/usr/bin/install -c -m 755 xls2csv /usr/local/bin/xls2csv
/usr/bin/install -c -m 755 catppt /usr/local/bin/catppt
../mkinstalldirs /usr/local/share/man
/usr/bin/install -c -m 644 catdoc.1 /usr/local/share/man/man1/catdoc.1
/usr/bin/install -c -m 644 xls2csv.1 /usr/local/share/man/man1/xls2csv.1
/usr/bin/install -c -m 644 catppt /usr/local/share/man/man1/catppt.1
../mkinstalldirs /usr/local/share/catdoc
mkdir /usr/local/share/catdoc
/usr/bin/install -c -m 644 ascii.spc /usr/local/share/catdoc/ascii.specchars
/usr/bin/install -c -m 644 tex.spc /usr/local/share/catdoc/tex.specchars
/usr/bin/install -c -m 644 ascii.rpl /usr/local/share/catdoc/ascii.replchars
/usr/bin/install -c -m 644 tex.rpl /usr/local/share/catdoc/tex.replchars
for i in *.txt; do\
          /usr/bin/install -c -m 0644 $i /usr/local/share/catdoc;\
         done
Step 8: Check Version
After successful installation, you can check the current installed catdoc version by using catdoc -V command as shown below.
cyberithub@macos1066 ~ % catdoc -V
Catdoc Version 0.95
Step 9: Using xls2csv
Now that you have catdoc formulae installed in your system, you can use xls2csv to convert xls file to csv file. Here we are using an example excel file called excel_example.xls to convert it to excel_example.csv using xls2csv -x excel_example.xls -s cp1252 -d 8859-1 > excel_example.csv command as shown below.
cyberithub@macos1066 ~ % xls2csv -x excel_example.xls -s cp1252 -d 8859-1 > excel_example.csv
-x : print unknown Unicode chars as \xNNNN, rather than as question marks
-s : specifies source charset
-d : specifies destination charset name
Sometimes while running above command, you might observe -s: no such file or directory error. If you see this error in your system then do not worry, the output csv file will be generated irrespective of the error. But still if you want to suppress the error then you can redirect it to /dev/null file as shown below.
cyberithub@macos1066 ~ % xls2csv -x excel_example.xls -s cp1252 -d 8859-1 > excel_example.csv &> /dev/null