
Table of Contents
In this article, we will see how to install Tableplus on macOS using 5 easy steps. TablePlus is a very popular light weight, native and GUI friendly tool for connecting and managing relational databases such as MySQL, PostgreSQL, MariaDB, Oracle and so on. It is not just fast and efficient but also has tons of security features along with multi-step authentication support, native libssh and TLS encryption to protect your databases. It also provides the unique feature of customizing looks and appearance according to your personal requirements and needs.
It provides spreadsheet like editor which makes data query and browsing so simple and flexible like it was never before. Anyone who is using this application for the first time would able to perform all the database operations with minimal efforts. TablePlus also allows us to build internal metric dashboards which further helps us analyzing the performance of databases. It is currently available to install in almost all the Linux / Windows / Mac based systems. Here we will see the steps to install TablePlus on macOS system in great detail.
How to Install TablePlus on macOS Using 5 Easy Steps
Also Read: How to Install Mojo on Ubuntu 20.04 LTS (Focal Fossa)
Step 1: Prerequisites
a) You should have a running macOS System.
b) You should have access to install formulae in your System.
c) You should have brew utility available in your System.
Step 2: Update Your Server
In the first step, you need to update all the outdated formulae in your systems by using brew update command as shown below.
[cyberithub@macos1066 ~ % brew update
Step 3: Install TablePlus
In the next step, you can install TablePlus application by using any of the below given methods.
a) Using Brew Utility
The most convenient way to install tableplus is through homebrew utility. You just need to run brew install --cask tableplus command as shown below.
[cyberithub@macos1066 ~ % brew install --cask tableplus
==> Downloading https://download.tableplus.com/macos/496/TablePlus.dmg
################################################################################################################### 100.0%
==> Installing Cask tableplus
==> Moving App 'TablePlus.app' to '/Applications/TablePlus.app'
    tableplus was successfully installed!
b) Using GUI
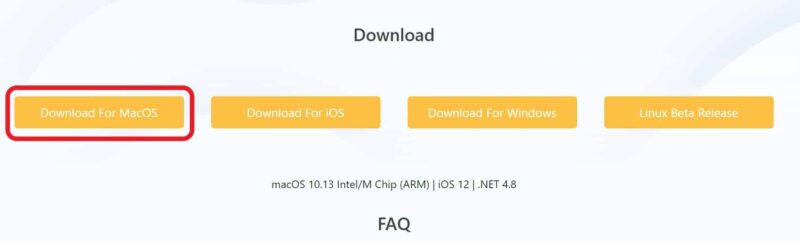
You have to go to TablePlus official website and download the latest version available for macOS by clicking below highlighted link.
Once downloaded, you now need to move the image file to /Applications directory by either opening it first and then dragging it to /Applications directory to copy all the files or you can simply mount the image file by using hdiutil mount TablePlus.dmg command as shown below.
[cyberithub@macos1066 ~ % hdiutil mount TablePlus.dmg
Checksumming Protective Master Boot Record (MBR : 0)_
Protective Master Boot Record (MBR :: verified CRC32 $52D15E3D
Checksumming GPT Header (Primary GPT Header : 1)_
 GPT Header (Primary GPT Header : 1): verified CRC32 $C12E7D82
Checksumming GPT Partition Data (Primary GPT Table: 2)_
GPT Partition Data (Primary GPT Tabl: verified CRC32 $6F5B071C
Checksumming (Apple_Free : 3)_
                   (Apple_Free : 3): verified CRC32 $00000000
Checksumming disk image (Apple_HFS : 4)_
.........................................................................................................................
         disk image (Apple_HFS : 4): verified CRC32 $C3E9B416
Checksumming (Apple_Free : 5)_
                   (Apple_Free : 5): verified CRC32 $00000000
Checksumming GPT Partition Data (Backup GPT Table : 6)_
GPT Partition Data (Backup GPT Table: verified CRC32 $6F7E091C
Checksumming GPT Header (Backup GPT Header : 7)_
  GPT Header (Backup GPT Header : 7): verified CRC32 $BE658012
verified CRC32 $62A98842
/dev/disk3        GUID_partition_scheme
/dev/disk3s1      Apple_HFS                    /Volumes/TablePlus
After mounting the disk image, you can now copy tableplus application using sudo cp -R /Volumes/TablePlus.app /Applications command as shown below.
[cyberithub@macos1066 ~ % sudo cp -R /Volumes/TablePlus.app /Applications
Step 4: Using TablePlus
Now if you search TablePlus application in finder (which usually should be on top right corner of your screen) then you should be able to find and launch it. Once the application is opened, you can go ahead and setup your connection to perform different database operations.
Later on, you can also unmount the disk image by using hdiutil unmount /Volumes/TablePlus command as shown below.
[cyberithub@macos1066 ~ % hdiutil unmount /Volumes/TablePlus
"/Volumes/TablePlus" unmounted successfully.
Step 5: Uninstall TablePlus
Once you are done using TablePlus application, you can choose to uninstall it from your system by using brew remove tableplus command as shown below.
[cyberithub@macos1066 ~ % brew remove tableplus
==> Uninstalling Cask tableplus
==> Backing App 'TablePlus.app' up to '/usr/local/Caskroom/tableplus/5.3.6,496/TablePlus.app'
==> Removing App '/Applications/TablePlus.app'
==> Purging files for version 5.3.6,496 of Cask tableplus