
Table of Contents
In this article, we will see how to install bmon on Ubuntu 20.04. bmon is a free and open source command-line bandwidth monitor and rate estimator tool used in Linux and Unix-like operating systems. It is designed to capture networking-related statistics and visualize them in a meaningful and easy-to-understand way. The tool is often used by system administrators and network engineers to analyze and troubleshoot network performance. It is also easy to install and use in almost all the famous platforms. Here we will see the steps to install bmon utility on Ubuntu 20.04 based systems.
Key Features
- Real-Time Monitoring: bmon provides real-time monitoring of network interfaces and displays various statistics such as the amount of data sent and received.
- Support for Various Interfaces: It can monitor multiple network interfaces simultaneously, including Ethernet, WLAN, virtual interfaces, and more.
- Graphical and Textual Output: bmon can output data in both graphical and textual formats. The graphical display is ASCII-based, making it usable even on a terminal.
- Customizable: The tool is highly customizable. Users can configure the type of data displayed, the refresh rate, and other display settings.
- Portable: bmon is designed to be portable and can run on a wide range of Unix and Linux systems.
- Input and Output Modules: It supports multiple input and output modules. This flexibility allows bmon to be extended and integrated with other tools and scripts.
Common Usages
- Network Traffic Analysis: Observing the current bandwidth usage of network interfaces, which is crucial for diagnosing network congestion or bandwidth-related issues.
- Monitoring Data Transfer Rates: Useful for tracking the speed of data transfers over the network, helping in performance analysis.
- Debugging and Troubleshooting: Assisting in identifying problems in network configurations or hardware by providing live feedback on network throughput.

How to Install bmon (Bandwidth Monitoring tool) on Ubuntu 20.04
Also Read: Which linux distribution is known to be most stable?
Step 1: Prerequisites
a) You should have a running Ubuntu 20.04 Server.
b) You should have sudo or root access to run privileged commands.
c) You should have apt or apt-get utility available in your Server.
d) You should also have git and make utility available in case you are looking to install bmon application using source code.
Step 2: Update Your Server
Before proceeding with the steps, I would highly recommend to check all available updates and install them by using sudo apt update && sudo apt upgrade command as shown below.
cyberithub@ubuntu:~$ sudo apt update && sudo apt upgrade
Hit:1 https://d3nt0h4h6pmmc4.cloudfront.net/ubuntu focal InRelease
Hit:2 http://ppa.launchpad.net/flatpak/stable/ubuntu focal InRelease
Hit:3 https://dl.winehq.org/wine-builds/ubuntu focal InRelease
Hit:4 http://security.ubuntu.com/ubuntu focal-security InRelease
Hit:5 https://dl.google.com/linux/chrome/deb stable InRelease
Hit:6 http://ppa.launchpad.net/gencfsm/ppa/ubuntu focal InRelease
Hit:7 http://ppa.launchpad.net/juju/stable/ubuntu focal InRelease
Get:8 https://repositories.timber.io/public/vector/deb/ubuntu focal InRelease [4,947 B]
Ign:9 https://pkg.jenkins.io/debian-stable binary/ InRelease
Hit:10 https://pkg.jenkins.io/debian-stable binary/ Release
Hit:11 http://ppa.launchpad.net/libreoffice/ppa/ubuntu focal InRelease
...................................................................
Step 3: Install bmon
There are multiple ways to install bmon utility on Ubuntu or Debian based systems. You can use any of the below methods depending on your needs and requirements.
a) Using apt or apt-get
The easiest way to install bmon is from default Ubuntu repo. You can use sudo apt install bmon command to download and install the package along with all its dependencies.
cyberithub@ubuntu:~$ sudo apt install bmon
[sudo] password for cyberithub:
Reading package lists... Done
Building dependency tree
Reading state information... Done
The following additional packages will be installed:
libconfuse-common libconfuse2
The following NEW packages will be installed:
bmon libconfuse-common libconfuse2
0 upgraded, 3 newly installed, 0 to remove and 2 not upgraded.
Need to get 74.7 kB of archives.
After this operation, 252 kB of additional disk space will be used.
Do you want to continue? [Y/n] Y
Get:1 http://in.archive.ubuntu.com/ubuntu focal/universe amd64 libconfuse-common all 3.2.2+dfsg-1 [5,512 B]
Get:2 http://in.archive.ubuntu.com/ubuntu focal/universe amd64 libconfuse2 amd64 3.2.2+dfsg-1 [23.7 kB]
Get:3 http://in.archive.ubuntu.com/ubuntu focal/universe amd64 bmon amd64 1:4.0-6 [45.5 kB]
Fetched 74.7 kB in 1s (56.0 kB/s)
Selecting previously unselected package libconfuse-common.
(Reading database ... 295650 files and directories currently installed.)
Preparing to unpack .../libconfuse-common_3.2.2+dfsg-1_all.deb ...
Unpacking libconfuse-common (3.2.2+dfsg-1) ...
Selecting previously unselected package libconfuse2:amd64.
Preparing to unpack .../libconfuse2_3.2.2+dfsg-1_amd64.deb ...
Unpacking libconfuse2:amd64 (3.2.2+dfsg-1) ...
Selecting previously unselected package bmon.
Preparing to unpack .../bmon_1%3a4.0-6_amd64.deb ...
Unpacking bmon (1:4.0-6) ...
Setting up libconfuse-common (3.2.2+dfsg-1) ...
Setting up libconfuse2:amd64 (3.2.2+dfsg-1) ...
Setting up bmon (1:4.0-6) ...
Processing triggers for man-db (2.9.1-1) ...
Processing triggers for libc-bin (2.31-0ubuntu9.14) ...
b) Using Source Code
If you are looking to use the latest version then it is recommended to install through source code. But before installing through source code, you have to first install all the packages and libraries required for the bmon installation.
cyberithub@ubuntu:~$ sudo apt-get install build-essential make libconfuse-dev libnl-3-dev libnl-route-3-dev libncurses-dev pkg-config dh-autoreconf
Once installed then clone the latest released source code from GitHub using git clone https://github.com/tgraf/bmon.git command as shown below. This will create a directory called bmon in current working location and copy all the contents in it.
cyberithub@ubuntu:~$ git clone https://github.com/tgraf/bmon.git
Cloning into 'bmon'...
remote: Enumerating objects: 706, done.
remote: Counting objects: 100% (3/3), done.
remote: Compressing objects: 100% (3/3), done.
remote: Total 706 (delta 0), reused 1 (delta 0), pack-reused 703
Receiving objects: 100% (706/706), 860.74 KiB | 942.00 KiB/s, done.
Resolving deltas: 100% (395/395), done.
To proceed, switch to bmon directory using cd bmon command.
cyberithub@ubuntu:~$ cd bmon
Then run autogen.sh script to generate configure script and other files necessary for building the package.
cyberithub@ubuntu:~/bmon$ ./autogen.sh
configure.ac:35: installing 'build-aux/compile'
configure.ac:29: installing 'build-aux/config.guess'
configure.ac:29: installing 'build-aux/config.sub'
configure.ac:32: installing 'build-aux/install-sh'
configure.ac:32: installing 'build-aux/missing'
src/Makefile.am: installing 'build-aux/depcomp'
Once you have the configure script generated, run the script to detect system configuration and all the prerequisites required to prepare the package source code to be compiled on the target system.
cyberithub@ubuntu:~/bmon$ ./configure
checking build system type... x86_64-pc-linux-gnu
checking host system type... x86_64-pc-linux-gnu
checking target system type... x86_64-pc-linux-gnu
checking for a BSD-compatible install... /usr/bin/install -c
checking whether build environment is sane... yes
checking for a thread-safe mkdir -p... /usr/bin/mkdir -p
checking for gawk... gawk
checking whether make sets $(MAKE)... yes
checking whether make supports nested variables... yes
checking whether make supports nested variables... (cached) yes
checking whether make supports the include directive... yes (GNU style)
checking for gcc... gcc
checking whether the C compiler works... yes
checking for C compiler default output file name... a.out
checking for suffix of executables...
checking whether we are cross compiling... no
checking for suffix of object files... o
checking whether we are using the GNU C compiler... yes
..................................................
After checking configuration, build source code using make command as shown below.
cyberithub@ubuntu:~/bmon$ make
Making all in src
make[1]: Entering directory '/home/cyberithub/bmon/src'
CC bmon-utils.o
CC bmon-unit.o
CC bmon-conf.o
CC bmon-input.o
CC bmon-output.o
CC bmon-group.o
CC bmon-element.o
CC bmon-attr.o
CC bmon-element_cfg.o
CC bmon-history.o
CC bmon-graph.o
CC bmon-bmon.o
CC bmon-module.o
CC bmon-in_netlink.o
............................................
Finally install all the object files generated using sudo make install command as shown below.
cyberithub@ubuntu:~/bmon$ sudo make install
[sudo] password for cyberithub:
Making install in src
make[1]: Entering directory '/home/cyberithub/bmon/src'
make[2]: Entering directory '/home/cyberithub/bmon/src'
/usr/bin/mkdir -p '/usr/local/bin'
/usr/bin/install -c bmon '/usr/local/bin'
make[2]: Nothing to be done for 'install-data-am'.
make[2]: Leaving directory '/home/cyberithub/bmon/src'
make[1]: Leaving directory '/home/cyberithub/bmon/src'
Making install in man
make[1]: Entering directory '/home/cyberithub/bmon/man'
make[2]: Entering directory '/home/cyberithub/bmon/man'
make[2]: Nothing to be done for 'install-exec-am'.
/usr/bin/mkdir -p '/usr/local/share/man/man8'
/usr/bin/install -c -m 644 bmon.8 '/usr/local/share/man/man8'
make[2]: Leaving directory '/home/cyberithub/bmon/man'
make[1]: Leaving directory '/home/cyberithub/bmon/man'
...................................................
You will see bmon utility installed under /usr/local/bin path. If this path is already set under global PATH environment variable then you can directly run bmon command.
Step 4: Check Version
You can check the version you have currently installed by running bmon --version command as shown below.
cyberithub@ubuntu:~$ bmon --version
bmon 4.0
Copyright (C) 2001-2015 by Thomas Graf <tgraf@suug.ch>
Copyright (C) 2013 Red Hat, Inc.
bmon comes with ABSOLUTELY NO WARRANTY. This is free software, and you
are welcome to redistribute it under certain conditions. See the source
code for details.
Also Read
Step 5: Verify Installation
If you installed bmon from default Ubuntu repo then you can verify the installed files path by using dpkg -L bmon command as shown below.
cyberithub@ubuntu:~$ dpkg -L bmon
/.
/etc
/etc/bmon.conf
/usr
/usr/bin
/usr/bin/bmon
/usr/share
/usr/share/doc
/usr/share/doc/bmon
/usr/share/doc/bmon/changelog.Debian.gz
/usr/share/doc/bmon/copyright
/usr/share/doc/bmon/examples
/usr/share/doc/bmon/examples/bmon.conf
/usr/share/man
/usr/share/man/man8
/usr/share/man/man8/bmon.8.gz
Step 6: Using bmon
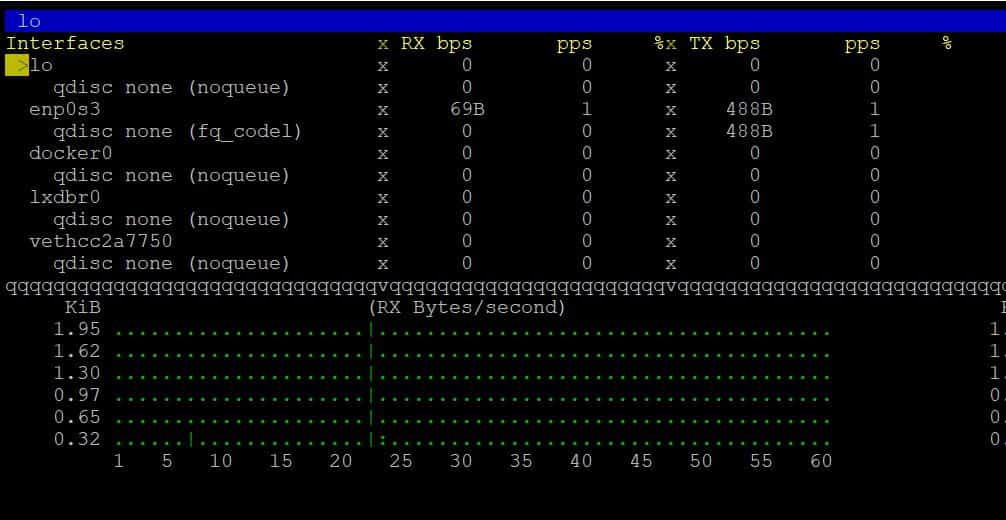
To launch bmon. type bmon command on terminal and press Enter as show below.
cyberithub@ubuntu:~$ bmon
It will launch the tool and you will see network bandwidth status as below.
Also Read
Step 7: Check all available options
To check all the input and output options available with bmon utility, use bmon --help command as shown below.
cyberithub@ubuntu:~$ bmon --help
bmon 4.0
Copyright (C) 2001-2015 by Thomas Graf <tgraf@suug.ch>
Copyright (C) 2013 Red Hat, Inc.
bmon comes with ABSOLUTELY NO WARRANTY. This is free software, and you
are welcome to redistribute it under certain conditions. See the source
code for details.

Usage: bmon [OPTION]...

Options:
Startup:
-i, --input=MODPARM Input module(s)
-o, --output=MODPARM Output module(s)
-f, --configfile=PATH Alternative path to configuration file
-h, --help Show this help text
-V, --version Show version
........................................................
Step 8: Uninstall bmon
When you are done using bmon tool then you can think of removing it from your system by using any of the below methods depending on how you installed it.
a) Using apt or apt-get
If you installed bmon from default ubuntu repo then for removal, run sudo apt remove bmon command as shown below. If you are looking to remove dependencies as well then use --auto-remove option with below command.
cyberithub@ubuntu:~$ sudo apt remove bmon
Reading package lists... Done
Building dependency tree
Reading state information... Done
The following packages were automatically installed and are no longer required:
libconfuse-common libconfuse2
Use 'sudo apt autoremove' to remove them.
The following packages will be REMOVED:
bmon
0 upgraded, 0 newly installed, 1 to remove and 2 not upgraded.
After this operation, 150 kB disk space will be freed.
Do you want to continue? [Y/n] Y
(Reading database ... 295668 files and directories currently installed.)
Removing bmon (1:4.0-6) ...
Processing triggers for man-db (2.9.1-1) ...
b) Using make utility
If you installed bmon tool from source code then for removal you have to first switch to cloned directory and run sudo make uninstall command as shown below.
cyberithub@ubuntu:~/bmon$ sudo make uninstall
[sudo] password for cyberithub:
Making uninstall in src
make[1]: Entering directory '/home/cyberithub/bmon/src'
( cd '/usr/local/bin' && rm -f bmon )
make[1]: Leaving directory '/home/cyberithub/bmon/src'
Making uninstall in man
make[1]: Entering directory '/home/cyberithub/bmon/man'
( cd '/usr/local/share/man/man8' && rm -f bmon.8 )
make[1]: Leaving directory '/home/cyberithub/bmon/man'
Making uninstall in include
make[1]: Entering directory '/home/cyberithub/bmon/include'
make[1]: Nothing to be done for 'uninstall'.
make[1]: Leaving directory '/home/cyberithub/bmon/include'
Making uninstall in examples
make[1]: Entering directory '/home/cyberithub/bmon/examples'
( cd '/usr/local/share/doc/bmon/examples' && rm -f bmon.conf )
make[1]: Leaving directory '/home/cyberithub/bmon/examples'
make[1]: Entering directory '/home/cyberithub/bmon'
make[1]: Nothing to be done for 'uninstall-am'.
make[1]: Leaving directory '/home/cyberithub/bmon'