Table of Contents
In this article, we will see how to install and use Lombok in Java Eclipse IDE. Project Lombok is a Java library that automatically plugs into our editor and build tools, thus enabling us to reduce or remove the boilerplate code hence reducing the complexity and saving a great deal of development time. All we need to do is to just use some annotations. It is also very easy to plug into almost all the famous Java editors. Here we will see the steps to install and use Project Lombok in Java Eclipse IDE.
Key Features
- Automatic Resource Management
- Hassle-free final local variables
- Hassle-free local variables
- Reduces the complexity of the code
- Immutable classes made very easy
- Saves lot of development time
- Implementation of Safe locking
- Use of annotations for checking null values
- Easy Logging
- Generate Constructors that take no arguments and so on
How to Install and Use Lombok in Java Eclipse IDE
Also Read: How to write JUnit test cases for Threads in Java
Step 1: Prerequisites
a) You should have eclipse installed in your System.
b) You should have the permission to install Lombok in your System.
c) You should have access to eclipse installation path.
Step 2: Download Lombok
You have to visit Project Lombok official website and download the latest jar file using wget or curl command as shown below.
cyberithub@ubuntu:~$ wget https://projectlombok.org/downloads/lombok.jar
--2023-08-16 21:57:39-- https://projectlombok.org/downloads/lombok.jar
Resolving projectlombok.org (projectlombok.org)... 172.67.130.232, 104.21.3.156, 2606:4700:3030::ac43:82e8, ...
Connecting to projectlombok.org (projectlombok.org)|172.67.130.232|:443... connected.
HTTP request sent, awaiting response... 200 OK
Length: 1979854 (1.9M) [application/java-archive]
Saving to: ‘lombok.jar’

lombok.jar 100%[============================================================================>] 1.89M 6.77MB/s in 0.3s

2023-08-16 21:57:40 (6.77 MB/s) - ‘lombok.jar’ saved [1979854/1979854]
Step 3: Install Lombok
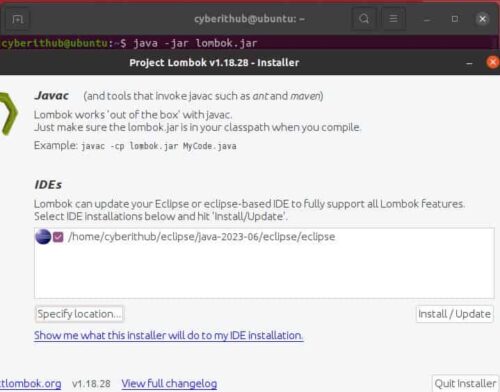
After downloading the jar file, you need to run java -jar lombok.jar command to install Lombok in Eclipse IDE. You will see below Installer getting launched which should auto detect the eclipse installation path. If in case eclipse installation path is not detected then you need to manually click on Specify location and browse to the installation path. For example, in our case it is installed on /home/cyberithub/eclipse/java-2023-06/eclipse/eclipse path as you can see below. Once detected, click on Install/Update to proceed.
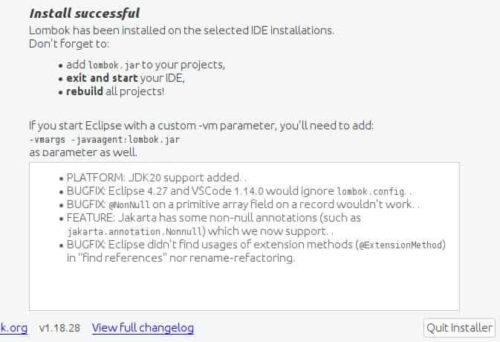
Lombok will be installed successfully and you should see below window with Install successful message. You can now quit the installer by clicking on Quit Installer and then restart your Eclipse IDE.
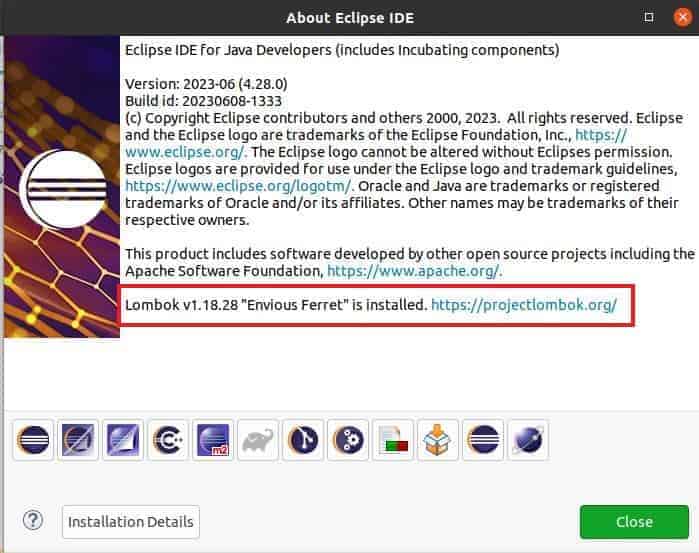
Once you restart eclipse IDE, you have to go to Help -> About section and look for Lombok version installed. If it shows like below then it confirms Lombok installed successfully in Eclipse IDE. Now you can start adding lombok.jar and build your projects.