
In this article, we will see how to solve "GLIBC_2.29 not found" error on Ubuntu Linux. Usually, you will encounter this error when you are trying to install a package that requires glibc version 2.29 to be installed in your System but currently you have either some newer or some older version installed. In few cases, it is also possible that you might get "GLIBC_2.29 not found" error on the output but the real problem could not be related to glibc version but to something else which might vary from system to system. Here we will see all the steps that you can take to approach towards finding the solution in the best possible manner.

Solved "GLIBC_2.29 not found" error on Ubuntu Linux
Also Read: Solved "cannot execute binary file: Exec format error"
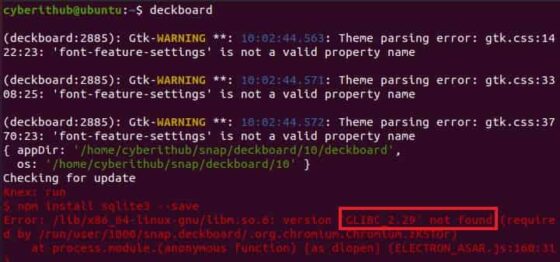
When I tried to open deckboard from terminal then I noticed below "GLIBC_2.29 not found" error on my Ubuntu 20.04 LTS System.
After getting above error, the first task is to check the current installed glibc version by using ldd --version command as shown below.
cyberithub@ubuntu:~$ ldd --version
ldd (Ubuntu GLIBC 2.31-0ubuntu9.9) 2.31
Copyright (C) 2020 Free Software Foundation, Inc.
This is free software; see the source for copying conditions. There is NO
warranty; not even for MERCHANTABILITY or FITNESS FOR A PARTICULAR PURPOSE.
Written by Roland McGrath and Ulrich Drepper.
As you can see from the above output, I already have version 2.31 installed which is above the version 2.29. So in this case, I won't be installing the older version as this will make my system throw all kind of library errors and ultimately makes the Kernel Panic after system restart. Believe me I did this mistake two times and both times my system crashed.
In certain cases, you might need some specific version of glibc library. So if you think you need version 2.29 only then you need to configure this library version by using sudo ldconfig command to make your system point to the lower version otherwise you will again end up having lot of library errors and finally the Kernel Panic error. So be careful with this step.
In case if your current installed glibc version is older than 2.29 then you can proceed with the below steps to install glibc 2.29. To fix the problem, first you need to download glibc 2.29 tar file by using below wget command.
cyberithub@ubuntu:~$ wget -c https://ftp.gnu.org/gnu/glibc/glibc-2.29.tar.gz
--2023-01-17 11:12:35-- https://ftp.gnu.org/gnu/glibc/glibc-2.29.tar.gz
Resolving ftp.gnu.org (ftp.gnu.org)... 209.51.188.20, 2001:470:142:3::b
Connecting to ftp.gnu.org (ftp.gnu.org)|209.51.188.20|:443... connected.
HTTP request sent, awaiting response... 200 OK
Length: 32592893 (31M) [application/x-gzip]
Saving to: ‘glibc-2.29.tar.gz’

glibc-2.29.tar.gz 100%[============================================================================>] 31.08M 1.41MB/s in 19s

2023-01-17 11:12:55 (1.62 MB/s) - ‘glibc-2.29.tar.gz’ saved [32592893/32592893]
Then extract the file using tar -zxvf glibc-2.29.tar.gz command as shown below.
cyberithub@ubuntu:~$ tar -zxvf glibc-2.29.tar.gz
Switch to glibc-2.29 directory using cd glibc-2.29 command as shown below.
cyberithub@ubuntu:~$ cd glibc-2.29
Next step is to create a separate build directory with any name you would like to create. Here we are creating glibc-build directory using mkdir glibc-build command as shown below.
cyberithub@ubuntu:~/glibc-2.29$ mkdir glibc-build
Then switch to the build directory using cd glibc-build command as shown below.
cyberithub@ubuntu:~/glibc-2.29$ cd glibc-build/
Then configure the code for your local architecture by running below configure script.
cyberithub@ubuntu:~/glibc-2.29/glibc-build$ ../configure --prefix=/home/cyberithub/glibc-2.29/glibc-build
checking build system type... x86_64-pc-linux-gnu
checking host system type... x86_64-pc-linux-gnu
checking for gcc... gcc
checking for suffix of object files... o
checking whether we are using the GNU C compiler... yes
checking whether gcc accepts -g... yes
checking for readelf... readelf
checking for g++... g++
checking whether we are using the GNU C++ compiler... yes
checking whether g++ accepts -g... yes
checking whether g++ can link programs... yes
checking for sysdeps preconfigure fragments... aarch64 alpha arm csky hppa i386 m68k microblaze mips nios2 powerpc riscv s390 sh sparc x86_64 checking whether gcc compiles in -mx32 mode by default... no
checking for use of fpu sysdeps directories... yes
.............................
running configure fragment for sysdeps/x86
checking whether -fPIC is default... yes
checking whether -fPIE is default... yes
configure: creating ./config.status
config.status: creating config.make
config.status: creating Makefile
config.status: creating config.h
config.status: executing default commands
Then compile the code using make command as shown below.
cyberithub@ubuntu:~/glibc-2.29/glibc-build$ make
............................
gcc -pie -Wl,-O1 -nostdlib -nostartfiles -o /home/cyberithub/glibc-2.29/glibc-build/elf/pldd -Wl,-z,combreloc -Wl,-z,relro -Wl,--hash-style=both /home/cyberithub/glibc-2.29/glibc-build/csu/Scrt1.o /home/cyberithub/glibc-2.29/glibc-build/csu/crti.o `gcc --print-file-name=crtbeginS.o` /home/cyberithub/glibc-2.29/glibc-build/elf/pldd.o /home/cyberithub/glibc-2.29/glibc-build/elf/xmalloc.o -Wl,-dynamic-linker=/lib64/ld-linux-x86-64.so.2 -Wl,-rpath-link=/home/cyberithub/glibc-2.29/glibc-build:/home/cyberithub/glibc-2.29/glibc-build/math:/home/cyberithub/glibc-2.29/glibc-build/elf:/home/cyberithub/glibc-2.29/glibc-build/dlfcn:/home/cyberithub/glibc-2.29/glibc-build/nss:/home/cyberithub/glibc-2.29/glibc-build/nis:/home/cyberithub/glibc-2.29/glibc-build/rt:/home/cyberithub/glibc-2.29/glibc-build/resolv:/home/cyberithub/glibc-2.29/glibc-build/mathvec:/home/cyberithub/glibc-2.29/glibc-build/support:/home/cyberithub/glibc-2.29/glibc-build/crypt:/home/cyberithub/glibc-2.29/glibc-build/nptl /home/cyberithub/glibc-2.29/glibc-build/libc.so.6 /home/cyberithub/glibc-2.29/glibc-build/libc_nonshared.a -Wl,--as-needed /home/cyberithub/glibc-2.29/glibc-build/elf/ld.so -Wl,--no-as-needed -lgcc `gcc --print-file-name=crtendS.o` /home/cyberithub/glibc-2.29/glibc-build/csu/crtn.o
make[2]: Leaving directory '/home/cyberithub/glibc-2.29/elf'
make[1]: Leaving directory '/home/cyberithub/glibc-2.29'
Finally install using make install command as shown below.
cyberithub@ubuntu:~/glibc-2.29/glibc-build$ sudo make install
LC_ALL=C; export LC_ALL; \
make -r PARALLELMFLAGS="" -C .. objdir=`pwd` install
make[1]: Entering directory '/home/cyberithub/glibc-2.29'
make subdir=csu -C csu ..=../ subdir_lib
make subdir=iconv -C iconv ..=../ subdir_lib
make[2]: Entering directory '/home/cyberithub/glibc-2.29/iconv'
make[2]: Leaving directory '/home/cyberithub/glibc-2.29/iconv'
make subdir=locale -C locale ..=../ subdir_lib
make[2]: Entering directory '/home/cyberithub/glibc-2.29/locale'
make[2]: Leaving directory '/home/cyberithub/glibc-2.29/locale'
make subdir=localedata -C localedata ..=../ subdir_lib
make[2]: Entering directory '/home/cyberithub/glibc-2.29/localedata'
make[2]: Nothing to be done for 'subdir_lib'.
make[2]: Leaving directory '/home/cyberithub/glibc-2.29/localedata'
make subdir=iconvdata -C iconvdata ..=../ subdir_lib
make[2]: Entering directory '/home/cyberithub/glibc-2.29/iconvdata'
make[2]: Nothing to be done for 'subdir_lib'.
make[2]: Leaving directory '/home/cyberithub/glibc-2.29/iconvdata'
make subdir=assert -C assert ..=../ subdir_lib
..........................................................
You will see that the glibc library version 2.29 will be installed successfully. Now you can try to run deckboard again and see if it works. Sometimes, even after following above steps deckboard might not work. In that case, the issue necessarily may not be due to glibc library but due to some other issue. In my case, the actually issue was with the package itself. I have install deckboard as snap package from Snap Store which had some issue.
But when I installed using the deb package by downloading it from the official deckboard website then it worked perfectly. You can check the detailed installation steps on How to Install Deckboard on Ubuntu 20.04 LTS (Focal Fossa) article. Hopefully, this article helped you in solving your "GLIBC_2.29 not found" error as well. Kindly let me know your feedback in the comment box !!