
Table of Contents
In this article, we will see how to install Xrdp on Ubuntu 22.04 LTS (Jammy Jellyfish). Xrdp is a free and open source implementation of Remote Desktop Protocol(RDP) Server in Linux/Unix based systems. This allows Linux and Unix based systems to accept remote desktop connection from multiple RDP Client systems including Microsoft Remote Desktop Client. By default, RDP transport is encrypted using TLS by default. Xrdp supports not only graphics remoting but also two-way clipboard transfer, auto redirection and drive redirection. More on official website. It is also very easy to install and use. Here we will see the steps to install Xrdp on Ubuntu 22.04 LTS Server in great detail.

How to Install Xrdp on Ubuntu 22.04 LTS (Jammy Jellyfish)
Also Read: How to Install librtlsdr-dev Package on Ubuntu 20.04 LTS (Focal Fossa)
Step 1: Prerequisites
a) You should have a running Ubuntu 22.04 LTS with X Server(Desktop Environment) installed.
b) You should have sudo or root access to run privileged commands.
c) You should have apt or apt-get utility available in your Server.
d) You should have a remote desktop client available.
Step 2: Update Your Server
Before installing Xrdp packages, it is mandatory to look for all available updates from default Ubuntu repo and install it using sudo apt update && sudo apt upgrade command as shown below.
cyberithub@ubuntu:~$ sudo apt update && sudo apt upgrade
Hit:1 https://dl.google.com/linux/chrome/deb stable InRelease
Hit:2 http://in.archive.ubuntu.com/ubuntu jammy InRelease
Hit:3 http://security.ubuntu.com/ubuntu jammy-security InRelease
Hit:4 http://in.archive.ubuntu.com/ubuntu jammy-updates InRelease
Hit:5 http://in.archive.ubuntu.com/ubuntu jammy-backports InRelease
Reading package lists... Done
Building dependency tree... Done
Reading state information... Done
4 packages can be upgraded. Run 'apt list --upgradable' to see them.
Reading package lists... Done
Building dependency tree... Done
Reading state information... Done
Calculating upgrade... Done
The following packages have been kept back:
grub-common grub-pc grub-pc-bin grub2-common
0 upgraded, 0 newly installed, 0 to remove and 4 not upgraded.
Step 3: Install Xrdp
In the next step, you can install Xrdp from default Ubuntu repo by using sudo apt install xrdp command as shown below. This will download and install the package along with all its dependencies.
cyberithub@ubuntu:~$ sudo apt install xrdp
Reading package lists... Done
Building dependency tree... Done
Reading state information... Done
The following additional packages will be installed:
libfuse2 xorgxrdp
Suggested packages:
guacamole
The following NEW packages will be installed:
libfuse2 xorgxrdp xrdp
0 upgraded, 3 newly installed, 0 to remove and 4 not upgraded.
Need to get 672 kB of archives.
After this operation, 3,710 kB of additional disk space will be used.
Do you want to continue? [Y/n] Y
Get:1 http://in.archive.ubuntu.com/ubuntu jammy/universe amd64 libfuse2 amd64 2.9.9-5ubuntu3 [90.3 kB]
Get:2 http://in.archive.ubuntu.com/ubuntu jammy/universe amd64 xrdp amd64 0.9.17-2ubuntu2 [517 kB]
Get:3 http://in.archive.ubuntu.com/ubuntu jammy/universe amd64 xorgxrdp amd64 1:0.2.17-1build1 [65.3 kB]
Fetched 672 kB in 2s (317 kB/s)
........................................................
Step 4: Verify Installation
After successful installation, you can verify the installed files path by using dpkg -L xrdp command as shown below.
cyberithub@ubuntu:~$ dpkg -L xrdp
/.
/etc
/etc/default
/etc/default/xrdp
/etc/init.d
/etc/init.d/xrdp
/etc/pam.d
/etc/pam.d/xrdp-sesman
/etc/xrdp
/etc/xrdp/km-00000406.ini
/etc/xrdp/km-00000407.ini
/etc/xrdp/km-00000409.ini
/etc/xrdp/km-0000040a.ini
/etc/xrdp/km-0000040b.ini
/etc/xrdp/km-0000040c.ini
/etc/xrdp/km-00000410.ini
/etc/xrdp/km-00000411.ini
/etc/xrdp/km-00000412.ini
..........................................
Step 5: Check Service Status
You also need to verify Xrdp daemon status by using sudo systemctl status xrdp command as shown below. If the port is allowed then by default it should be in running status as you can see below. You can also use sudo systemctl start xrdp or sudo systemctl restart xrdp to start or restart daemon service.
cyberithub@ubuntu:~$ sudo systemctl status xrdp
● xrdp.service - xrdp daemon
Loaded: loaded (/lib/systemd/system/xrdp.service; enabled; vendor preset: enabled)
Active: active (running) since Thu 2023-06-22 00:27:55 IST; 5min ago
Docs: man:xrdp(8)
man:xrdp.ini(5)
Process: 37872 ExecStartPre=/bin/sh /usr/share/xrdp/socksetup (code=exited, status=0/SUCCESS)
Process: 37880 ExecStart=/usr/sbin/xrdp $XRDP_OPTIONS (code=exited, status=0/SUCCESS)
Main PID: 37881 (xrdp)
Tasks: 1 (limit: 2277)
Memory: 1.1M
CPU: 28ms
CGroup: /system.slice/xrdp.service
└─37881 /usr/sbin/xrdp

Jun 22 00:27:54 ubuntu systemd[1]: Starting xrdp daemon...
Jun 22 00:27:54 ubuntu xrdp[37880]: [INFO ] address [0.0.0.0] port [3389] mode 1
Jun 22 00:27:54 ubuntu xrdp[37880]: [INFO ] listening to port 3389 on 0.0.0.0
Jun 22 00:27:54 ubuntu xrdp[37880]: [INFO ] xrdp_listen_pp done
Jun 22 00:27:54 ubuntu systemd[1]: xrdp.service: Can't open PID file /run/xrdp/xrdp.pid (yet?) after start: Operation not permitted
Jun 22 00:27:55 ubuntu systemd[1]: Started xrdp daemon.
Jun 22 00:27:56 ubuntu xrdp[37881]: [INFO ] starting xrdp with pid 37881
Jun 22 00:27:56 ubuntu xrdp[37881]: [INFO ] address [0.0.0.0] port [3389] mode 1
Jun 22 00:27:56 ubuntu xrdp[37881]: [INFO ] listening to port 3389 on 0.0.0.0
Jun 22 00:27:56 ubuntu xrdp[37881]: [INFO ] xrdp_listen_pp done
Step 6: Add User
Then you need to add the xrdp user to group ssl-cert using sudo adduser xrdp ssl-cert command as shown below. This will allow xrdp user to read ssl-cert-snakeoil.key(an ssl certificate key) placed under /etc/ssl/private directory.
cyberithub@ubuntu:~$ sudo adduser xrdp ssl-cert
Adding user `xrdp' to group `ssl-cert' ...
Adding user xrdp to group ssl-cert
Done.
After adding xrdp user, you need to restart the service by using sudo systemctl restart xrdp command as shown below.
cyberithub@ubuntu:~$ sudo systemctl restart xrdp
[sudo] password for cyberithub:
Step 7: Allow Port (Optional)
If you are using firewall in your system then you need to allow incoming requests from RDP client system. For example, in our case Microsoft Remote Desktop Client having IP 192.168.0.106. So to allow incoming connection request from this client system, we need to run sudo ufw allow from 192.168.0.106 to any port 3389 command on Xrdp server.
cyberithub@ubuntu:~$ sudo ufw allow from 192.168.0.106 to any port 3389
You can also allow traffic for entire subnet instead for just one ip. Then you need to reload the firewall using sudo ufw reload command as shown below.
cyberithub@ubuntu:~$ ufw reload
Finally, verify the port status by using sudo ufw status command as shown below.
cyberithub@ubuntu:~$ ufw status
Step 8: Connect to Xrdp Server
To connect Xrdp Server from a Windows 10 machine, you need to open Run by Pressing Windows+R button and then type mstsc there to open Remote Desktop Connection as shown below. Here you need to provide the IP of your Xrdp Server. For example, in my case the IP of Xrdp server is 192.168.0.104 so I am providing it here and then click on Connect.

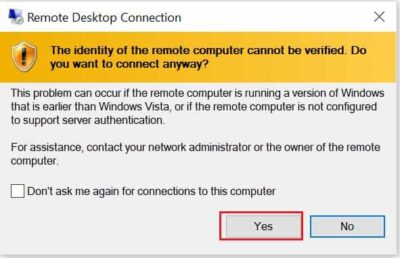
After clicking on Connect, you might see two different type of pop up screen depending on if you have restarted Xrdp daemon or not. If you forgot to restart then you will see below type of pop-up screen while trying to connect. Even if you click Yes here, you won't be able to connect to Xrdp Server.
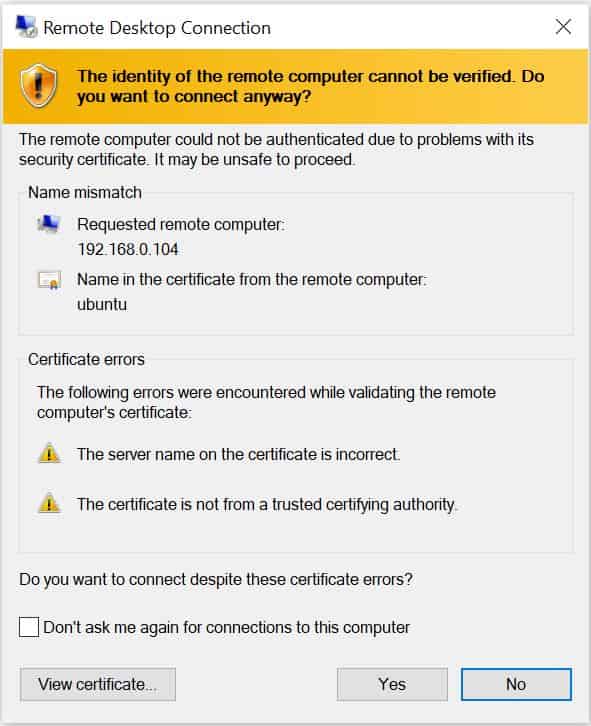
But if you have restarted the service then you will see below type of pop-up screen to connect. You can ignore below certificate error and proceed towards the connection by clicking on Yes.
You will see below window where you will be asked to provide username and password of Xrdp Server. It is important to remember here that since Xrdp supports only one Xsession so you need to logout from all the sessions before login through RDP Client. Once done, click on OK to connect.
NOTE:
OK, it won't connect and might redirect you back to the RDP Client window. In that case, you need to restart your Xrdp server once and see if it helps.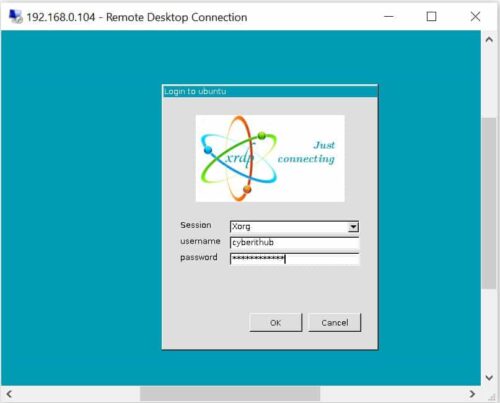
After successful connection, you will see below desktop screen of your Xrdp Server. You can now proceed with your work as usual on this Server.
