
Table of Contents
In this article, we will see how to install NGROK on Ubuntu 20.04 LTS (Focal Fossa). ngrok is a cross-platform secured unified ingress framework that combines different services such as reverse proxy, firewall, api gateway and load balancing into a ready to use production service. It not only save the overhead of running multiple different services but also provides instant ingress to your apps in any cloud, private network, or devices with authentication, load balancing, and other critical controls.
It provides the fastest way to put your local app on the Internet where you can do all sorts of testing before deployment. ngrok allows you to secure your applications with OAUTH 2.0. It supports OAuth tunnels with major providers such as Google, Github, and Microsoft. It provides an excellent realtime inspection interface which allows you to see what traffic is sent to your application server and what type of responses server is returning.
It has many other features which makes it an ideal service to choose for hosting application services on Internet. It is also very easy to install and use on almost all the famous platforms. Here we will see the steps to install ngrok on Ubuntu 20.04 LTS based systems.
How to Install NGROK on Ubuntu 20.04 LTS (Focal Fossa)
Also Read: Solved "gzip: stdin: not in gzip format" error in Linux/Unix
Step 1: Prerequisites
a) You should have a running Ubuntu 20.04 LTS Server.
b) You should have sudo or root access to run privileged commands.
c) You should have wget utility available in your System.
d) You should have curl and tee utility available in your System.
Step 2: Update Your System
Before installing any new packages, it is essential to look for all the available updates from default Ubuntu repo and install them by using sudo apt update && sudo apt upgrade command as shown below.
cyberithub@ubuntu:~$ sudo apt update && sudo apt upgrade
[sudo] password for cyberithub:
Hit:1 http://ppa.launchpad.net/flatpak/stable/ubuntu focal InRelease
Hit:2 http://in.archive.ubuntu.com/ubuntu focal InRelease
Hit:3 http://security.ubuntu.com/ubuntu focal-security InRelease
Hit:4 https://dl.winehq.org/wine-builds/ubuntu focal InRelease
Hit:5 http://in.archive.ubuntu.com/ubuntu focal-updates InRelease
Hit:6 https://d3nt0h4h6pmmc4.cloudfront.net/ubuntu focal InRelease
Hit:7 http://ppa.launchpad.net/gencfsm/ppa/ubuntu focal InRelease
Hit:8 https://dl.google.com/linux/chrome/deb stable InRelease
Hit:9 http://in.archive.ubuntu.com/ubuntu focal-backports InRelease
Hit:10 http://ppa.launchpad.net/juju/stable/ubuntu focal InRelease
Hit:11 https://download.sublimetext.com apt/stable/ InRelease
Hit:12 http://ppa.launchpad.net/libreoffice/ppa/ubuntu focal InRelease
Hit:13 https://ftp.postgresql.org/pub/pgadmin/pgadmin4/apt/focal pgadmin4 InRelease
Hit:14 http://ppa.launchpad.net/mojo-maintainers/ppa/ubuntu focal InRelease
Hit:15 http://ppa.launchpad.net/ubuntu-toolchain-r/test/ubuntu focal InRelease
..............................................................
Step 3: Install NGROK
In the next step, you can install ngrok package by using any of the below methods depending on availability of tools and your needs and requirements.
a) Using Binary Package
If you are looking to install ngrok binary file then you need to get the latest stable linux package by using below wget command. It will download the compressed file in current working directory.
cyberithub@ubuntu:~$ wget https://bin.equinox.io/c/bNyj1mQVY4c/ngrok-v3-stable-linux-amd64.tgz
--2023-08-24 22:55:04-- https://bin.equinox.io/c/bNyj1mQVY4c/ngrok-v3-stable-linux-amd64.tgz
Resolving bin.equinox.io (bin.equinox.io)... 52.202.168.65, 54.237.133.81, 18.205.222.128, ...
Connecting to bin.equinox.io (bin.equinox.io)|52.202.168.65|:443... connected.
HTTP request sent, awaiting response... 200 OK
Length: 8829222 (8.4M) [application/octet-stream]
Saving to: ‘ngrok-v3-stable-linux-amd64.tgz’

ngrok-v3-stable-linux-amd64.tgz 100%[============================================================================>] 8.42M 1.68MB/s in 5.9s

2023-08-24 22:55:11 (1.44 MB/s) - ‘ngrok-v3-stable-linux-amd64.tgz’ saved [8829222/8829222]
After downloading the package, you need to extract the binary under /usr/local/bin path using below tar command.
cyberithub@ubuntu:~$ sudo tar xvzf ngrok-v3-stable-linux-amd64.tgz -C /usr/local/bin
ngrok
b) Using APT
If you are looking to install ngrok package from apt package manager then first you have to visit the official website and get the latest command to download and add public ascii key as shown below.
cyberithub@ubuntu:~$ curl -s https://ngrok-agent.s3.amazonaws.com/ngrok.asc | sudo tee /etc/apt/trusted.gpg.d/ngrok.asc >/dev/null
Then you have to add the repo information in ngrok.list under /etc/apt/sources.list.d directory path using below command.
cyberithub@ubuntu:~$ echo "deb https://ngrok-agent.s3.amazonaws.com buster main" | sudo tee /etc/apt/sources.list.d/ngrok.list
deb https://ngrok-agent.s3.amazonaws.com buster main
Update the package cache by using sudo apt update command as shown below. This will load all the packages information from the added repo.
cyberithub@ubuntu:~$ sudo apt update
Hit:1 https://dl.winehq.org/wine-builds/ubuntu focal InRelease
Hit:2 https://dl.google.com/linux/chrome/deb stable InRelease
Get:3 http://security.ubuntu.com/ubuntu focal-security InRelease [114 kB]
Hit:4 http://ppa.launchpad.net/flatpak/stable/ubuntu focal InRelease
Hit:5 http://in.archive.ubuntu.com/ubuntu focal InRelease
Hit:6 http://in.archive.ubuntu.com/ubuntu focal-updates InRelease
Hit:7 http://ppa.launchpad.net/gencfsm/ppa/ubuntu focal InRelease
Hit:8 https://d3nt0h4h6pmmc4.cloudfront.net/ubuntu focal InRelease
Hit:9 http://in.archive.ubuntu.com/ubuntu focal-backports InRelease
Hit:10 https://download.sublimetext.com apt/stable/ InRelease
Hit:11 http://ppa.launchpad.net/juju/stable/ubuntu focal InRelease
Get:12 https://ngrok-agent.s3.amazonaws.com buster InRelease [20.3 kB]
Hit:13 http://ppa.launchpad.net/libreoffice/ppa/ubuntu focal InRelease
Hit:14 https://ftp.postgresql.org/pub/pgadmin/pgadmin4/apt/focal pgadmin4 InRelease
Hit:15 http://ppa.launchpad.net/mojo-maintainers/ppa/ubuntu focal InRelease
Hit:16 http://ppa.launchpad.net/ubuntu-toolchain-r/test/ubuntu focal InRelease
Get:17 http://security.ubuntu.com/ubuntu focal-security/main amd64 DEP-11 Metadata [59.9 kB]
Get:18 http://security.ubuntu.com/ubuntu focal-security/universe amd64 DEP-11 Metadata [96.5 kB]
Get:19 http://security.ubuntu.com/ubuntu focal-security/multiverse amd64 DEP-11 Metadata [940 B]
Get:20 https://ngrok-agent.s3.amazonaws.com buster/main amd64 Packages [2,799 B]
Get:21 https://ngrok-agent.s3.amazonaws.com buster/main i386 Packages [2,513 B]
Fetched 297 kB in 25s (11.7 kB/s)
Reading package lists... Done
Building dependency tree
Reading state information... Done
2 packages can be upgraded. Run 'apt list --upgradable' to see them.
Then install ngrok package by using sudo apt install ngrok command as shown below. This will download and install the package along with all its dependencies.
cyberithub@ubuntu:~$ sudo apt install ngrok
[sudo] password for cyberithub:
Reading package lists... Done
Building dependency tree
Reading state information... Done
The following NEW packages will be installed:
ngrok
0 upgraded, 1 newly installed, 0 to remove and 2 not upgraded.
Need to get 6,499 kB of archives.
After this operation, 0 B of additional disk space will be used.
Get:1 https://ngrok-agent.s3.amazonaws.com buster/main amd64 ngrok amd64 3.3.3 [6,499 kB]
Fetched 6,499 kB in 6s (1,022 kB/s)
Selecting previously unselected package ngrok.
(Reading database ... 255122 files and directories currently installed.)
Preparing to unpack .../archives/ngrok_3.3.3_amd64.deb ...
Unpacking ngrok (3.3.3) ...
Setting up ngrok (3.3.3) ...
c) Using Snap
Finally, if you have snap utility available in your system then you can also install ngrok as snap package from snap store by using sudo snap install ngrok command as shown below.
cyberithub@ubuntu:~$ sudo snap install ngrok
ngrok (v3/stable) 3.3.1 from Kyle Wenholz (kyle-ngrok) installed
Step 4: Check Version
After successful installation, you can check the current installed ngrok version by using ngrok --version command as show below.
cyberithub@ubuntu:~$ ngrok --version
ngrok version 3.3.3
Step 5: Add authtoken
Then you have to run ngrok config add-authtoken <token> command to add your authtoken to the default ngrok.yml configuration file. This will grant you access to more features and longer session times.
NOTE:
cyberithub@ubuntu:~$ ngrok config add-authtoken 5FKTJVM4nQcu8FihPargdBrw_8JLwvdoNjqOsd9b9NWxOP
Authtoken saved to configuration file: /home/cyberithub/.config/ngrok/ngrok.yml
Step 6: Start a Tunnel
Now to start a HTTP tunnel forwarding to your local Port 80, run ngrok http 80 command as shown below.
cyberithub@ubuntu:~$ ngrok http 80
ngrok (Ctrl+C to quit)

🤯 Try the ngrok Kubernetes Ingress Controller: https://ngrok.com/s/k8s-ingress

Session Status          online
Account                 cyberithub (Plan: Free)
Update                  update available (version 3.3.4, Ctrl-U to update)
Version                 3.3.3
Region                  United States (us)
Latency                 31ms
Web Interface           http://127.0.0.1:4040
Forwarding              https://gike-72-77-33-108.ngrok-free.app -> http://localhost:80

Connections             ttl  opn  rt1   rt5   p50   p90
                        0    0    0.00  0.00  0.00  0.00
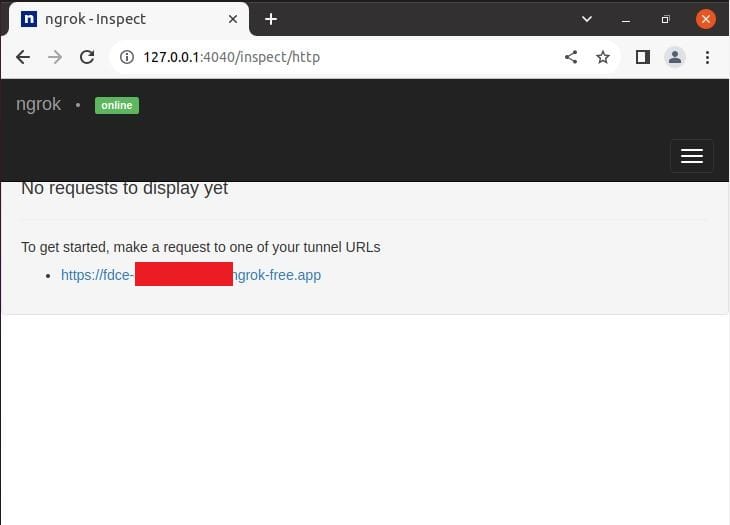
Step 7: Access Dashboard
Now you have to go to Desktop and open your favorite web browser. In the URL section, provide 127.0.0.1:4040 and press Enter. You will see a dashboard open like below where it will provide you the tunnel URLs and should show status as online.
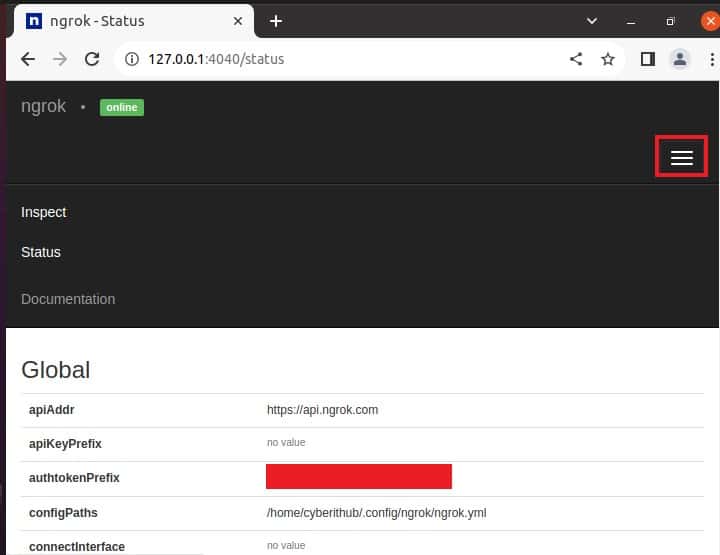
You can also check the status by clicking on below highlighted option. This shows that ngrok is online and running fine.
Step 8: Uninstall Ngrok
Once you are done using Ngrok, you can choose to uninstall it from your system by using any of the below methods.
a) Remove binary file
If you are using binary file, then all you need to do is to remove the file by using sudo rm -rf /usr/local/bin/ngrok command as shown below.
cyberithub@ubuntu:~$ sudo rm -rf /usr/local/bin/ngrok
b) Using APT
If you installed package using apt package manager then you have to run sudo apt remove ngrok command to remove the package from your system.
cyberithub@ubuntu:~$ sudo apt remove ngrok
[sudo] password for cyberithub:
Reading package lists... Done
Building dependency tree
Reading state information... Done
The following packages will be REMOVED:
ngrok
0 upgraded, 0 newly installed, 1 to remove and 2 not upgraded.
After this operation, 0 B of additional disk space will be used.
Do you want to continue? [Y/n] Y
(Reading database ... 255124 files and directories currently installed.)
Removing ngrok (3.3.3) ...
dpkg: warning: while removing ngrok, directory '/usr/local/bin' not empty so not removed
c) Using Snap
If you installed ngrok as snap package then to remove you have to run sudo snap remove ngrok command as shown below.
cyberithub@ubuntu:~$ sudo snap remove ngrok
ngrok removed