Table of Contents
In this article, we will see how to install new relic infrastructure agent on Ubuntu 20.04 LTS. New Relic Infrastructure monitoring agent is a very lightweight piece of software that runs on your host and collects all the data which includes performance and health data about the system resources and processes of the host where it's enabled (on-premises or virtualized). If you want to collect data about core services running on your host, you need to install the infrastructure monitoring agent first, and then install or enable on-host integrations.
The infrastructure monitoring agent can be installed on many platforms such as Linux, Windows and Mac. There are multiple ways to deploy agent depending on your requirements and needs. Here we will follow the best way to install infrastructure agent on Ubuntu 22.04 LTS based systems.

How to Install New Relic Infrastructure Agent on Ubuntu 20.04 LTS
Also Read: How to Install Synopsysctl on Linux Using 5 Easy Steps
Step 1: Prerequisites
a) You should have a running Ubuntu 20.04 LTS Server.
b) You should have sudo or root access to run privileged commands.
c) You should have apt and dpkg utility available in your Server.
d) You should have a valid New Relic Account.
Step 2: Update Your Server
Before doing any changes in the system, it is essential to update your system packages by using sudo apt update && sudo apt upgrade command as shown below.
cyberithub@ubuntu:~$ sudo apt update && sudo apt upgrade
Hit:1 https://dl.winehq.org/wine-builds/ubuntu focal InRelease
Hit:2 https://d3nt0h4h6pmmc4.cloudfront.net/ubuntu focal InRelease
Hit:3 https://dl.google.com/linux/chrome/deb stable InRelease
Hit:4 http://ppa.launchpad.net/flatpak/stable/ubuntu focal InRelease
Hit:5 http://in.archive.ubuntu.com/ubuntu focal InRelease
Get:6 http://security.ubuntu.com/ubuntu focal-security InRelease [114 kB]
Get:7 http://in.archive.ubuntu.com/ubuntu focal-updates InRelease [114 kB]
Hit:8 http://ppa.launchpad.net/gencfsm/ppa/ubuntu focal InRelease
Hit:9 http://ppa.launchpad.net/juju/stable/ubuntu focal InRelease
Hit:10 https://download.sublimetext.com apt/stable/ InRelease
Get:11 http://in.archive.ubuntu.com/ubuntu focal-backports InRelease [108 kB]
Hit:12 http://ppa.launchpad.net/libreoffice/ppa/ubuntu focal InRelease
Hit:13 https://ngrok-agent.s3.amazonaws.com buster InRelease
Hit:14 http://ppa.launchpad.net/mojo-maintainers/ppa/ubuntu focal InRelease
Hit:15 https://ftp.postgresql.org/pub/pgadmin/pgadmin4/apt/focal pgadmin4 InRelease
Hit:16 http://ppa.launchpad.net/ubuntu-toolchain-r/test/ubuntu focal InRelease
....................................................
Step 3: Add Your License Key
You have to mandatorily get the license key by logging in to your New Relic Account. If you don't have your account created then you need to first sign up and create. Once you login, you will get the License Key which you need to put it in the configuration file /etc/newrelic-infra.yml using below command.
cyberithub@ubuntu:~$ echo "license_key: 7be5ad1dc7d4aebbf309986526ff786fFFEFLASK" | sudo tee -a /etc/newrelic-infra.yml
[sudo] password for cyberithub:
license_key: 7be5ad1dc7d4aebbf309986526ff786fFFEFLASK
Step 4: Download GPG Key
In the next step, you have to add the GPG Key using below curl command to securely download the package from new relic repo.
cyberithub@ubuntu:~$ curl -fsSL https://download.newrelic.com/infrastructure_agent/gpg/newrelic-infra.gpg | sudo gpg --dearmor -o /etc/apt/trusted.gpg.d/newrelic-infra.gpg
Step 5: Add Repo
Since new relic infrastructure agent package is only available from new relic repo so you need to add the repo first using below command to download the package along with all its dependencies.
cyberithub@ubuntu:~$ echo "deb https://download.newrelic.com/infrastructure_agent/linux/apt focal main" | sudo tee -a /etc/apt/sources.list.d/newrelic-infra.list
deb https://download.newrelic.com/infrastructure_agent/linux/apt focal main
Step 6: Refresh Repositories
After adding the repo, you have to refresh the repositories by using sudo apt update command to update the metadata information about all the available packages from the repo.
cyberithub@ubuntu:~$ sudo apt update
Hit:1 https://d3nt0h4h6pmmc4.cloudfront.net/ubuntu focal InRelease
Get:2 https://download.newrelic.com/infrastructure_agent/linux/apt focal InRelease [10.8 kB]
Hit:3 https://dl.winehq.org/wine-builds/ubuntu focal InRelease
Hit:4 https://dl.google.com/linux/chrome/deb stable InRelease
Hit:5 http://ppa.launchpad.net/flatpak/stable/ubuntu focal InRelease
Hit:6 http://security.ubuntu.com/ubuntu focal-security InRelease
Hit:7 http://in.archive.ubuntu.com/ubuntu focal InRelease
Hit:8 http://ppa.launchpad.net/gencfsm/ppa/ubuntu focal InRelease
Hit:9 http://in.archive.ubuntu.com/ubuntu focal-updates InRelease
Get:10 https://download.newrelic.com/infrastructure_agent/linux/apt focal/main amd64 Packages [137 kB]
Hit:11 https://ftp.postgresql.org/pub/pgadmin/pgadmin4/apt/focal pgadmin4 InRelease
Hit:12 http://ppa.launchpad.net/juju/stable/ubuntu focal InRelease
Hit:13 http://in.archive.ubuntu.com/ubuntu focal-backports InRelease
Hit:14 https://download.sublimetext.com apt/stable/ InRelease
Hit:15 https://ngrok-agent.s3.amazonaws.com buster InRelease
Hit:16 http://ppa.launchpad.net/libreoffice/ppa/ubuntu focal InRelease
Hit:17 http://ppa.launchpad.net/mojo-maintainers/ppa/ubuntu focal InRelease
Hit:18 http://ppa.launchpad.net/ubuntu-toolchain-r/test/ubuntu focal InRelease
Fetched 148 kB in 4s (41.7 kB/s)
Reading package lists... Done
Building dependency tree
Reading state information... Done
Step 7: Install New Relic Agent
In the next step, you can download and install new relic agent package using sudo apt install newrelic-infra command as shown below. This will download and install the agent package along with all its dependencies.
NOTE:
libcap2-bin package will be available in your system but in case it is not available then you have to run sudo apt install libcap2-bin command to download and install the package from default Ubuntu repo along with all its dependencies.cyberithub@ubuntu:~$ sudo apt install newrelic-infra Reading package lists... Done Building dependency tree Reading state information... Done The following additional packages will be installed: fluent-bit td-agent-bit The following NEW packages will be installed: fluent-bit newrelic-infra td-agent-bit 0 upgraded, 3 newly installed, 0 to remove and 25 not upgraded. Need to get 49.8 MB/95.6 MB of archives. After this operation, 285 MB of additional disk space will be used. Do you want to continue? [Y/n] Y Get:1 https://download.newrelic.com/infrastructure_agent/linux/apt focal/main amd64 newrelic-infra amd64 1.47.0 [49.8 MB] Fetched 49.8 MB in 6s (8,075 kB/s) Selecting previously unselected package fluent-bit. (Reading database ... 255122 files and directories currently installed.) Preparing to unpack .../fluent-bit_2.0.8_amd64.deb ... Unpacking fluent-bit (2.0.8) ... Selecting previously unselected package td-agent-bit. Preparing to unpack .../td-agent-bit_1.9.3_amd64.deb ... Unpacking td-agent-bit (1.9.3) ... Selecting previously unselected package newrelic-infra. Preparing to unpack .../newrelic-infra_1.47.0_amd64.deb ... Unpacking newrelic-infra (1.47.0) ... Setting up fluent-bit (2.0.8) ... Setting up newrelic-infra (1.47.0) ... Created symlink /etc/systemd/system/multi-user.target.wants/newrelic-infra.service → /etc/systemd/system/newrelic-infra.service. Setting up td-agent-bit (1.9.3) ...
Step 8: Verify Installation
After successful installation, you can verify the installed files path by using dpkg -L newrelic-infra command as shown below.
cyberithub@ubuntu:~$ dpkg -L newrelic-infra
/var
/var/db
/var/db/newrelic-infra
/var/db/newrelic-infra/custom-integrations
/var/db/newrelic-infra/integrations.d
/var/log
/var/log/newrelic-infra
/var/run
/var/run/newrelic-infra
/usr
/usr/bin
/usr/bin/newrelic-infra
/usr/bin/newrelic-infra-ctl
/usr/bin/newrelic-infra-service
/var/db/newrelic-infra/LICENSE.txt
/etc
/etc/newrelic-infra
/etc/newrelic-infra/logging.d
/etc/newrelic-infra/logging.d/file.yml.example
/etc/newrelic-infra/logging.d/fluentbit.yml.example
/etc/newrelic-infra/logging.d/syslog.yml.example
/etc/newrelic-infra/logging.d/systemd.yml.example
/etc/newrelic-infra/logging.d/tcp.yml.example
/var/db/newrelic-infra/newrelic-integrations
/var/db/newrelic-infra/newrelic-integrations/logging
/var/db/newrelic-infra/newrelic-integrations/logging/parsers.conf
/etc/systemd
/etc/systemd/system
/etc/systemd/system/newrelic-infra.service
/var/db/newrelic-infra/newrelic-integrations/logging/out_newrelic.so
/etc/newrelic-infra/integrations.d
/etc/newrelic-infra/integrations.d/docker-config.yml
/var/db/newrelic-infra/newrelic-integrations/bin
/var/db/newrelic-infra/newrelic-integrations/bin/nri-docker
/var/db/newrelic-infra/newrelic-integrations/bin/nri-flex
/var/db/newrelic-infra/newrelic-integrations/bin/nri-prometheus
Step 9: Check Version
You can also check the current installed new relic agent version by using newrelic-infra -version command as shown below.
cyberithub@ubuntu:~$ newrelic-infra -version
New Relic Infrastructure Agent version: 1.47.0, GoVersion: go1.20.5, GitCommit: 73da2d373f064b96297f9504b5b0755ad0307ef6, BuildDate: 2023-08-25T07:12:57Z
Step 10: Check Service Status
To make sure agent collects all the information about host, you must ensure agent is always in active and running status by using sudo systemctl status newrelic-infra command as shown below.
cyberithub@ubuntu:~$ sudo systemctl status newrelic-infra
● newrelic-infra.service - New Relic Infrastructure Agent
Loaded: loaded (/etc/systemd/system/newrelic-infra.service; enabled; vendor preset: enabled)
Active: active (running) since Sat 2023-09-02 19:42:06 IST; 1h 11min ago
Main PID: 104291 (newrelic-infra-)
Tasks: 20 (limit: 2261)
Memory: 42.9M (limit: 1.0G)
CGroup: /system.slice/newrelic-infra.service
├─104291 /usr/bin/newrelic-infra-service
└─104297 /usr/bin/newrelic-infra

Sep 02 19:42:31 ubuntu newrelic-infra-service[104297]: time="2023-09-02T19:42:31+05:30" level=info msg="Agent plugin" plugin=services/supervisord
Sep 02 19:42:31 ubuntu newrelic-infra-service[104297]: time="2023-09-02T19:42:31+05:30" level=info msg="Agent plugin" plugin=system/network_interfaces
Sep 02 19:42:31 ubuntu newrelic-infra-service[104297]: time="2023-09-02T19:42:31+05:30" level=info msg="Agent plugin" plugin=kernel/sysctl
Sep 02 19:42:31 ubuntu newrelic-infra-service[104297]: time="2023-09-02T19:42:31+05:30" level=info msg="Agent plugin" plugin=kernel/modules
Sep 02 19:42:31 ubuntu newrelic-infra-service[104297]: time="2023-09-02T19:42:31+05:30" level=info msg="Agent plugin" plugin=services/pidfile
Sep 02 19:42:31 ubuntu newrelic-infra-service[104297]: time="2023-09-02T19:42:31+05:30" level=info msg="Agent plugin" plugin=config/sshd
Sep 02 19:42:31 ubuntu newrelic-infra-service[104297]: time="2023-09-02T19:42:31+05:30" level=info msg="Agent plugin" plugin=packages/dpkg
Sep 02 19:42:31 ubuntu newrelic-infra-service[104297]: time="2023-09-02T19:42:31+05:30" level=info msg="Agent plugin" plugin=config/selinux
Sep 02 19:42:32 ubuntu newrelic-infra-service[104297]: time="2023-09-02T19:42:32+05:30" level=info msg="connect got id" agent-guid=LHMtNTI3MHxJTkZSQXxOQXwzN>
Sep 02 19:43:56 ubuntu newrelic-infra-service[104297]: time="2023-09-02T19:43:56+05:30" level=info msg="Integration health check finished with success" comp>
lines 1-20/20 (END)
Step 11: Stop/Start/Restart Service
You can stop the agent by using sudo systemctl stop newrelic-infra command as shown below.
cyberithub@ubuntu:~$ sudo systemctl stop newrelic-infra
Similarly, you can start the agent by using sudo systemctl start newrelic-infra command as shown below.
cyberithub@ubuntu:~$ sudo systemctl start newrelic-infra
If you are looking to restart agent then use sudo systemctl restart newrelic-infra command.
cyberithub@ubuntu:~$ sudo systemctl restart newrelic-infra
Step 12: Go to Dashboard
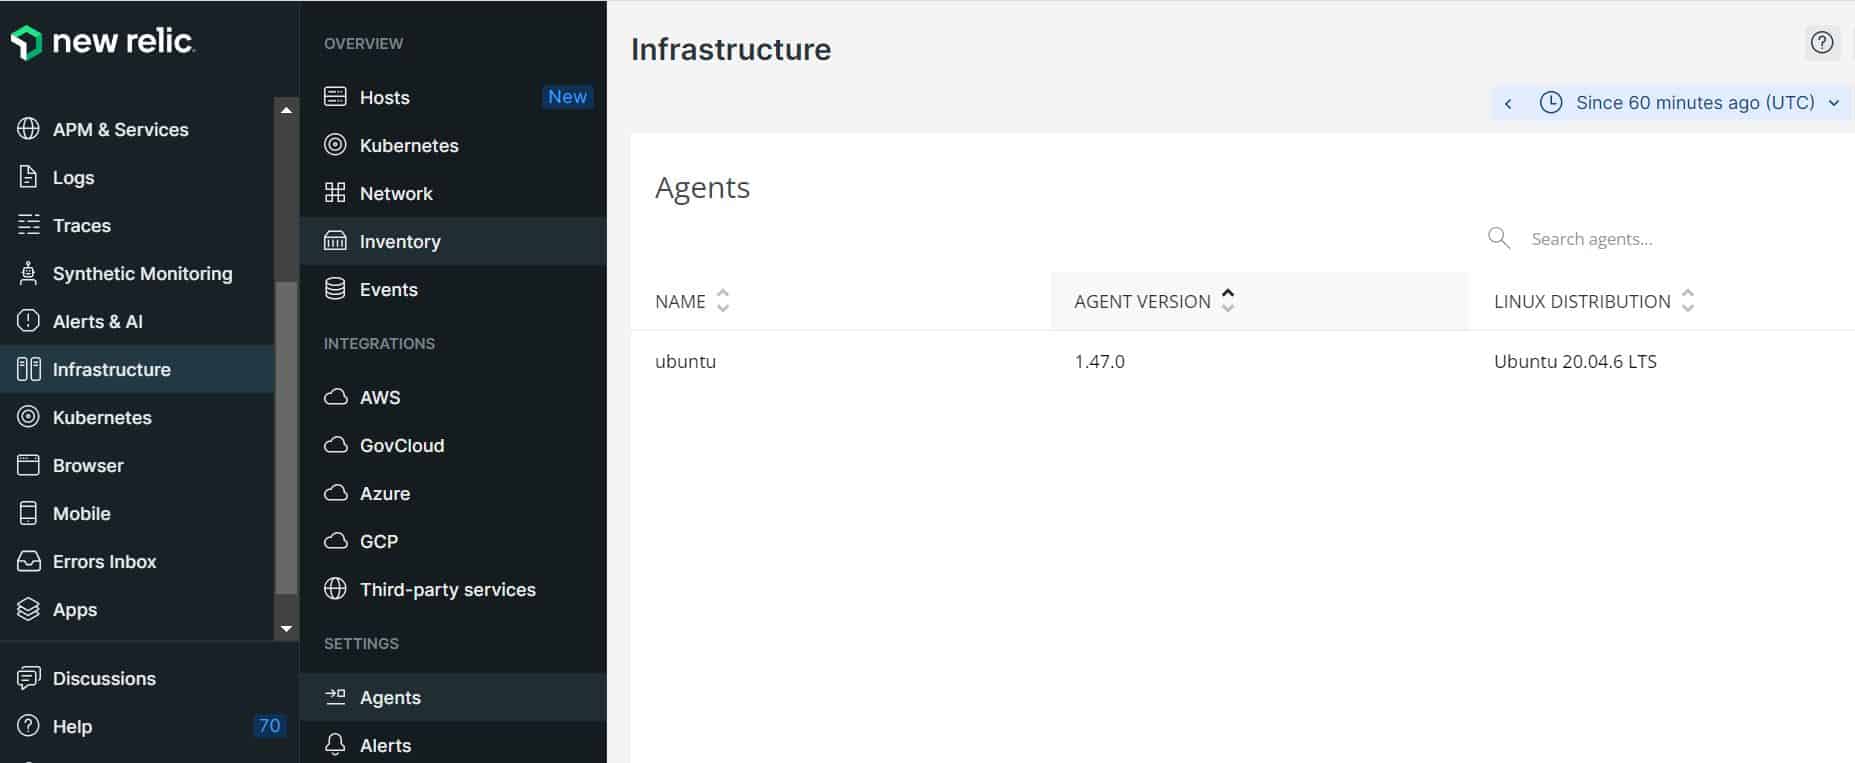
Now you have to go to New Relic Dashboard and navigate to Infrastructure->Agents to see the agent status. As you can see below, Ubuntu 20.04.6 LTS is getting detected here.
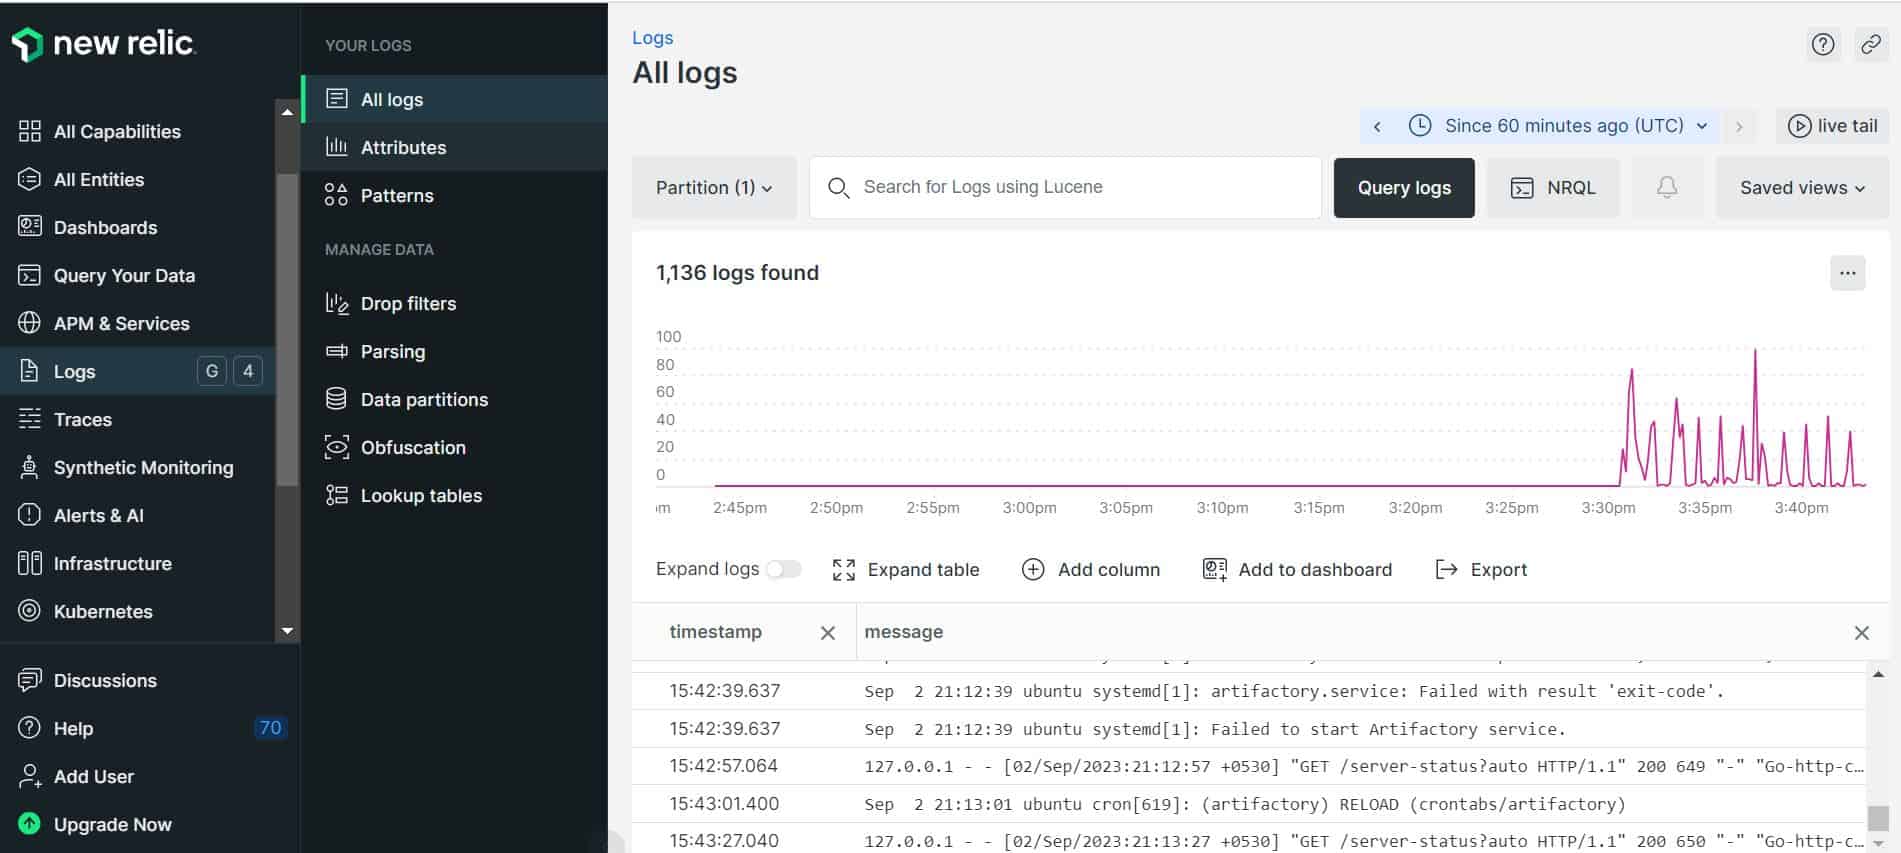
You can now start monitoring the logs of host from Logs->All logs as you can see below.
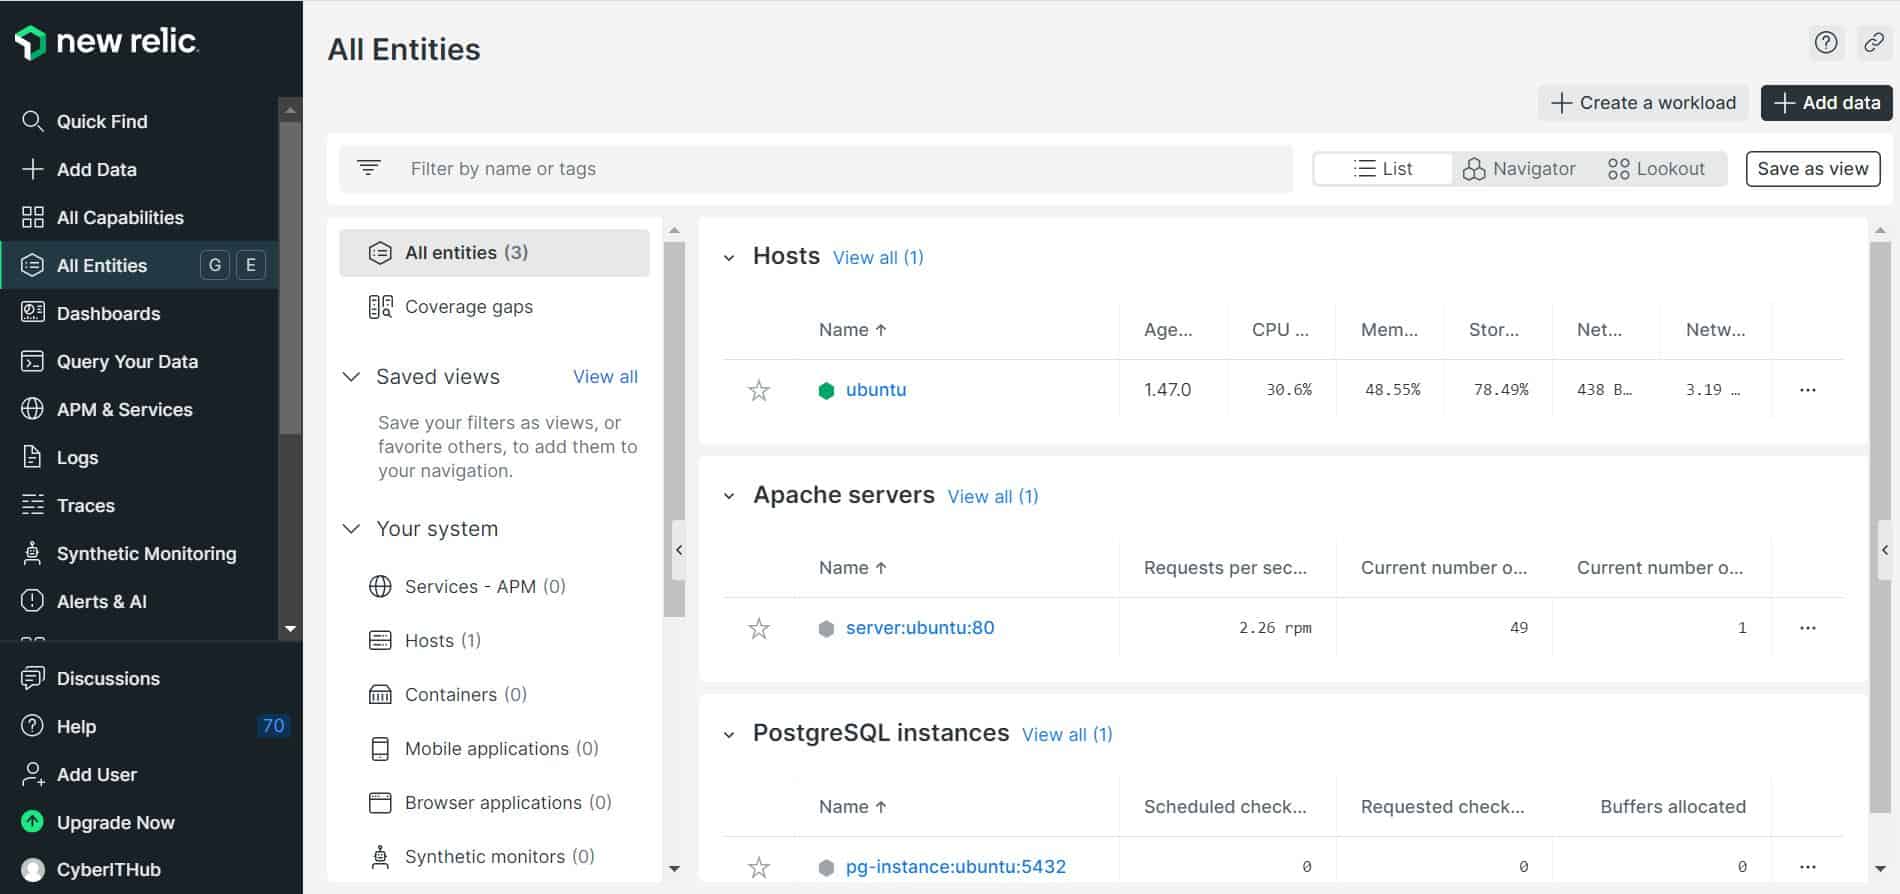
You can also check about host and all the integrations done from All Entities as shown below. Similarly, you can monitor whole lot of applications and processes from here.