
Table of Contents
In this article, I will take you through the steps to install Jupyter Notebook on Ubuntu 20.04 LTS (Focal Fossa). Jupyter Notebook is a free and open source web application for creating and sharing computational documents. It is a part of open source Project Jupyter. It offers a simple, streamlined, document-centric experience. It is widely used for learning and showing demonstrations of computational programming in languages such as Python. It has the ability to produce rich and interactive output containing images, graphs, videos, LaTeX, and custom MIME types. Check more on official website.

How to Install Jupyter Notebook on Ubuntu 20.04 LTS (Focal Fossa)
Also Read: How to Install PyPy on Linux Using 6 Easy Steps
Step 1: Prerequisites
a) You should have a running Ubuntu 20.04 LTS Server.
b) You should have sudo or root access to run privileged commands.
c) You should have Internet access to download and install the package.
Step 2: Update Your Server
In the first step, you need to update the System packages using sudo apt update command as shown below. This will sync the system with all the latest available versions from the Ubuntu Repo.
cyberithub@ubuntu:~$ sudo apt update
[sudo] password for cyberithub:
Hit:1 https://download.docker.com/linux/ubuntu focal InRelease
Get:2 https://dl.google.com/linux/chrome/deb stable InRelease [1,811 B]
Get:3 http://security.ubuntu.com/ubuntu focal-security InRelease [114 kB]
Hit:4 http://ppa.launchpad.net/ubuntu-toolchain-r/test/ubuntu focal InRelease
Hit:5 http://in.archive.ubuntu.com/ubuntu focal InRelease
Get:6 http://in.archive.ubuntu.com/ubuntu focal-updates InRelease [114 kB]
Get:7 https://dl.google.com/linux/chrome/deb stable/main amd64 Packages [1,094 B]
Hit:8 https://apt.boltops.com stable InRelease
Get:9 http://in.archive.ubuntu.com/ubuntu focal-backports InRelease [108 kB]
Get:10 http://security.ubuntu.com/ubuntu focal-security/main i386 Packages [497 kB]
Get:11 http://security.ubuntu.com/ubuntu focal-security/main amd64 Packages [1,740 kB]
....................................................
If any of the packages needs to be upgraded then run sudo apt upgrade command as shown below.
cyberithub@ubuntu:~$ sudo apt upgrade
[sudo] password for cyberithub:
Reading package lists... Done
Building dependency tree
Reading state information... Done
Calculating upgrade... Done
The following package was automatically installed and is no longer required:
pypy-lib
Use 'sudo apt autoremove' to remove it.
The following packages will be upgraded:
google-chrome-stable libjpeg-turbo8 libnss-systemd libpam-systemd libpcre2-16-0 libpcre2-32-0 libpcre2-8-0 libpcre2-dev libpcre2-posix2 libsystemd0
libudev-dev libudev1 systemd systemd-sysv systemd-timesyncd udev xserver-xorg-video-amdgpu
17 upgraded, 0 newly installed, 0 to remove and 0 not upgraded.
6 standard security updates
Need to get 97.2 MB/98.5 MB of archives.
After this operation, 284 kB disk space will be freed.
Do you want to continue? [Y/n] y
Get:1 https://dl.google.com/linux/chrome/deb stable/main amd64 google-chrome-stable amd64 105.0.5195.125-1 [91.2 MB]
Get:2 http://in.archive.ubuntu.com/ubuntu focal-updates/main amd64 libudev-dev amd64 245.4-4ubuntu3.18 [19.7 kB]
Get:3 http://in.archive.ubuntu.com/ubuntu focal-updates/main amd64 udev amd64 245.4-4ubuntu3.18 [1,367 kB]
.....................................................
Step 3: Install Python3
Then you need to install the latest available Python3 package using sudo apt install python3 command as shown below. This will download and install the package from default Ubuntu repo along with all its dependencies. In my case, since I already have it installed, it does not need to install again.
cyberithub@ubuntu:~$ sudo apt install python3
Reading package lists... Done
Building dependency tree
Reading state information... Done
python3 is already the newest version (3.8.2-0ubuntu2).
The following package was automatically installed and is no longer required:
pypy-lib
Use 'sudo apt autoremove' to remove it.
0 upgraded, 0 newly installed, 0 to remove and 0 not upgraded.
Step 4: Install pip3
Next step is to install pip3 utility using sudo apt install python3-pip command as shown below. This will download and install the package from default Ubuntu repo along with all its dependencies.
cyberithub@ubuntu:~$ sudo apt install python3-pip
Reading package lists... Done
Building dependency tree
Reading state information... Done
The following package was automatically installed and is no longer required:
pypy-lib
Use 'sudo apt autoremove' to remove it.
The following NEW packages will be installed:
python3-pip
0 upgraded, 1 newly installed, 0 to remove and 17 not upgraded.
Need to get 0 B/231 kB of archives.
After this operation, 1,050 kB of additional disk space will be used.
Selecting previously unselected package python3-pip.
(Reading database ... 258939 files and directories currently installed.)
Preparing to unpack .../python3-pip_20.0.2-5ubuntu1.6_all.deb ...
Unpacking python3-pip (20.0.2-5ubuntu1.6) ...
Setting up python3-pip (20.0.2-5ubuntu1.6) ...
Processing triggers for man-db (2.9.1-1) ...
Step 5: Install Jupyter Notebook
Once you have the pip3 utility installed and available, you can easily install Jupyter notebook by using pip3 install notebook command as shown below. If you are using older pip version then you might need to use pip install notebook command.
cyberithub@ubuntu:~$ pip3 install notebook
Collecting notebook
Downloading notebook-6.4.12-py3-none-any.whl (9.9 MB)
|████████████████████████████████| 9.9 MB 3.3 MB/s
Collecting nest-asyncio>=1.5
Downloading nest_asyncio-1.5.5-py3-none-any.whl (5.2 kB)
Collecting tornado>=6.1
Downloading tornado-6.2-cp37-abi3-manylinux_2_5_x86_64.manylinux1_x86_64.manylinux_2_17_x86_64.manylinux2014_x86_64.whl (423 kB)
|████████████████████████████████| 423 kB 3.1 MB/s
Collecting jupyter-core>=4.6.1
Downloading jupyter_core-4.11.1-py3-none-any.whl (88 kB)
|████████████████████████████████| 88 kB 5.6 MB/s
Collecting nbformat
Downloading nbformat-5.6.0-py3-none-any.whl (77 kB)
|████████████████████████████████| 77 kB 5.2 MB/s
Collecting ipython-genutils
Downloading ipython_genutils-0.2.0-py2.py3-none-any.whl (26 kB)
Collecting pyzmq>=17
Downloading pyzmq-24.0.1-cp39-cp39-manylinux_2_12_x86_64.manylinux2010_x86_64.whl (1.1 MB)
|████████████████████████████████| 1.1 MB 5.3 MB/s
Collecting Send2Trash>=1.8.0
Downloading Send2Trash-1.8.0-py3-none-any.whl (18 kB)
......................................
Step 6: Check Version
After successful installation, you can test it by using jupyter --version command as shown below.
cyberithub@ubuntu:~$ jupyter --version
Selected Jupyter core packages...
IPython : 8.5.0
ipykernel : 6.15.3
ipywidgets : not installed
jupyter_client : 7.3.5
jupyter_core : 4.11.1
jupyter_server : not installed
jupyterlab : not installed
nbclient : 0.6.8
nbconvert : 7.0.0
nbformat : 5.6.0
notebook : 6.4.12
qtconsole : not installed
traitlets : 5.4.0
Step 7: Launch Jupyter Notebook
To run Notebook, you need to use jupyter notebook command as shown below.
cyberithub@ubuntu:~$ jupyter notebook
[I 20:24:12.541 NotebookApp] Writing notebook server cookie secret to /home/cyberithub/.local/share/jupyter/runtime/notebook_cookie_secret
[I 20:24:12.783 NotebookApp] Serving notebooks from local directory: /home/cyberithub
[I 20:24:12.784 NotebookApp] Jupyter Notebook 6.4.12 is running at:
[I 20:24:12.784 NotebookApp] http://localhost:8888/?token=c4fc1ab4adba8ca57191724a41fe746cc240b22014ab56d7
[I 20:24:12.785 NotebookApp] or http://127.0.0.1:8888/?token=c4fc1ab4adba8ca57191724a41fe746cc240b22014ab56d7
[I 20:24:12.785 NotebookApp] Use Control-C to stop this server and shut down all kernels (twice to skip confirmation).
[W 20:24:12.794 NotebookApp] No web browser found: could not locate runnable browser.
[C 20:24:12.795 NotebookApp]

To access the notebook, open this file in a browser:
file:///home/cyberithub/.local/share/jupyter/runtime/nbserver-19999-open.html
Or copy and paste one of these URLs:
http://localhost:8888/?token=c4fc1ab4adba8ca57191724a41fe746cc240b22014ab56d7
or http://127.0.0.1:8888/?token=c4fc1ab4adba8ca57191724a41fe746cc240b22014ab56d7
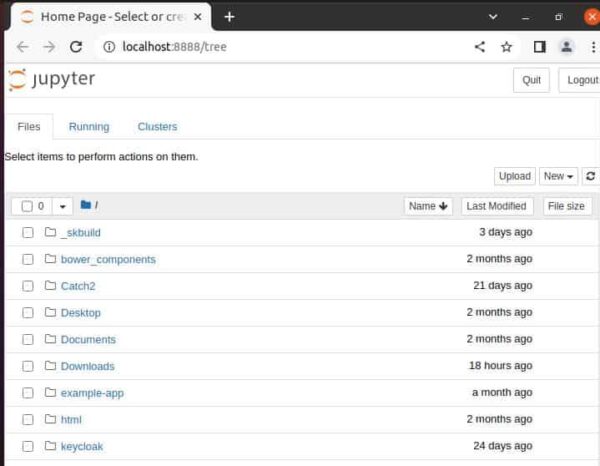
When it is opened, the home page in default web browser should look like below.
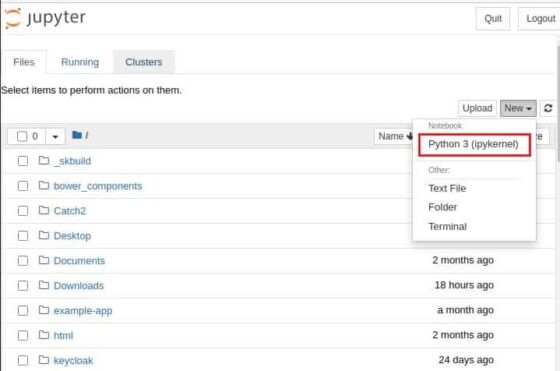
You need to click on New and select Python3 as shown below.
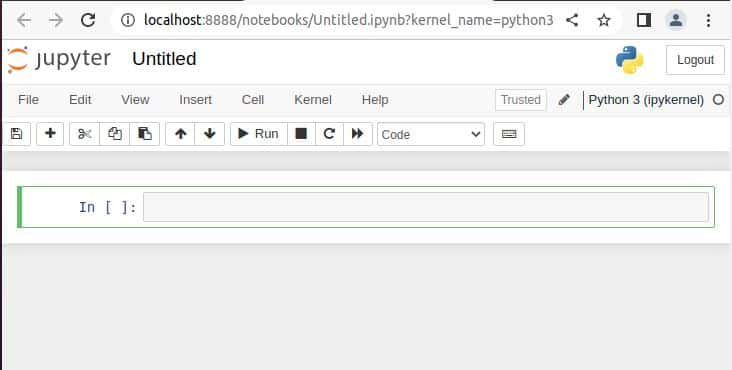
It should open a new browser tab like below where you can go ahead and start writing your programs.
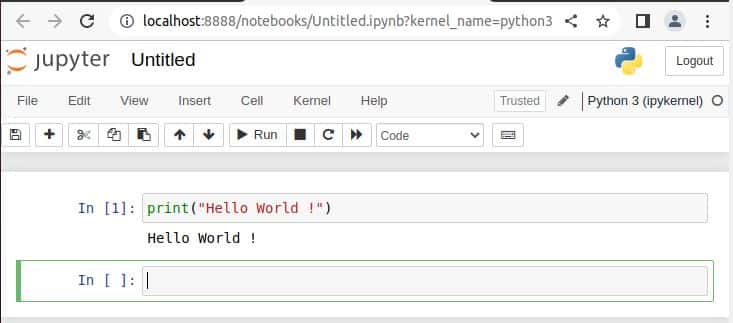
Here you can write a simple print statement to display "Hello World !" on the output as shown below.
Step 8: Uninstall Jupyter Notebook
Once you are done with notebook, you can choose to uninstall Jupyter Notebook from your System by using pip3 uninstall notebook command as shown below.
cyberithub@ubuntu:~$ pip3 uninstall notebook
Found existing installation: notebook 6.4.12
Uninstalling notebook-6.4.12:
Would remove:
/home/cyberithub/miniconda3/bin/jupyter-bundlerextension
/home/cyberithub/miniconda3/bin/jupyter-nbextension
/home/cyberithub/miniconda3/bin/jupyter-notebook
/home/cyberithub/miniconda3/bin/jupyter-serverextension
/home/cyberithub/miniconda3/lib/python3.9/site-packages/notebook-6.4.12.dist-info/*
/home/cyberithub/miniconda3/lib/python3.9/site-packages/notebook/*
/home/cyberithub/miniconda3/share/applications/jupyter-notebook.desktop
/home/cyberithub/miniconda3/share/icons/hicolor/scalable/apps/notebook.svg
Proceed (Y/n)? Y
Successfully uninstalled notebook-6.4.12