
Table of Contents
In this article, we will see how to install flutter on Ubuntu 22.04 LTS (Jammy Jellyfish). Flutter is a free and open source UI framework by Google for building beautiful, natively compiled, multi-platform applications from a single codebase. Since it is supported and used by Google itself, it is being trusted by well known organizations across the world. Flutter is known for its performance and the ability to deploy to multiple devices such as mobile, desktop, web and embedded devices from same codebase.
It can easily take control of your codebase and perform automated testing and developer tooling to build quality applications. Since it is an open source framework, it is supported by community of developers across the world. More can be checked on official website. It is also very easy to install and use in almost all the famous platforms. Here we will see the steps to install flutter on Ubuntu 22.04 LTS based systems.

How to Install Flutter on Ubuntu 22.04 LTS (Jammy Jellyfish)
Also Read: How to install curl command on Ubuntu 22.04 LTS (Jammy Jellyfish)
Step 1: Prerequisites
a) You should have a running Ubuntu 22.04 LTS System.
b) You should have sudo or root access to run privileged commands in your System.
c) You should have apt or apt-get and wget utility available in your System.
d) You should have chrome web browser installed in your System.
e) If you are installing package from snap store, then you should have snap utility available in your System.
Step 2: Update Your System
Before installing any new packages, you must check for all the available updates and install them using sudo apt update && sudo apt upgrade command as shown below. This will save the system from any broken dependency issues encountered during installation of new packages. It will also update the system cache and reading the latest available packages in all the added repo.
cyberithub@ubuntu:~$ sudo apt update && sudo apt upgrade
[sudo] password for cyberithub:
Hit:1 http://in.archive.ubuntu.com/ubuntu jammy InRelease
Get:2 http://in.archive.ubuntu.com/ubuntu jammy-updates InRelease [119 kB]
Get:3 http://security.ubuntu.com/ubuntu jammy-security InRelease [110 kB]
Hit:4 https://artifacts.elastic.co/packages/8.x/apt stable InRelease
Hit:5 https://dl.google.com/linux/chrome/deb stable InRelease
Get:6 http://in.archive.ubuntu.com/ubuntu jammy-backports InRelease [109 kB]
Get:7 http://security.ubuntu.com/ubuntu jammy-security/main amd64 DEP-11 Metadata [42.8 kB]
Get:8 http://in.archive.ubuntu.com/ubuntu jammy-updates/main amd64 Packages [894 kB]
Get:9 http://security.ubuntu.com/ubuntu jammy-security/universe amd64 DEP-11 Metadata [39.8 kB]
Get:10 http://in.archive.ubuntu.com/ubuntu jammy-updates/main i386 Packages [471 kB]
Get:11 http://in.archive.ubuntu.com/ubuntu jammy-updates/main amd64 DEP-11 Metadata [100 kB]
Get:12 http://in.archive.ubuntu.com/ubuntu jammy-updates/universe amd64 DEP-11 Metadata [288 kB]
Get:13 http://in.archive.ubuntu.com/ubuntu jammy-updates/multiverse amd64 DEP-11 Metadata [940 B]
Get:14 http://in.archive.ubuntu.com/ubuntu jammy-backports/main amd64 DEP-11 Metadata [4,920 B]
Get:15 http://in.archive.ubuntu.com/ubuntu jammy-backports/universe amd64 DEP-11 Metadata [15.6 kB]
Fetched 2,195 kB in 6s (374 kB/s)
Reading package lists... Done
Building dependency tree... Done
Reading state information... Done
2 packages can be upgraded. Run 'apt list --upgradable' to see them.
Reading package lists... Done
Building dependency tree... Done
Reading state information... Done
Calculating upgrade... Done
#
# You can verify the status of security fixes using the `pro fix` command.
# E.g., a recent Ruby vulnerability can be checked with: `pro fix USN-6219-1`
# For more detail see: https://ubuntu.com/security/notices/USN-6219-1
#
The following packages have been kept back:
gjs libgjs0g
0 upgraded, 0 newly installed, 0 to remove and 2 not upgraded.
Step 3: Install Flutter
In the next step, you can install flutter by using any of the below methods depending on your needs and availability of tools.
a) Using Snap
If you are looking to install flutter as snap package from Snap store then you need to use sudo snap install flutter --classic command as shown below.
cyberithub@ubuntu:~$ sudo snap install flutter --classic
[sudo] password for cyberithub:
flutter 0+git.fb97815 from Flutter Team** installed
b) Using SDK
Another method that you can use to install flutter is through the binary file. For that, you need to download the latest stable release of flutter SDK from official website using wget utility as shown below. It will download the SDK in current working directory.
cyberithub@ubuntu:~$ wget https://storage.googleapis.com/flutter_infra_release/releases/stable/linux/flutter_linux_3.13.0-stable.tar.xz
--2023-08-21 02:21:20-- https://storage.googleapis.com/flutter_infra_release/releases/stable/linux/flutter_linux_3.13.0-stable.tar.xz
Resolving storage.googleapis.com (storage.googleapis.com)... 142.250.193.144, 142.250.193.176, 142.250.205.240, ...
Connecting to storage.googleapis.com (storage.googleapis.com)|142.250.193.144|:443... connected.
HTTP request sent, awaiting response... 200 OK
Length: 563857060 (538M) [application/x-tar]
Saving to: ‘flutter_linux_3.13.0-stable.tar.xz’

flutter_linux_3.13.0-stable.tar.xz 100%[============================================================================>] 537.74M 9.07MB/s in 64s

2023-08-21 02:22:24 (8.42 MB/s) - ‘flutter_linux_3.13.0-stable.tar.xz’ saved [563857060/563857060]
After downloading flutter SDK, you need to create a directory where you can extract the package and then switch to it as shown below.
cyberithub@ubuntu:~$ mkdir ~/development
cyberithub@ubuntu:~$ cd ~/development/
Then extract the package by using tar xf ~/flutter_linux_3.13.0-stable.tar.xz command as shown below.
cyberithub@ubuntu:~/development$ tar xf ~/flutter_linux_3.13.0-stable.tar.xz
Now you have to add the flutter binary file location to PATH environment variable as shown below. But remember this is just a temporary way to add. To add it permanently, you need to put an entry in ~/.profile or ~/.bashrc file and then run source ~/.profile or source ~/.bashrc command to update the changes from same terminal session.
cyberithub@ubuntu:~/development$ export PATH="$PATH:`pwd`/flutter/bin"
Step 4: Check Version
After successful installation, you can check the flutter installed version by using flutter --version command as show below.
cyberithub@ubuntu:~$ flutter --version
Flutter 3.13.0 • channel stable • https://github.com/flutter/flutter.git
Framework • revision efbf63d9c6 (5 days ago) • 2023-08-15 21:05:06 -0500
Engine • revision 1ac611c64e
Tools • Dart 3.1.0 • DevTools 2.25.0

╔════════════════════════════════════════════════════════════════════════════╗
║ Welcome to Flutter! - https://flutter.dev                                  ║
║                                                                            ║
║ The Flutter tool uses Google Analytics to anonymously report feature usage ║
║ statistics and basic crash reports. This data is used to help improve      ║
║ Flutter tools over time.                                                   ║
║                                                                            ║
║ Flutter tool analytics are not sent on the very first run. To disable      ║
║ reporting, type 'flutter config --no-analytics'. To display the current    ║
║ setting, type 'flutter config'. If you opt out of analytics, an opt-out    ║
║ event will be sent, and then no further information will be sent by the    ║
║ Flutter tool.                                                              ║
║                                                                            ║
║ By downloading the Flutter SDK, you agree to the Google Terms of Service.  ║
║ Note: The Google Privacy Policy describes how data is handled in this      ║
║ service.                                                                   ║
║                                                                            ║
║ Moreover, Flutter includes the Dart SDK, which may send usage metrics and  ║
║ crash reports to Google.                                                   ║
║                                                                            ║
║ Read about data we send with crash reports:                                ║
║ https://flutter.dev/docs/reference/crash-reporting                         ║
║                                                                            ║
║ See Google's privacy policy:                                               ║
║ https://policies.google.com/privacy                                        ║
╚════════════════════════════════════════════════════════════════════════════╝


The Flutter CLI developer tool uses Google Analytics to report usage and diagnostic data
along with package dependencies, and crash reporting to send basic crash reports.
This data is used to help improve the Dart platform, Flutter framework, and related tools.

Telemetry is not sent on the very first run.
To disable reporting of telemetry, run this terminal command:

flutter --disable-telemetry.
If you opt out of telemetry, an opt-out event will be sent,
and then no further information will be sent.
This data is collected in accordance with the
Google Privacy Policy (https://policies.google.com/privacy).

You have received two consent messages because the flutter tool is migrating to a new analytics system. Disabling analytics collection will disable both the
legacy and new analytics collection systems. You can disable analytics reporting by running `flutter --disable-telemetry`
Step 5: Run Flutter doctor
Now it is time to run flutter doctor command to check all the dependencies required to be installed to complete the setup. This command checks the environment and display report on output as shown below.
cyberithub@ubuntu:~$ flutter doctor
Doctor summary (to see all details, run flutter doctor -v):
[✓] Flutter (Channel stable, 3.13.0, on Ubuntu 22.04.3 LTS 6.2.0-26-generic, locale en_IN)
[✗] Android toolchain - develop for Android devices
    ✗ Unable to locate Android SDK.
      Install Android Studio from: https://developer.android.com/studio/index.html
      On first launch it will assist you in installing the Android SDK components.
      (or visit https://flutter.dev/docs/get-started/install/linux#android-setup for detailed instructions).
      If the Android SDK has been installed to a custom location, please use
`     flutter config --android-sdk` to update to that location.

[✗] Chrome - develop for the web (Cannot find Chrome executable at google-chrome)
    ! Cannot find Chrome. Try setting CHROME_EXECUTABLE to a Chrome executable.
[✗] Linux toolchain - develop for Linux desktop
    ✗ clang++ is required for Linux development.
       It is likely available from your distribution (e.g.: apt install clang), or can be downloaded from https://releases.llvm.org/
    ✗ ninja is required for Linux development.
      It is likely available from your distribution (e.g.: apt install ninja-build), or can be downloaded from https://github.com/ninja-build/ninja/releases
    ✗ pkg-config is required for Linux development.
      It is likely available from your distribution (e.g.: apt install pkg-config), or can be downloaded from
      https://www.freedesktop.org/wiki/Software/pkg-config/
[!] Android Studio (not installed)
[✓] Connected device (1 available)
[✓] Network resources

! Doctor found issues in 4 categories.
As you can see from above output, we need to install plenty of dependencies to complete the setup so we will run below command to install all the required packages.
cyberithub@ubuntu:~$ sudo apt-get install clang cmake ninja-build pkg-config libgtk-3-dev liblzma-dev
Step 6: Run flutter devices
To show all the devices connected to flutter, you need to use flutter devices command as shown below.
cyberithub@ubuntu:~$ flutter devices
1 connected device:

Linux (desktop) • linux • linux-x64 • Ubuntu 22.04.3 LTS 6.2.0-26-generic
Step 7: Create a New App
Now that flutter is successfully setup, let's create a project called sampleapp using flutter create sampleapp command as shown below.
cyberithub@ubuntu:~$ flutter create sampleapp
Creating project sampleapp...
Resolving dependencies in sampleapp... (2.0s)
Got dependencies in sampleapp.
Wrote 129 files.

All done!
You can find general documentation for Flutter at: https://docs.flutter.dev/
Detailed API documentation is available at: https://api.flutter.dev/
If you prefer video documentation, consider: https://www.youtube.com/c/flutterdev

In order to run your application, type:

$ cd sampleapp
$ flutter run

Your application code is in sampleapp/lib/main.dart.
Step 8: Run App
Now you need to switch to application using cd sampleapp command as shown below.
cyberithub@ubuntu:~$ cd sampleapp
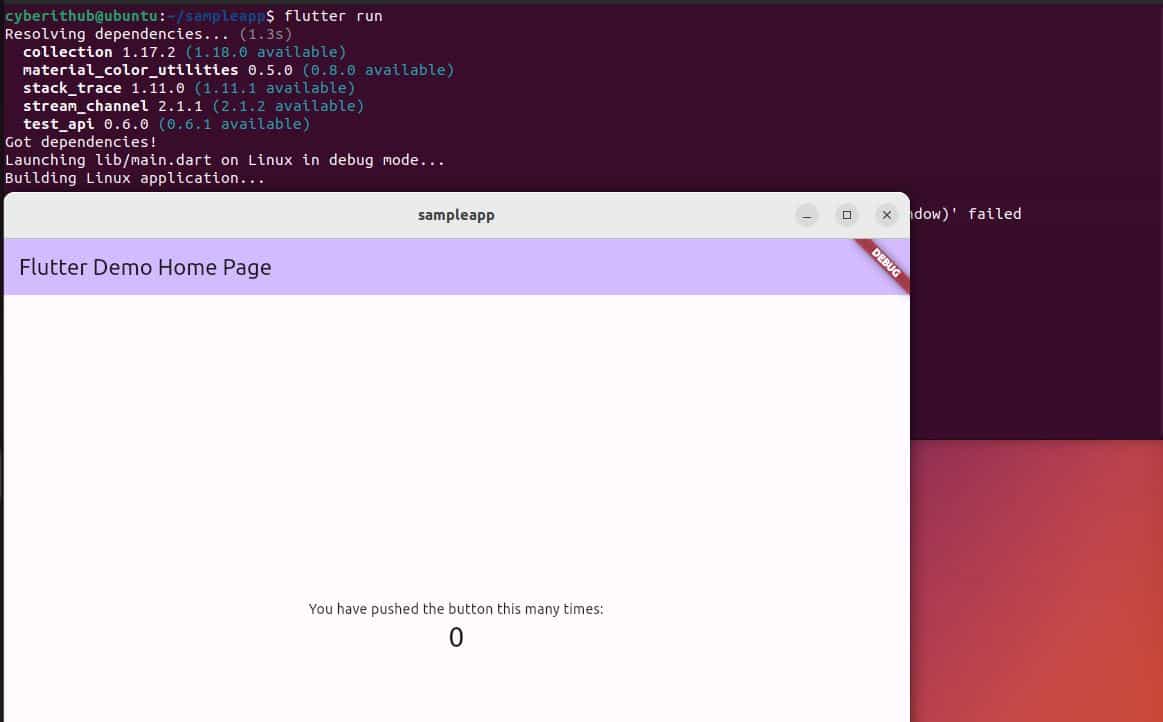
And then run the application using flutter run command. If everything goes well then after building the application, flutter demo home page will be launched as you can see below. This confirms that flutter is working as expected.
Step 9: Uninstall Flutter
Once you are done using Flutter, you can choose to uninstall it from your system by using any of the below methods depending on how you have installed it.
a) Using Snap
If you installed flutter as snap package then you need to use sudo snap remove flutter command to uninstall the package as shown below.
cyberithub@ubuntu:~$ sudo snap remove flutter
flutter removed
b) Using Manual Method
To remove flutter from your system, you just need to delete the directory where you extracted the flutter SDK files. For example, we extracted flutter SDK files in development directory so to remove flutter we just removed the directory by using rm -rf development command as shown below.
cyberithub@ubuntu:~$ rm -rf development/