
Table of Contents
In this article, I will take you through the steps to install flameshot screenshot tool on Ubuntu 20.04 LTS (Focal Fossa). Flameshot is a free and open-source, cross-platform tool to take screenshots with many built-in features included. It not only provides different option to customize the screenshot but also has many time saving features that saves your editing time. Starting and using this tool is relatively simple than the others and hence makes it one of the most liked screenshot tool currently available in the market. More on flameshot official website.
Features
- It is highly customizable with an option to customize the interface color, button selection, keyboard shortcuts etc.
- Built in editing tool provides multiple options to edit like add an arrow mark, highlight text, blur a section, add a text, draw something etc.
- It is as easy to use as simple it looks. One can simply drag the selection box to capture an area and save it using simplified interface.
- It allows users to upload the screenshot directly to the cloud in order to share with others.
- It has CLI support which allows this tool to be integrated with bash or any other scripts as well.
How to Install Flameshot Screenshot Tool on Ubuntu 20.04 LTS
Also Read: How to Install Java 17 (OpenJDK 17) on Debian 11 (Bullseye)
Step 1: Prerequisites
a) You should have a running Ubuntu 20.04 LTS System.
b) You should have sudo or root access to run privileged commands.
c) You should have apt utility available in your System.
Step 2: Update Your Server
You can choose to download and install all the latest available updates from Debian repo by using apt update command as shown below. If any of the packages needs to be upgraded then you can also use apt upgrade command.
root@cyberithub:~# apt update
Hit:1 http://in.archive.ubuntu.com/ubuntu focal InRelease
Get:2 http://in.archive.ubuntu.com/ubuntu focal-updates InRelease [114 kB]
Get:4 https://dl.google.com/linux/chrome/deb stable InRelease [1,811 B]
Hit:5 http://apt.postgresql.org/pub/repos/apt focal-pgdg InRelease
Get:6 http://in.archive.ubuntu.com/ubuntu focal-backports InRelease [108 kB]
Hit:7 http://ppa.launchpad.net/nilarimogard/webupd8/ubuntu focal InRelease
Get:8 http://security.ubuntu.com/ubuntu focal-security InRelease [114 kB]
Get:9 https://repo.protonvpn.com/debian stable InRelease [2,519 B]
Get:10 http://in.archive.ubuntu.com/ubuntu focal-updates/main i386 Packages [629 kB]
Get:11 https://dl.google.com/linux/chrome/deb stable/main amd64 Packages [1,089 B]
Get:12 http://in.archive.ubuntu.com/ubuntu focal-updates/main amd64 Packages [1,712 kB]
Get:13 http://in.archive.ubuntu.com/ubuntu focal-updates/main Translation-en [320 kB]
...................................
Step 3: Install Flameshot
Next step is to install flameshot screenshot tool by using apt install flameshot command as shown below. This will download and install the package from Ubuntu repo along with all its dependencies.
root@cyberithub:~# apt install flameshot
Reading package lists... Done
Building dependency tree
Reading state information... Done
The following packages were automatically installed and are no longer required:
dmeventd libaio1 libdevmapper-event1.02.1 liblvm2cmd2.03 linux-headers-5.13.0-35-generic linux-hwe-5.13-headers-5.13.0-35 linux-image-5.13.0-35-generic
linux-modules-5.13.0-35-generic linux-modules-extra-5.13.0-35-generic thin-provisioning-tools
Use 'apt autoremove' to remove them.
The following additional packages will be installed:
libdouble-conversion3 libpcre2-16-0 libqt5core5a libqt5dbus5 libqt5gui5 libqt5network5 libqt5svg5 libqt5widgets5 libxcb-xinerama0 libxcb-xinput0
qt5-gtk-platformtheme qttranslations5-l10n
Suggested packages:
qt5-image-formats-plugins qtwayland5
The following NEW packages will be installed:
flameshot libdouble-conversion3 libpcre2-16-0 libqt5core5a libqt5dbus5 libqt5gui5 libqt5network5 libqt5svg5 libqt5widgets5 libxcb-xinerama0
libxcb-xinput0 qt5-gtk-platformtheme qttranslations5-l10n
0 upgraded, 13 newly installed, 0 to remove and 171 not upgraded.
Need to get 10.4 MB of archives.
After this operation, 45.0 MB of additional disk space will be used.
Do you want to continue? [Y/n] y
...............................................
Step 4: Check Version
After successful installation you can check the current installed version by using flameshot --version command as shown below.
root@cyberithub:~# flameshot --version
Flameshot 0.6.0+git20191001-2(Debian)
Compiled with Qt 5.12.5
Step 5: Using GUI Mode
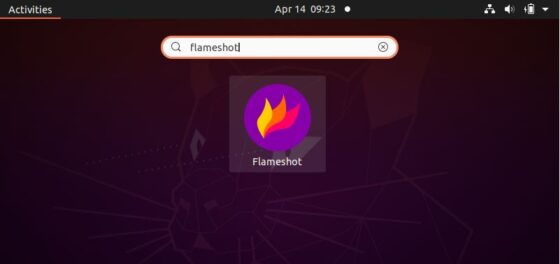
To start Flameshot, go to Activities and search flameshot in the Search box. Click on it once it shows up. You might notice that after starting it will start showing as one of the System Tray Icon. To start taking the screenshot, you need right click on that Icon and select the appropriate option. We will see all the options one by one.
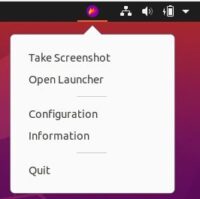
a) Take Screenshot
The first option you will see once you click or right click on flameshot Icon is Take Screenshot. You need to simply click on it.
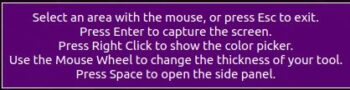
Once you clicked on Take Screenshot, you will see below box with the information about performing multiple actions. You can choose appropriate action as per your requirements.
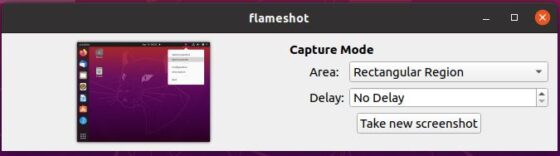
b) Open Launcher
The next option is Open Launcher which allows you to select the Capture mode. By default, area will be selected as Rectangular Region and Delay as No Delay. You can select the area as Full Screen(All Monitors) and delay to few seconds as per your requirement and then Click on Take new screenshot.
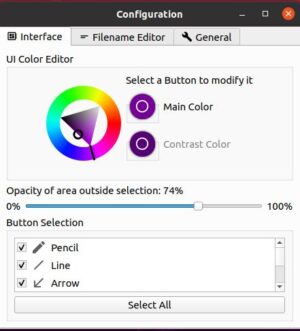
c) Configuration
Next option is to edit the Configuration. Here you will see three tabs - Interface, Filename Editor and General. In Interface tab, you select the UI Color, Opacity of area and Button as you like.
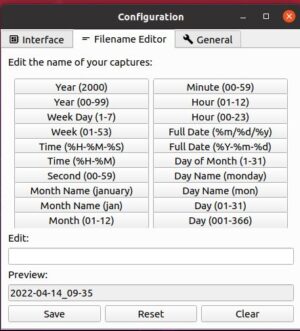
Then you have the Filename Editor tab where you can select the default name you want to provide to your screenshot.
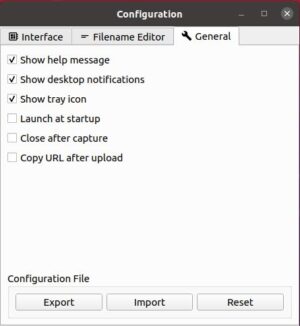
Finally in the General tab you can select/unselect certain options like show help message, show desktop notifications, show tray icon, launch at startup etc as shown below. You can even export/import your configuration from here.
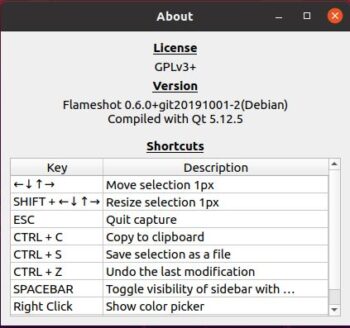
d) Information
Last option that you see in the Flameshot icon is the Information. This will show you the License information and current installed version along with all the shortcuts key that can be used to perform given set of actions.
Step 6: Using CLI Mode
Whatever you can go using GUI, you can do all of those operations using CLI mode as well. This can be better understood using below given examples.
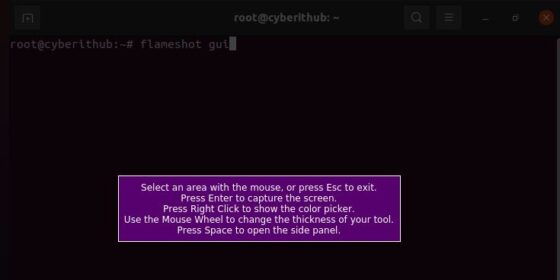
If you want to take store screenshot in some different path then it can done by using -p switch with the complete directory path passed as an argument.
root@cyberithub:~# flameshot gui -p /home/cyberithub/screenshot
If you want add a delay then you need to use -d switch with number of seconds passed as an argument.
root@cyberithub:~# flameshot gui -d 5000
You can also specify both path and delay in one command as shown below.
root@cyberithub:~# flameshot gui -p /home/cyberithub/screenshot -d 2000
If you want to take a full screenshot then instead of flameshot gui, you need to use flameshot full command as shown below.
root@cyberithub:~# flameshot full -p /home/cyberithub/screenshot -d 2000
If you want to open the configuration then you need to use flameshot config command as shown below.
root@cyberithub:~# flameshot config
If you want to capture the screen number 1 and copy it to the clipboard then use below flameshot screen command.
root@cyberithub:~# flameshot screen -n 1 -c
If you are looking to capture the screen containing the mouse and print the image (bytes) in PNG format then use below flameshot command.
root@cyberithub:~# flameshot screen -r
If you are looking for full screen capture with custom save path copying to clipboard then use -c switch with flameshot command as shown below.
root@cyberithub:~# flameshot full -c -p ~/home/cyberithub/screenshot
Step 7: Uninstall Flameshot
Once you are done with flameshot then you can choose to uninstall it from your System by using apt remove flameshot command as shown below.
root@cyberithub:~# apt remove flameshot
Reading package lists... Done
Building dependency tree
Reading state information... Done
The following packages were automatically installed and are no longer required:
dmeventd libaio1 libdevmapper-event1.02.1 libdouble-conversion3 liblvm2cmd2.03 libpcre2-16-0 libqt5core5a libqt5dbus5 libqt5gui5 libqt5network5
libqt5svg5 libqt5widgets5 libxcb-xinerama0 libxcb-xinput0 linux-headers-5.13.0-35-generic linux-hwe-5.13-headers-5.13.0-35 linux-image-5.13.0-35-generic
linux-modules-5.13.0-35-generic linux-modules-extra-5.13.0-35-generic qt5-gtk-platformtheme qttranslations5-l10n thin-provisioning-tools
Use 'apt autoremove' to remove them.
The following packages will be REMOVED:
flameshot
0 upgraded, 0 newly installed, 1 to remove and 171 not upgraded.
After this operation, 1,220 kB disk space will be freed.
Do you want to continue? [Y/n] Y
(Reading database ... 228903 files and directories currently installed.)
Removing flameshot (0.6.0+git20191001-2) ...
Processing triggers for mime-support (3.64ubuntu1) ...
Processing triggers for hicolor-icon-theme (0.17-2) ...
Processing triggers for gnome-menus (3.36.0-1ubuntu1) ...
Processing triggers for man-db (2.9.1-1) ...
Processing triggers for desktop-file-utils (0.24-1ubuntu3) ...
If you see any leftover packages which are not required anymore, then you can remove those packages by using apt autoremove command as shown below.
root@cyberithub:~# apt autoremove
Reading package lists... Done
Building dependency tree
Reading state information... Done
The following packages will be REMOVED:
dmeventd libaio1 libdevmapper-event1.02.1 libdouble-conversion3 liblvm2cmd2.03 libpcre2-16-0 libqt5core5a libqt5dbus5 libqt5gui5 libqt5network5
libqt5svg5 libqt5widgets5 libxcb-xinerama0 libxcb-xinput0 linux-headers-5.13.0-35-generic linux-hwe-5.13-headers-5.13.0-35 linux-image-5.13.0-35-generic
linux-modules-5.13.0-35-generic linux-modules-extra-5.13.0-35-generic qt5-gtk-platformtheme qttranslations5-l10n thin-provisioning-tools
0 upgraded, 0 newly installed, 22 to remove and 171 not upgraded.
After this operation, 556 MB disk space will be freed.
Do you want to continue? [Y/n] y
(Reading database ... 228871 files and directories currently installed.)
Removing thin-provisioning-tools (0.8.5-4build1) ...
update-initramfs: deferring update (trigger activated)
Removing qt5-gtk-platformtheme:amd64 (5.12.8+dfsg-0ubuntu2.1) ...
Removing libqt5svg5:amd64 (5.12.8-0ubuntu1) ...
Removing libqt5widgets5:amd64 (5.12.8+dfsg-0ubuntu2.1) ...