
Table of Contents
In this article, we will see how to install Blender on Linux Using 5 Easy Steps. Blender is a free and open source 3D creation suite. It allows us to create different 3D visualizations such as still images, 3D animations and VFX shots. It takes comparatively lesser amount of memory and disk space than other 3D suites. Hence making it one of the obvious choice for 3D enthusiasts professionals.
It is very well suited for individuals as well as for small studios who benefit from its unified pipeline and responsive development process. More on official website. It is also a cross platform application which means it can be easily installed and used on famous systems such as Windows, Linux and Mac. Here we will see the steps to install Blender on Linux based systems.
Key Features
- It is a fully integrated 3D content creation suite which offers wide variety of tools such as Modeling, Rendering, Animation & Rigging, Video editing etc.
- Its interface uses OpenGL GUI which provides a consistent performance across all the platforms.
- Its high quality 3D architecture provides fast and efficient creation workflow.
- It has very active community support from across the globe.
- It has small executable which makes it highly portable.
Minimum Hardware Requirements
- 64-bit quad core CPU with SSE2 support
- 8 GB RAM
- Full HD display
- Mouse, trackpad or pen+tablet
- Graphics card with 2 GB RAM, OpenGL 4.3

How to Install Blender on Linux Using 5 Easy Steps
Also Read: How to Update or Upgrade GCC to Latest Version on Ubuntu/Debian
Step 1: Prerequisites
a) You should have a running Linux System.
b) You should have sudo or root access to run privileged commands.
c) You should have snap utility available in your System.
d) You should have glibc and python3 installed in your System.
Step 2: Update Your System
Before installing blender in your system, it is best recommended to install all the latest available updates on Ubuntu/Debian based systems using sudo apt update && sudo apt upgrade command as shown below.
cyberithub@ubuntu:~$ sudo apt update && sudo apt upgrade
[sudo] password for cyberithub:
Hit:1 https://dl.winehq.org/wine-builds/ubuntu focal InRelease
Hit:2 https://d3nt0h4h6pmmc4.cloudfront.net/ubuntu focal InRelease
Hit:3 http://ppa.launchpad.net/flatpak/stable/ubuntu focal InRelease
Hit:4 http://in.archive.ubuntu.com/ubuntu focal InRelease
Get:5 http://security.ubuntu.com/ubuntu focal-security InRelease [114 kB]
Hit:6 https://dl.google.com/linux/chrome/deb stable InRelease
Get:7 http://in.archive.ubuntu.com/ubuntu focal-updates InRelease [114 kB]
Hit:8 http://ppa.launchpad.net/gencfsm/ppa/ubuntu focal InRelease
Hit:9 https://download.sublimetext.com apt/stable/ InRelease
Hit:10 http://ppa.launchpad.net/juju/stable/ubuntu focal InRelease
Hit:11 http://ppa.launchpad.net/libreoffice/ppa/ubuntu focal InRelease
Get:12 http://in.archive.ubuntu.com/ubuntu focal-backports InRelease [108 kB]
Hit:13 http://ppa.launchpad.net/mojo-maintainers/ppa/ubuntu focal InRelease
.........................................................
If you are using any RHEL/CentOS based systems then you need to use either sudo yum update && sudo yum upgrade or sudo dnf update && sudo dnf upgrade command.
sudo yum update && sudo yum upgrade
sudo dnf update && sudo dnf upgrade
Step 3: Install Blender
There are various methods which you can use to install Blender on your Linux based system depending on your needs and availability of tools.
a) Using Snap
If you are looking to install blender as a snap package from Snap store then you need to use sudo snap install blender --classic command to install the package as you can see below.
cyberithub@ubuntu:~$ sudo snap install blender --classic
blender 3.6.1 from Blender Foundation (blenderfoundation**) installed
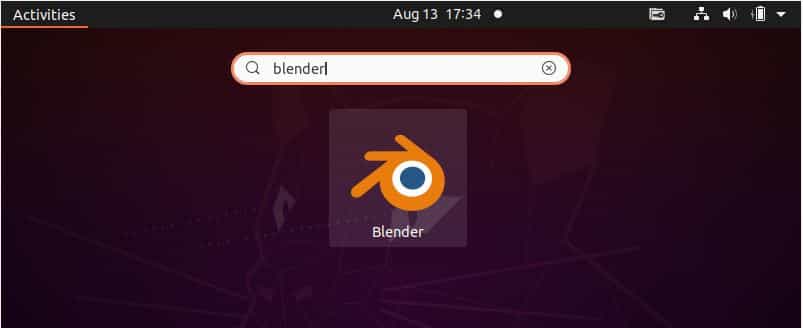
After successful installation, you can launch blender from Desktop by navigating to Activities and search blender in the search bar as shown below. Once it appears, tap on it to open.
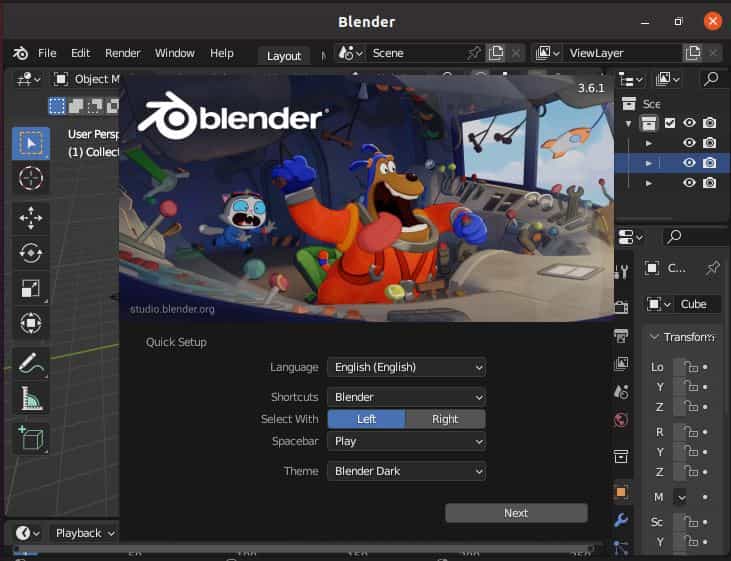
When you open it for the first time, it should look like below. You can now start doing your work on this.
b) Using Binary File
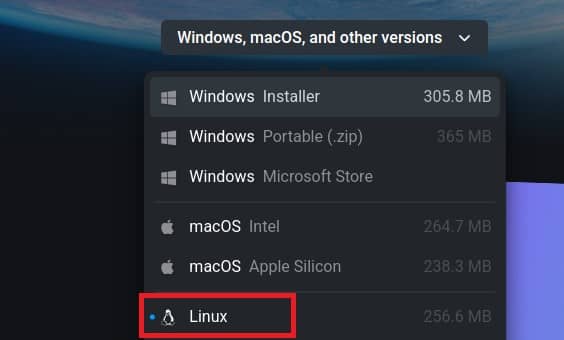
The other way you can install and use blender is through binary file. You need to download the latest available binary package from official website as highlighted below.
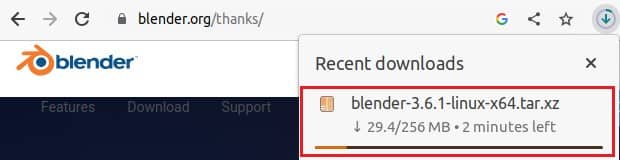
Once you click on the above, you will see that the package will start downloading in local Download directory as shown below.
After successfully downloading the package, you can extract it by using tar -xvf blender-3.6.1-linux-x64.tar.xz command as shown below.
cyberithub@ubuntu:~$ cd Downloads/
cyberithub@ubuntu:~/Downloads$ tar -xvf blender-3.6.1-linux-x64.tar.xz
Once extracted, you can switch to blender directory using cd blender-3.6.1-linux-x64/ command.
cyberithub@ubuntu:~/Downloads$ cd blender-3.6.1-linux-x64/
And, then run ./blender to launch it.
cyberithub@ubuntu:~/Downloads/blender-3.6.1-linux-x64$ ./blender
It will be launched just like below. You can now proceed with your work.
c) Using Source Code
Finally the last method that you can use to install blender is through source code. For that, you need to download the latest available source code from official website by using wget https://download.blender.org/source/blender-3.6.1.tar.xz command as shown below. It will download the source code file in current working directory.
cyberithub@ubuntu:~$ wget https://download.blender.org/source/blender-3.6.1.tar.xz
--2023-08-13 19:45:38-- https://download.blender.org/source/blender-3.6.1.tar.xz
Resolving download.blender.org (download.blender.org)... 82.94.213.221
Connecting to download.blender.org (download.blender.org)|82.94.213.221|:443... connected.
HTTP request sent, awaiting response... 200 OK
Length: 70432840 (67M) [application/octet-stream]
Saving to: ‘blender-3.6.1.tar.xz’

blender-3.6.1.tar.xz 100%[============================================================================>] 67.17M 1.46MB/s in 70s

2023-08-13 19:46:49 (982 KB/s) - ‘blender-3.6.1.tar.xz’ saved [70432840/70432840]
Once downloaded, you need to extract it by using tar -xvf blender-3.6.1.tar.xz command as shown below.
cyberithub@ubuntu:~$ tar -xvf blender-3.6.1.tar.xz
Then you need to switch directory and install all the basic dependencies using below python script.
cyberithub@ubuntu:~$ cd blender-3.6.1/
cyberithub@ubuntu:~/blender-3.6.1$ sudo ./build_files/build_environment/install_linux_packages.py
WARNING: A valid distribution ID could not be found using `platform.freedesktop_os_release`, now trying a lower-level check for specific files
INFO: Distribution identified as 'debian'
INFO: Trying to update packages info.
INFO: Done.

INFO: Trying to install group of packages Basics Mandatory Build.
INFO: Installing packages build-essential, git, subversion, cmake.
INFO: Done.

INFO: Trying to install group of packages Basics Optional Build.
INFO: Installing packages ninja-build, cmake-curses-gui, cmake-gui, patch.
INFO: Done.

INFO: Trying to install group of packages Basic Critical Deps.
INFO: Installing packages libx11-dev, libxxf86vm-dev, libxcursor-dev, libxi-dev, libxrandr-dev, libxinerama-dev, libxkbcommon-dev, libwayland-dev, libdecor-0-dev, wayland-protocols, libdbus-1-dev.
........................................................
Once all the dependencies are installed, you need to configure and compile the source code using make utility as shown below.
cyberithub@ubuntu:~/blender-3.6.1$ make

Configuring Blender in "/home/cyberithub/build_linux" ...
-- The C compiler identification is GNU 9.4.0
-- The CXX compiler identification is GNU 9.4.0
-- Check for working C compiler: /usr/bin/cc
-- Check for working C compiler: /usr/bin/cc -- works
-- Detecting C compiler ABI info
-- Detecting C compiler ABI info - done
-- Detecting C compile features
-- Detecting C compile features - done
-- Check for working CXX compiler: /usr/bin/c++
-- Check for working CXX compiler: /usr/bin/c++ -- works
-- Detecting CXX compiler ABI info
-- Detecting CXX compiler ABI info - done
-- Detecting CXX compile features
-- Detecting CXX compile features - done
.....................................................
Once the build is finished, you will find it ready to run in ~/build_linux/bin. You can either run from here or set this location in PATH environment variable and run it from anywhere.
Step 4: Check Version
If you installed the package through snap utility then after successful installation you can check the current installed version by using blender --version command as shown below.
cyberithub@ubuntu:~$ blender --version
Blender 3.6.1
build date: 2023-07-17
build time: 23:31:33
build commit date: 2023-07-17
build commit time: 12:50
build hash: 8bda729ef4dc
build platform: Linux
build type: release
build c flags: -Wall -Werror=implicit-function-declaration -Werror=return-type -Werror=vla -Wstrict-prototypes -Wmissing-prototypes -Wno-char-subscripts -Wno-unknown-pragmas -Wpointer-arith -Wunused-parameter -Wwrite-strings -Wlogical-op -Wundef -Winit-self -Wmissing-include-dirs -Wno-div-by-zero -Wtype-limits -Wformat-signedness -Wrestrict -Wno-stringop-overread -Wno-stringop-overflow -Wnonnull -Wabsolute-value -Wuninitialized -Wredundant-decls -Wshadow -Wno-error=unused-but-set-variable -Wimplicit-fallthrough=5 -std=gnu11 -msse -pipe -fPIC -funsigned-char -fno-strict-aliasing -ffp-contract=off -msse2
build c++ flags: -Wuninitialized -Wredundant-decls -Wall -Wno-invalid-offsetof -Wno-sign-compare -Wlogical-op -Winit-self -Wmissing-include-dirs -Wno-div-by-zero -Wtype-limits -Werror=return-type -Wno-char-subscripts -Wno-unknown-pragmas -Wpointer-arith -Wunused-parameter -Wwrite-strings -Wundef -Wformat-signedness -Wrestrict -Wno-suggest-override -Wuninitialized -Wno-stringop-overread -Wno-stringop-overflow -Wundef -Wmissing-declarations -Wimplicit-fallthrough=5 -msse -pipe -fPIC -funsigned-char -fno-strict-aliasing -ffp-contract=off -msse2
build link flags: -Wl,--version-script='/home/blender/git/blender-v360/blender.git/source/creator/symbols_unix.map'
build system: CMake
Step 5: Uninstall Blender
Once you are done using Blender, you can choose to remove it from your system by using any of the below methods depending on how you installed the package.
a) Using Snap
If you installed Blender through snap utility then all you need to run is sudo snap remove blender command to remove the package.
cyberithub@ubuntu:~$ sudo snap remove blender
[sudo] password for cyberithub:
blender removed
b) Using Binary
If you are using Binary package, then to remove blender you just need to remove the directory by using rm -rf blender-3.6.1-linux-x64/ command as shown below.
cyberithub@ubuntu:~$ rm -rf blender-3.6.1-linux-x64/
c) Using Source Code
If you installed the package through source code then depending on the location it is installed, you can simply remove the entire directory. For example, in our case it is installed in ~/build_linux so to remove the application, we just need to remove this directory by using rm -rf ~/build_linux command as shown below.
cyberithub@ubuntu:~$ rm -rf ~/build_linux