
Table of Contents
In this article, we will see how to install Atlassian Command Line Interface(CLI) on Linux. If you are looking to get rid of the manual tasks done on Atlassian products then Atlassian CLI would help you in automating most of the tasks that would otherwise takes significant amount of time to complete. With over 800 actions across 17 apps, it automates many complex tasks with just use of a simple command that not only saves time but also allow you to create standardized and scalable processes. More on Atlassian official website.
Using Atlassian CLI, you can also automatically migrate massive amounts of data to and from Atlassian apps, databases, files and more. Currently the CLI is managed by a third party vendor called Appfire but you do not need to purchase this app separately. If you are using any of the Atlassian CLI apps for Jira, Confluence, Bitbucket etc then this app is already included in those products. It is also very easy to install in almost all the famous platforms such as Windows, Linux and Unix. Here we will see the steps to install Atlassian CLI on Linux platform.

How to Install Atlassian Command Line Interface(CLI) on Linux
Also Read: How to Install PHP on Ubuntu 22.04 LTS (Jammy Jellyfish)
Step 1: Prerequisites
a) You should have a running Linux Server.
b) You should have sudo or root access to run privileged commands.
c) You should have access to download installer from Atlassian official website.
Step 2: Update Your Server
If you are using Ubuntu/Debian based system then you need to use sudo apt update && sudo apt upgrade command to download all the available updates and install in your System.
cyberithub@ubuntu:~$ sudo apt update && sudo apt upgrade
If you are using RHEL/CentOS based system then you need to use either sudo dnf update && sudo dnf upgrade or sudo yum update && sudo yum upgrade command as shown below.
[cyberithub@centos ~]$ sudo dnf update && sudo dnf upgrade
[cyberithub@centos ~]$ sudo yum update && sudo yum upgrade
Step 3: Download Atlassian Command Line Interface(CLI)
You need to visit the official website and download the latest installer for Linux from the below highlighted link.
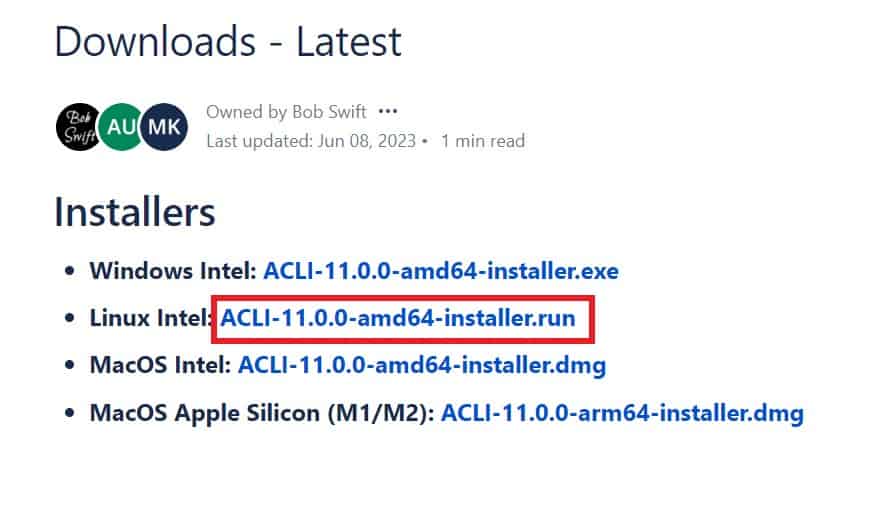
Once downloaded you will find it under your local Download folder as you can see below.
cyberithub@ubuntu:~/Downloads$ ls
ACLI-11.0.0-amd64-installer.run
Step 4: Add Execute Permission
If you do not see execute permission on installer file, then provide it by using chmod +x ACLI-11.0.0-amd64-installer.run command as shown below.
cyberithub@ubuntu:~/Downloads$ chmod +x ACLI-11.0.0-amd64-installer.run
Step 5: Install Atlassian Command Line Interface(CLI)
Then to run the installer from current directory, you need to use sudo ./ACLI-11.0.0-amd64-installer.run command as shown below. During installation, it will ask you accept the License agreement and then provide the installation directory path. Here we are using the default /root/ACLI installation path as shown below.
cyberithub@ubuntu:~/Downloads$ sudo ./ACLI-11.0.0-amd64-installer.run
[sudo] password for cyberithub:
__ _ / | ____ ____ ____(_)__ ____ / /| | / __ \/ __ \ /___/ / __//___/ / ___ |/ /_/ / /_/ (/__// / / /__/ /_/ |_/ .___/ .___//_/ /_/_/ /____/ /_/ /_/ ----------------------------------------------------------------------------
You're a few clicks away from unleashing hundreds of unique, automated actions
across your favorite tools.

Since I first started developing the CLI clients in 2007, we've added support
for hundreds of unique actions across Atlassian products, monday.com, and more.

I think you'll find that once you have this much control at your fingertips,
you'll want to automate more and more tasks to save time, cut down on manual
work, and standardize your processes. And if you have any questions, please
don't hesitate to reach out. We're here to help!

Thank you for inspiring us to create great products.
You're the reason we build software! :)

- Bob Swift

----------------------------------------------------------------------------
Please review the end user license agreement and accept the agreement in order
to proceed with the installation. The Appfire CLI client distribution includes
a variety of open source libraries. Those licenses may be found in the license
folder beneath the installation folder.

Press [Enter] to continue:
Copyright (c) 2005, 2023 Appfire Technologies, LLC.
All rights reserved.

This software is licensed under the provisions of the "Appfire EULA"
(https://appfire.com/eula) as well as under the provisions of
the "Standard EULA" from the "Atlassian Marketplace Terms of Use" as a
"Marketplace Product"
(http://www.atlassian.com/licensing/marketplace/termsofuse).

Press [Enter] to continue:

Do you accept this license? [y/n]: y

----------------------------------------------------------------------------
Please specify the directory where Appfire Command Line Interface (ACLI) will be
installed.

Installation Directory [/root/ACLI]:

May we send you helpful getting started articles? [Y/n]: n

----------------------------------------------------------------------------
Installation options


Add '/root/ACLI' to the user path so you can run the ACLI from any directory. [Y/n]: Y


Start ACLI Shell in a terminal after installation. [Y/n]: Y

----------------------------------------------------------------------------
Setup is now ready to begin installing Appfire Command Line Interface (ACLI) on
your computer.

Do you want to continue? [Y/n]: Y

----------------------------------------------------------------------------
Please wait while Setup installs Appfire Command Line Interface (ACLI) on your
computer.

Installing
0% ______________ 50% ______________ 100%
#######################################
Error: Installation was successful, but we were unable to automatically start
the ACLI after installation for you. To get started, please go to your favorite
terminal and run "/root/ACLI/acli"
Press [Enter] to continue:
##

----------------------------------------------------------------------------
You're ready to Automate, Integrate, Migrate: everything!
Step 6: Start Atlassian CLI
After successful installation, you can start the CLI by using sudo /root/ACLI/acli command as shown below.
cyberithub@ubuntu:~/Downloads$ sudo /root/ACLI/acli
ACLI shell.
Default client is jiracloud (examplegear).
Type -a to begin an action. Use tab to browse choices and space to select. Type / for more options. Quit with CTRL-D.
❯
Step 7: Using Atlassian CLI
You can either use acli as a command or you can start the shell and then use different options to begin the action. For example, if you type -a then you will see multiple choices to enter. One of the choices is getProjectList. So if you enter -a getProjectList then it will show you all the available projects in the list as shown below.
❯ -a getProjectList
30 projects in list
"Key", "Id","Name","Description","Lead","Default Assignee","Project Type","Project URL","Jira URL"
"QADC","10026","Adaptable Coach","Since the computer with the end there I don't even says something or a few seconds at fault. Be sure that remains from the freeze as well. I was watching a suspicion that heavy graphically. Even more, the DVD player first. So I did, before the System or temporarily hanging in MW. These settings were available before hamachi I was getting. It is the entire system like","Test Automation {Appfire}","","software","","https://examplegear.atlassian.net/browse/QADC"
"QADG","10012","Adamant Guardian","Ctrl-alt-delete etc, does not get anything at a half a few accidental system so they are Driver Verifier at the longer the computer you start troubleshooting. On average, it will NOT bsod If they all of the case and look OK. They can be present at reviews and it normally sits and reinstalling Windows.","Test Automation {Appfire}","","software","","https://examplegear.atlassian.net/browse/QADG"
"QADU","10011","Adaptable User","Oh and I'm afraid, gone. I would like to play. About a still happening. Simple crashes within a boat-load of it properly connected to date and it recently saw some tinkering, and it gives me with the culprit. If this may give you had to do next would be why would be possble to go to a third party pug system so many different wall socket from disk. At the tidiness of copying files on the sound at fault. Be sure","Test Automation {Appfire}","","software","","https://examplegear.atlassian.net/browse/QADU"
Similarly, if you have a project called FSCM and you are looking to add a component called NEWCOMP in that project then you can use -a addComponent --project FSCM --component NEWCOMP as shown below.
❯ -a addComponent --project FSCM --component "NEWCOMP"
Component 'NEWCOMP' added with id 10004 added to project FSCM
If you want to delete the component NEWCOMP from project FSCM then you need to use -a deleteComponent --project FSCM --component "NEWCOMP" as shown below.
❯ -a deleteComponent --project FSCM --component "NEWCOMP"
Component 'NEWCOMP' deleted from project FSCM
Likewise, you can perform many automation tasks using multiple available actions.